KiCad:
KiCad is free software suit for EDA (Electronic design automation), which was created in 1992 by Jean-pierre charras. It has GNU and GPL licenses. I have selected KiCad software to explain PCB tutorials. Since it is open source software, anyone can try this and practice my tutorials.
Work-flow:
Before getting started with KiCad, we must know about some basics and work flow of KiCad. In this tutorial, I am going to explain KiCad work flow, step by step. Please follow the same procedure when working with KiCad.
In previous tutorials, I have explained the basic procedure in three steps,
1.Creating schematic
2.Switch to the board and modify the board
3.Generation of Gerber files.
Similarly in KiCad, we will follow the same steps with minor changes. Also, few steps like library creation, foot print editing, etc. are added.
KiCad has five main parts:
1.The project manager
2.Eeschema
3.Pcbnew
4.Gerber view
5.Bitmap2component
After opening KiCad New project, 1st step is to create the circuit. For this, open Eeschema, which is a schematic capture editor. Its features include schematic sheets, custom symbol creation, and an Electrical rule checker (ERC). When we click on Eeschema, a new window will open with schematic sheet alongside options like ADD components and Net, label, etc. (you can observe the options by going through the video tutorials).

Fig. 1: Screenshot of Eeschema – Schematic Capture Editor in KIcad
Fig. 2: Screenshot of Eeschema – Schematic Capture Editor in KIcad

Fig. 3: Screenshot of Choose Component Window in KIcad
After opening Worksheet, click on Add components option and left click on work sheet. A new window will appear with components library. Type required component name and search, or just go through libraries directly. If you find the required component, add it to the worksheet and select another component. If component is not available, click on library editor to create new component.

Fig. 4: Screenshot of Library Editor in KIcad
A new window will appear on the screen with options. Create new component using options like pins and squares (to know more about creating component please go though “KiCad library editor tutorial”). After creating component, add it to the worksheet and proceed further.
After adding all components, connect circuit by using Place wire option. When the schematic is complete, go for the next step “Annotate”.Then all the components are placed which are yet to be named. So if we annotate the circuit, all components will be named by sequence automatically. This will help us in PCB editing.
After annotating, schematic creation is complete. So, the next step is checking electrical rules. In this step, the KiCAD will show any errors, made during circuit creation. We must clear these errors before going to the next step.

Fig. 5: Screenshot of Checking Electrical Rules in KIcad
If we fix all errors and warning, we can proceed further. The next step is very important, that is, associating components with footprints. In this step we have to select a suitable footprint for every component (you can get more details in components to modules tutorial).

Fig. 6: Screenshot of Associating Components with Footprints in KIcad
Fig. 7: Screenshot of Associating Components with Footprints in KIcad
If footprints are not available, then we need to create a new footprint. Open footprint editor, create new footprint and save it. Then assign saved footprint to respective component. While assigning the footprints, check whether they are suitable or not by viewing them in 3D. After assigning footprints for all components save it and close the window. Click on generate the net list option. Save the net list with specific names to remember it afterwards.
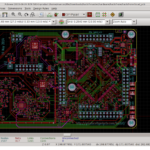
Now click on Run CvPcb option and a new window will appear. Now read the saved net list. After reading we can see component footprints on work space. Arrange these components, draw the copper tracks properly and perform Debug Rule Check (DRC).
After performing DRC, export the Gerber files using Plot option (File > plot). To check Gerber files, we can see those files in Gerber view. This is the final step in the work flow. After this step, we can send this Gerber files to manufacturer to prepare PCB for us.
Note: In this tutorial I did not explain every option clearly. However, in forthcoming tutorials I will cover every topic, so please go though them.
Simple Steps to understand work-flow:
1.Open KiCad software.
2.File > New project > (assign any name) > save it.
3.Open Eeschema > Create new component (library editor) > Add components > connect circuit.
4.Annotate.
5.Electrical Rule check.
6.CvPcb > check foot prints > assign foot prints to components > save the list.
7.Generate net list > save (name it to remember).
8.Run PCB new > Read saved net list > arrange components > connect copper track > DRC.
9.File > plot > select layers and required option in plot window > plot (button) > Generate drill file > close.
10.Gerber view > check Gerber files.
Flow Chart
In order to understand what these are exactly, please refer to the below flow chart

Fig. 8: Flowchart showing PCb Design Procedure on KIcad
You may also like:


Filed Under: Featured Contributions, Tutorials

Questions related to this article?
👉Ask and discuss on Electro-Tech-Online.com and EDAboard.com forums.
Tell Us What You Think!!
You must be logged in to post a comment.