
Objectives:
This project has following objectives which are fulfilled using AT Commands:
Project Source Code
###
//Program to interface GSM Modem with PIC18F4550 Microcontroller //This code takes four choices as four inputs//Choice 1 : Test the simple AT Command.
//Choice 2 : Find out the IMEI number of the GSM Modem.
//Choice 3 : Connect a call to a GSM mobile number.
//Choice 4 : Send a text message to a mobile number.#define FREQ 12000000
#define baud 9600
#define spbrg_value (((FREQ/64)/baud)-1)
#define rs LATA.F0
#define rw LATA.F1
#define en LATA.F2
#define lcdport LATBvoid tx_data(unsigned char);
unsigned char rx_data();
void lcd_ini();
void lcdcmd(unsigned char);
void lcddata(unsigned char);
void gsm_cmd(unsigned char *);
void output(void);unsigned char value=0;
int i=0,j,k,temp,flag,choice;
unsigned char *starting_text="Enter choice=";
unsigned char *dial_text="Dialing...";
unsigned char *at_cmd="AT";
unsigned char *imei_cmd="AT+GSN";
unsigned char *call_cmd="ATD9xxxxxxxxx;"; // Provide a 10-Digit Mobile Number
unsigned char *sms_format="AT+CMGF=1";
unsigned char *sms_write="AT+CMGS="xxxxxxxxxx""; // 10-Digit Mobile Number
unsigned char *sms="Hello";
unsigned char *sms_report="SMS Sent...";
unsigned char sms_terminate=0x1A;
unsigned char enter=0x0D;
unsigned char *data;void main()
{
TRISB=0; // Set Port B as output port
LATB=0;
TRISA=0;
LATA=0;
TRISD=0xFF;
LATD=0;
SPBRG=spbrg_value; // Fill SPBRG register to set the baud rate
RCSTA.SPEN=1; // To activate serial port (Tx and Rx pins)
TXSTA.TXEN=1; // Activate Transmissiom
RCSTA.CREN=1; // Activate Reception
PIE1.RCIE=1; // Enable Reception interrupt
INTCON.GIE=1; // Enable Global interrupt
INTCON.PEIE=1; // Enable Peripheral interrupt
lcd_ini();
while(1)
{
k=0;
lcdcmd(0x80);
while(starting_text[k]!='�')
{
lcddata(starting_text[k]);
k++;
}
//Check inputs//Choice 1
if(PORTD.F0)
{
gsm_cmd(at_cmd);
output();
Delay_ms(1000);
}
//Choice 2
if(PORTD.F1)
{
gsm_cmd(imei_cmd);
output();
Delay_ms(1000);
}
//Choice 3
if(PORTD.F2)
{
gsm_cmd(call_cmd);
output();
Delay_ms(1000);
}//Choice 4
if(PORTD.F3)
{
gsm_cmd(sms_format);
output();
Delay_ms(1000);gsm_cmd(sms_write);
output();
Delay_ms(1000);gsm_cmd(sms);
output();
tx_data(0x1A);
Delay_ms(1000);
}}
}
void gsm_cmd(unsigned char *string)
{
i=0;j=0;
while(string[i]!='�')
{
temp=0;
if(string[i]==0x5C) // Not to send '' cahracter
i++;
tx_data(string[i]); // Send by serial communication
i++;
while(temp!=1);
}
temp=0;
tx_data(enter); // Send ASCII code for 'Enter' key
while(temp!=1);
}void output(void) // To print data on LCD
{
lcdcmd(0x01);
i=-1;flag=0;
while(i<j)
{
if(flag>1)
{
flag=0;
Delay_ms(500);
lcdcmd(0x01);
lcdcmd(0x80);
}
if(data[i]==0x0A) // This condition is to avoid double Enter// during execution of a command
{
flag++;
lcdcmd(0xc0);
}
if(data[i]=='>'||data[i]=='"') // Not to print this character
{
i++;
lcdcmd(0xc0);
}
if(data[i]!=0x0D&&data[i]!=0x0A&&data[i]!=0x1A) // Condition to print the data
// except 'Enter','New line' and 'Submit'
{
lcddata(data[i]);
i++;
}
else
i++;
Delay_ms(300);
}
lcdcmd(0x01);
}void tx_data(unsigned char serial_data) // Transmit data function
{
TXREG=serial_data;
while(PIR1.TXIF==0);
}
void interrupt()
{
data[j]=RCREG; // Store the data into array when Reception interrupt occurs
value=RCREG;
j++;
temp=1;
}void lcd_ini()
{
lcdcmd(0x38); // Configure the LCD in 8-bit mode, 2 line and 5x7 font
lcdcmd(0x0C); // Display On and Cursor Off
lcdcmd(0x01); // Clear display screen
lcdcmd(0x06); // Increment cursor
lcdcmd(0x80); // Set cursor position to 1st line, 1st column
}void lcdcmd(unsigned char cmdout)
{
lcdport=cmdout; //Send command to lcdport=PORTB
rs=0;
rw=0;
en=1;
Delay_ms(10);
en=0;
}void lcddata(unsigned char dataout)
{
lcdport=dataout; //Send data to lcdport=PORTB
rs=1;
rw=0;
en=1;
Delay_ms(10);
en=0;
}###
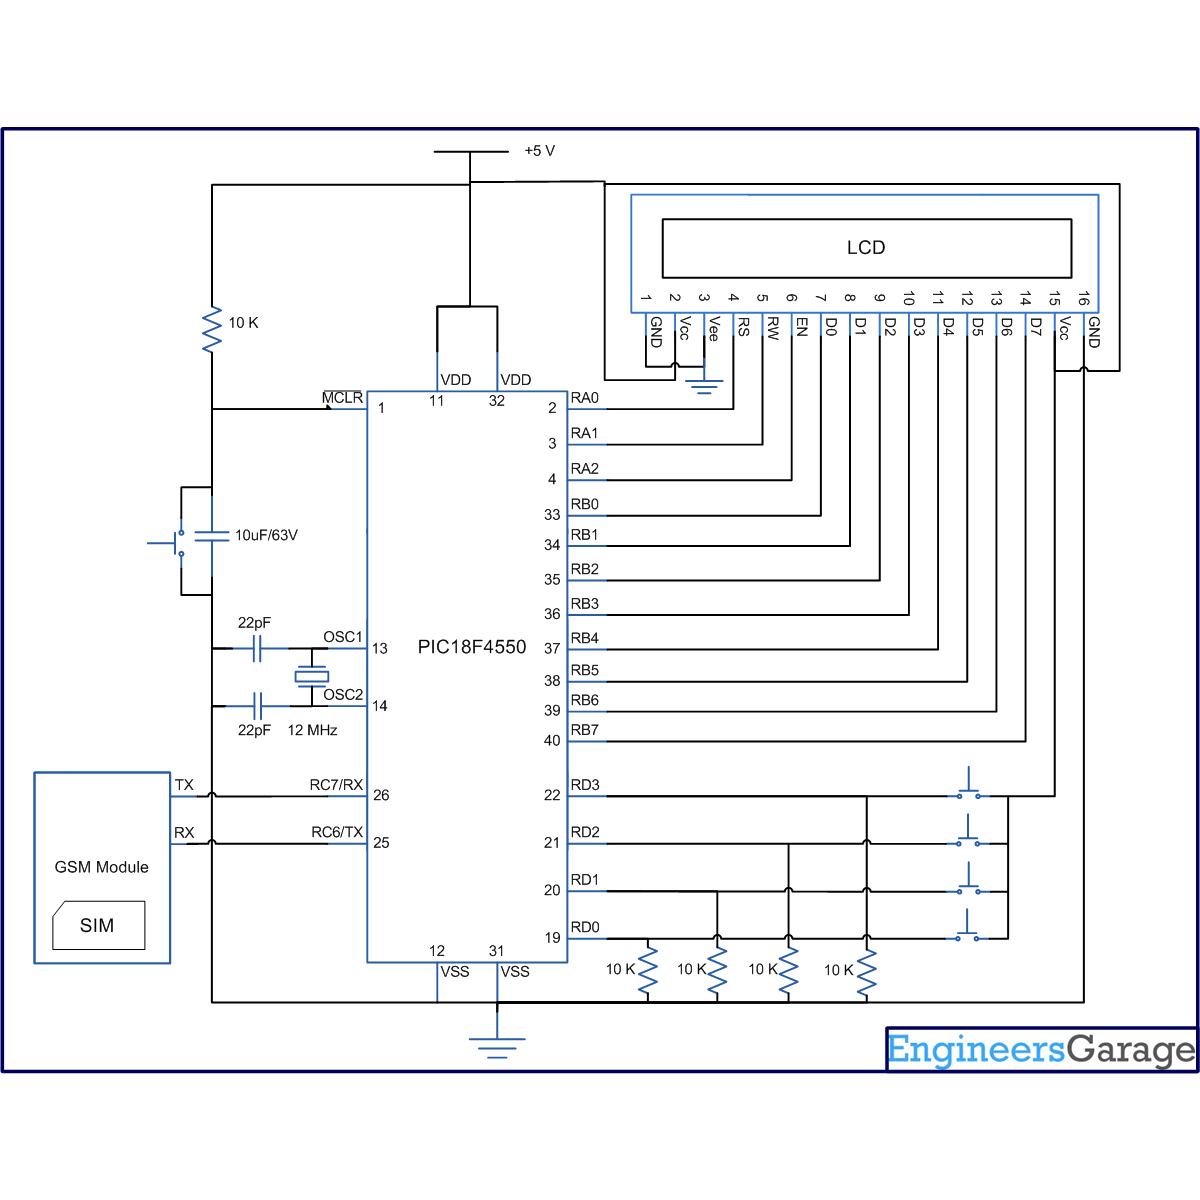
Circuit Diagrams
Project Components
Project Video
Filed Under: PIC Microcontroller.
Filed Under: PIC Microcontroller.

Questions related to this article?
👉Ask and discuss on Electro-Tech-Online.com and EDAboard.com forums.
Tell Us What You Think!!
You must be logged in to post a comment.