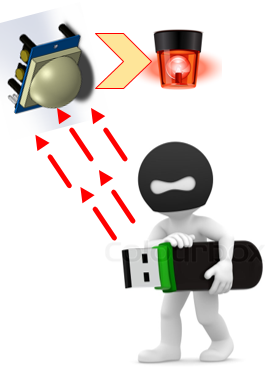
In this tutorial i am going to teach you how to interface PIR(Passive infrared) motion/intrusion detection sensor with nodemcu WiFi module and save your belongings from thief’s. When any body(human, animal or body emitting infrared radiations) emitting heat waves comes close to our diy project installation site. PIR motion sensor will instantly detect the presence of it and rings a buzzer alarm to notify you about an intrusion. The project can be taken as a small security system and could be installed in garage, garden(to check the presence of wild animals dogs, cats, pigs, birds etc), house, pet house, shops and stores. Every body emits heat waves and heat waves contains infrared rations. The more the body emitting heat the more the infrared radiations. Generally the living bodies emit more heat than the raw materials. So pir sensor can be used to detect the motion of living bodies.
|
PIR stands for passive infrared sensor. From passive it means it did not emit any thing by its own to detect presence of a body, rather it receives the infrared waves emitted by the bodies and generates a presence alert as output. Infrared radiations can not be seen by naked human eye.
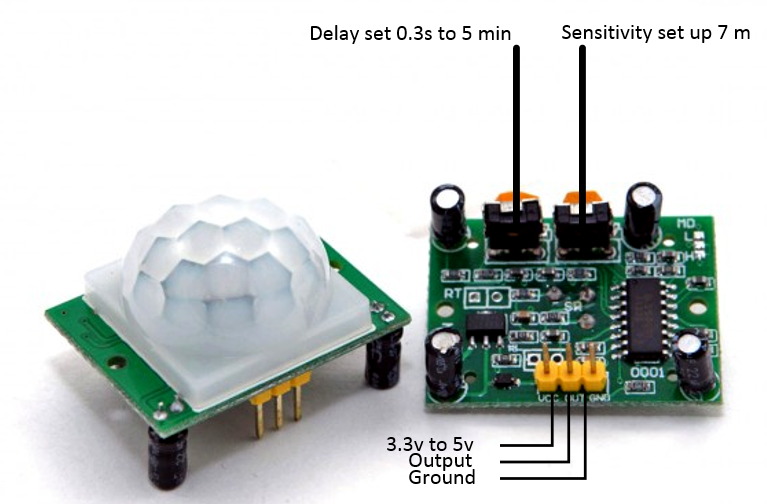
PIR motion detection sensors has a pyroelectric sensor in them. Pyroeletric sensor is enclosed in a round shaped lens or plastic material. The lens or plastic material focuses the received infrared radiations from body on a single point on pyroelectric sensor. Presence alert by pir sensor depends on the strength of the infrared radiations received on the pyroelectric sensor. The sensitivity and range of pir motion sensors can be varied. Numerous pir motion detection sensors are available in market with different dimensions, operating voltage(Dc and Ac), range, angle of detection and alert mechanism. Dc pir detectors are popular among diy community and in this project i am going to use a dc pir detector. |
PIR motion detection sensor working principle
|
HC-Sr501 PIR motion detection sensor
For this project i selected Hcsr501 pir detector. Hcsr501 is popular pir sensor. You can find many tutorials on internet about interfacing hcsr501 with different microcontrollers(arduino, pic, msp430 etc). Hscr501 requires 3.3 v to 5 v for its operation. I noticed it works great on 5 volts. It has 3 pins. Two are power pins Vcc and Gnd. We connect input power +ve lead to Vcc and negative to Gnd. The third pin is out pin. Out pin is the alert pin, normally it remains low when no infrared source is in pir range. When ever infrared radiation is detected by the pir sensor out pin goes high. This change in out pin voltage can be read by external controller and an alarm can be rung to notify the owner about intrusion/presence. External controller can also generate other notifications such as text sms on a mobile number, internet email notifications etc. For this project i only ring the buzzer when ever their is intrusion and pir sensor out pin goes high. Two variable resistors/potentiometers are also part of the hcsr501 pir sensor. One is used to set the sensitivity/range of the pir motion detector and other one is used to set the delay time of out pin. Delay time means how long the out pin remain high when ever the presence of a body is detected. Hcsr501 delay time can be set between 0.3 seconds to 5 minutes and sensitivity range can be set up to 7 meters. Hcsr-501 front and bacck image is given below.
PIR sensor pin out
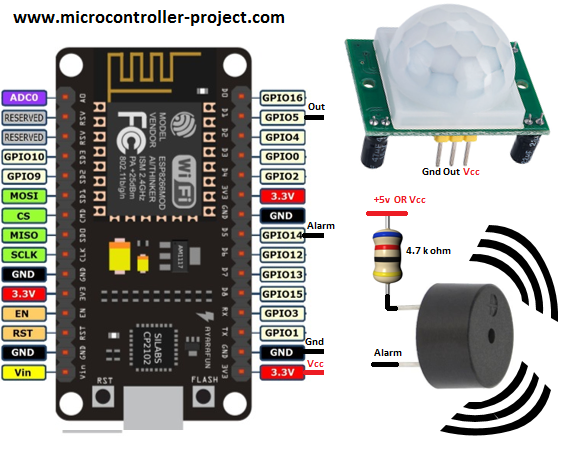
Project circuit diagram
Nodemcu works on 3.3v TTL logic. Hcsr501 pir sensor can work on 3.3 to 5v. So we can power pir sensor directly with nodemcu power output and i did it. It’s better to power pir with 5 volts. In our case nodemcu esp8266 is 3.3v tolerant board so i decided to power the pir with 3.3v which is in its power requirements. Out pin of pir is connected to GPIO-5 or D1 pin of nodemcu esp8266 WiFi module. One end of buzzer alarm is connected to 3.3 volts of nodemcu and the other with GPIO14 or D5 of nodemcu. Buzzer can be externally powered since it takes about 30 to 50 mA of current when buzzer rings. Chances are high that nodemcu will power reset if both the hcsr01 pir sensor and buzzer are powered through its power output pins.
Coming to project code. Code is written in arduino ide and its open source one can use and modify it according to its needs. First i defined the nodemcu esp8266 12e pins Balarm and PIRsensor which are interfaced with buzzer and hcsr01 motion detection sensor. In the setup function Pirsensor is declared as input pin and Balarm is declared as output pin.
In the loop function the statement state = digitalRead(PIRsensor) is checking the status of the pir sensor. If their is intrusion the state variable will be written high other wise low. A delay of 1/2 second is inserted in code. After ever half second nodemcu will check the pir sensor status. Next the if else statement is switching the buzzer on and off. If pir detects presence the state variable goes high and if in if statement its value is equal to high than the buzzer will become on and it will ring for 15 seconds. If not high the else statement will execute and buzzer will be switched off.
Future Work
This tutorial is only to teach you how you can interface the buzzer and pir motion detector with nodemcu WiFi module. Further many advanced project can be made with it. Like
- Security system using nodemcu, pir sensor and gsm module. Text message can be send to a number when an intrusion is detected. Visit GSM with nodemcu project
- Security system using nodemcu, pir sensor and door contact sensor. pir motion detector and door contact sensor can be used together to generate an alert.
- Email notifications alert system. Nodemcu can be connected to internet through WiFi and emails can be send to concerned person if intrusion is detected by the pir sensor.
- Night lighting with nodemcu and pir sensor. When a person goes to garage at night switch on the garage lights by detecting its presence using pir sensor.
- Data logging of time of presence of person in room(animal in garden) using a real time clock, pir sensor and nodemcu.
Download the project code. Folder contains arduino ide .ino project file. Please give your feed back on project. Write your comments and queries in the comments section.
Filed Under: ESP8266., Microcontroller Projects

Questions related to this article?
👉Ask and discuss on Electro-Tech-Online.com and EDAboard.com forums.
Tell Us What You Think!!
You must be logged in to post a comment.