This simple polarity cum continuity tester indicates the polarity of many components like diodes, LED including Zener diode and infrared LED. This can also be used to check the above components are good or bad before mounting them on the PCB. Many a times, it happens that people are unable to identify the polarity of the component which leads to wrong soldering of components that damages the components or it may damage the whole circuit. This circuit can also be used as a continuity tester circuit, to test the continuity of the circuit.
[[wysiwyg_imageupload:7845:]]
Fig. 1: Prototype Of Continuity Tester circuit On Breadboard
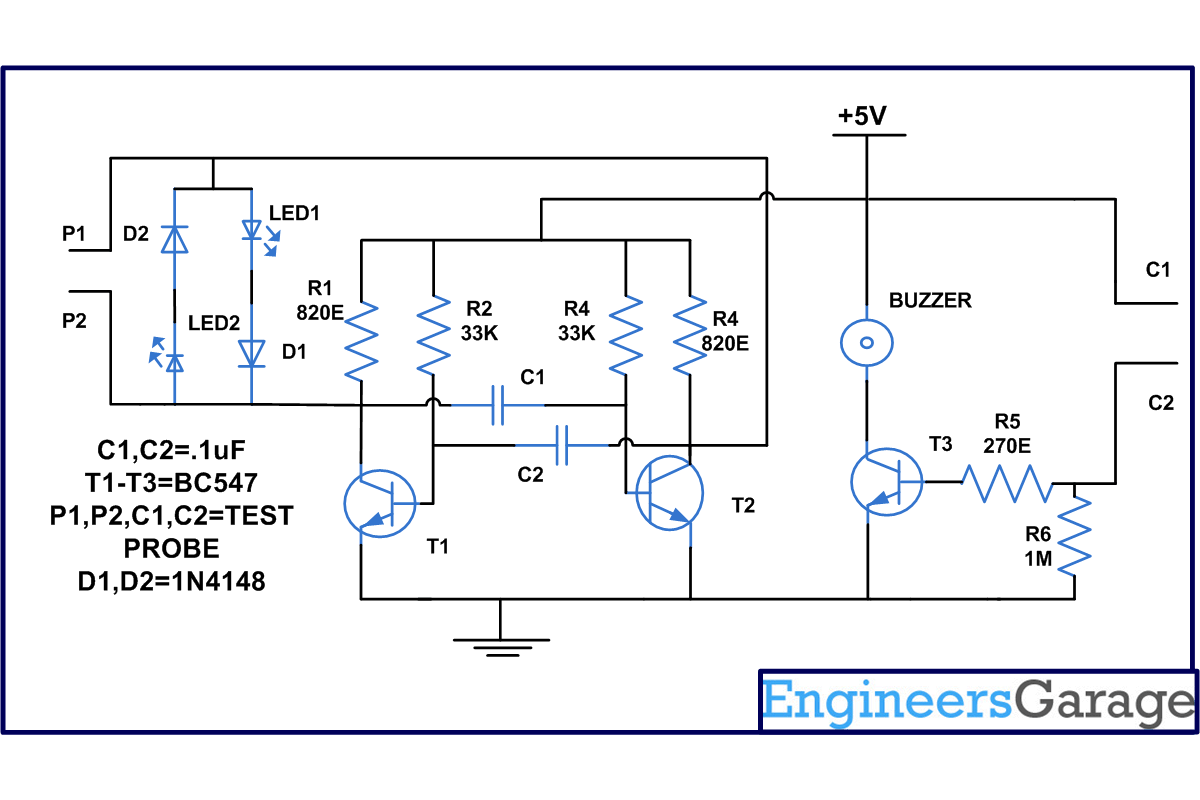
In this continuity tester circuit cathode terminal is indicated by glowing of any of the LED. When you first switch on the circuit, both the LED’s will glow. Now connect the component across the probe. If the cathode terminal of the component is connected to probe 1, LED1 will glow and if the cathode terminal is connected to probe2, LED2 will glow.
The circuit is made with the help of two transistor configured as astable multivibrator. Outputs of both the transistors are out of phase with each other meaning that if output of one transistor is high then output of another transistor will be low or vice versa. When transistor T1 is “on” and T2 is “off”, Led1 will glow similarly when transistor T1 is “off” and transistor T2 is “on” current flow through LED2 and it starts glowing.
When the component under test (diode, LED) is kept between the test probe, it bypasses either of the LED depending upon the polarity. Now the test current will flow through the component instead of the bypassed LED on the circuit. In this circuit we have connected the series combination of LED and Diode at the collector of transistor T1 and T2 to increase the forward voltage drop. This will ensure that the voltage drop across either of the LED is greater than the forward drop of the component being tested.
Test result-When you connect the component-
1. If LED 1 glows it indicates that cathode is connected to probe 1 and anode is connected to the probe 2.
2. If LED 2 glows, it indicates that cathode is connected to probe 2 and anode is connected to the probe 1.
3. If neither of the LED glows, component connected across is short circuited which has made the astable multibvibrator stop oscillating.
4. If both the LEDs glow, component is open-circuited.
Now for testing the continuity of the circuit use the probe C1 and C2 connected to the circuit. When you touch both the probes, buzzer start sounding indicating that circuit is working properly. When both the probes are disconnected, the transistor T3 is closed, there is no base current. At this time, emitter and base of transistor T3 are on the same voltage level. When you go for the continuity test it will open the transistor making the base to go reach a higher voltage level in comparison to emitter and buzzer connected to it starts sounding. With the help of this circuit you can also check different type of cables, PCBs etc.
Circuit Diagrams
Project Components
Project Video
Filed Under: Electronic Projects
Filed Under: Electronic Projects

Questions related to this article?
👉Ask and discuss on Electro-Tech-Online.com and EDAboard.com forums.
Tell Us What You Think!!
You must be logged in to post a comment.