Engineers Garage

  • Projects and Tutorials
    • Electronic Projects
      • 8051
      • Arduino
      • ARM
      • AVR
      • PIC
      • Raspberry pi
      • STM32
    • Tutorials
    • Circuit Design
    • Project Videos
    • Components
  • Articles
    • Tech Articles
    • Insight
    • Invention Stories
    • How to
    • What Is
  • News
    • Electronic Products News
    • DIY Reviews
    • Guest Post
  • Forums
    • EDABoard.com
    • Electro-Tech-Online
    • EG Forum Archive
  • Digi-Key Store
    • Cables, Wires
    • Connectors, Interconnect
    • Discrete
    • Electromechanical
    • Embedded Computers
    • Enclosures, Hardware, Office
    • Integrated Circuits (ICs)
    • Isolators
    • LED/Optoelectronics
    • Passive
    • Power, Circuit Protection
    • Programmers
    • RF, Wireless
    • Semiconductors
    • Sensors, Transducers
    • Test Products
    • Tools
  • EE Resources
    • DesignFast
    • LEAP Awards
    • Oscilloscope Product Finder
    • White Papers
    • Webinars
  • EE Learning Center
    • Design Guides
      • WiFi & the IOT Design Guide
      • Microcontrollers Design Guide
      • State of the Art Inductors Design Guide
  • Women in Engineering

How to design an online home-surveillance system using Raspberry Pi

By Nikhil Agnihotri

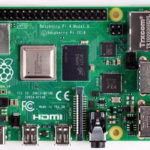
Camera streaming systems have become popular, enabling users to record and/or live stream a video over the Internet. The Raspberry Pi (RPi) camera is widely used for its streaming feature as it easily captures live images and videos. Plus, it’s straightforward to interface the RPi camera with the Raspberry Pi 2/3/4 — or any other microcomputer. 

For this project, we’re designing an online home-surveillance system using the Raspberry Pi Camera V2 and the Raspberry Pi 4B (note, RPi now also offers a high-quality camera for higher-resolution images). It will be possible to view the camera’s live video footage, which is streamed online, from any web browser. 

The camera module is easily controlled with clean Python codes. The only condition is that the RPi and the device opening the browser must be connected to the same network. 

Components required
1. Raspberry Pi 2B/3B/4B x1
2. Raspberry Pi camera V2 x1
3. Ribbon cable for connecting Raspberry Pi camera x1

Circuit connections
To design this project, it’s necessary to interface the Raspberry Pi camera module with RPi. Fortunately, RPi already has a camera serial interface (CSI). 

The CSI port on Raspberry Pi 2/3/4.

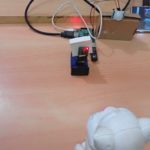
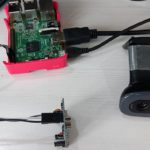
First, locate the CSI port on Raspberry Pi, gently removing the plastic clip from the port. Insert the camera module’s ribbon cable in the CSI port such that connectors at the bottom of the cable face the contacts in the port.

Next, place the plastic clip back so that the ribbon cable is secured. Once attached to RPi, the camera module should look like the below illustration.

Securing the ribbon cable to RPi’s CSI port.

The device is now ready for operation. You can secure the entire assembly in a Raspberry Pi camera case as shown here…

The Raspberry Pi camera case.

Configuring Raspberry Pi
Before using the home surveillance camera system, there are a few additional steps:

1. Enable the CSI port in Raspberry Pi.
2. Write the Python code for live streaming from the camera module.
3. Locate the RPi’s IP address to access the live stream.
4. Configure RPi to automatically run the Python code on start-up. 

By default, the camera module is disabled in Raspberry Pi. To enable the CSI port, go to the main menu and open the Raspberry Pi Configuration tool. It’s also possible to open this tool from the terminal by typing: sudo raspi-config. 

From the configuration tool, select the interfaces tab, making sure the camera is enabled. Raspberry Pi will then reboot with the camera enabled.

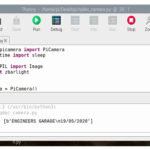
The Python code is provided and explained below. You can write the code using Thonny IDE in Raspbian OS, saving the script file by a suitable name.

To check the IP address, open the bash terminal and run this command: [email protected]:~ $ ifconfig

This command enlists several network interface parameters. One of these parameters is the IP address of the network, ensuring RPi is connected.

For this project, the IP address is 192.168.29.242. Since RPi’s live stream will be available from port 8000, it could be accessed via the HTTP link: <IP_ADDRESS>:8000. 

For us, this is 192.168.29.242:8000. However, the video stream can be captured on any device that’s running a browser via the above HTTP link. 

As we’d like the Python script to begin anytime RPi starts, open the profile file in the Bash terminal by executing this command: sudo nano /etc/profile 

Save the Python script under the name: onlineHomeSurveillance.py. To do so, scroll to the bottom of the file and add the following lines:

sudo python /home/pi/ onlineHomeSurveillance.py & 

Note the ampersand at the end of the line, which lets the script run repeatedly without stopping. 

Python script… 


How the project works
The Raspberry Pi camera is connected to the CSI port of the Raspberry Pi (RPi). With the support of the picamera library, the camera module can be configured to web stream the video captured by the module. 

The code for this project is a recipe from the picamera library. It uses Pytho’s built-in http.server module to use RPi as a video-streaming server. The video is streamed in MJPEG format. 

You can find more picamera recipes from the official documentation of the library.    

How the code works
The Python code runs a “try and exception” handling routine with an object instantiated from the PiCamera class. It captures a streaming output using the StreamingOutput() class into a variable “Output.”

Here’s what happens next:

  • The StreamingOutput() class uses the IO library functions to capture the raw video stream. 
  • The start_recording() method is called, which begins recording the camera’s object (the video stream). 
  • The “object server” (from the http.server module) is instantiated to the socketserver by using the StreamingServer() class. 
  • The video streaming server is configured using the StreamingHandler() class. 
  • The method server_forver() is called on the server object to run the video streaming server, endlessly. 

Take a closer look at the following lines of code:

with picamera.PiCamera(resolution=’640×480′, framerate=24) as camera:
output = StreamingOutput()
#Uncomment the next line to change your Pi’s Camera rotation (in degrees)
#camera.rotation = 90
camera.start_recording(output, format=’mjpeg’)
    try:
address = (”, 8000)
server = StreamingServer(address, StreamingHandler)
server.serve_forever()
finally:
camera.stop_recording()

The results 

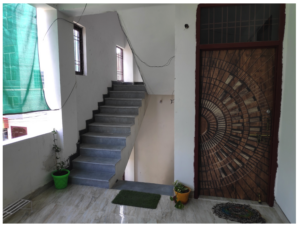
Camera installation site.

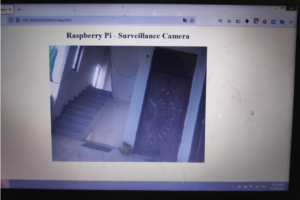
Live video footage from the RPi camera stream.

You may also like:


  • Raspberry Pi-based digital door peekhole

  • How to use Raspberry Pi camera module with Python
  • Raspberry Pi 4
    RPi Python Programming 01: Introduction to Raspberry Pi 4

  • Raspberry Pi-based smart home security system

  • Raspberry Pi camera QR-code scanning

  • Raspberry Pi offers new, high-quality camera with interchangeable lens

Filed Under: Electronic Projects
Tagged With: camera, raspberrypi, rpi, surveillance
 

HAVE A QUESTION?

Have a technical question about an article or other engineering questions? Check out our engineering forums EDABoard.com and Electro-Tech-Online.com where you can get those questions asked and answered by your peers!


Featured Tutorials

  • PS2 Keyboard To Store Text In SD Card Using Arduino Circuit Setup On Breadboard
    How To Use PS2 Keyboard To Store Text In SD Card Using Arduino- (Part 42/49)
  • Wireless Path Tracking System Using Mouse, XBee And Arduino Circuit Setup On Breadboard
    How To Make A Wireless Path Tracking System Using Mouse, XBee And Arduino- (Part 43/49)
  • How to Make a Wireless Keyboard Using Xbee with Arduino- (Part 44/49)
  • Making Phone Call From GSM Module Using Arduino Circuit Setup On Breadboard
    How to Make Phonecall From GSM Module Using Arduino- (Part 45/49)
  • How to Make a Call using Keyboard, GSM Module and Arduino
    How To Make A Call Using Keyboard, GSM Module And Arduino- (Part 46/49)
  • Receiving SMS Using GSM Module With Arduino Prototype
    How to Receive SMS Using GSM Module with Arduino- (Part 47/49)

Stay Up To Date

Newsletter Signup

Sign up and receive our weekly newsletter for latest Tech articles, Electronics Projects, Tutorial series and other insightful tech content.

EE Training Center Classrooms

EE Classrooms

Recent Articles

  • How to interface a DS18B20 temperature sensor with MicroPython’s Onewire driver
  • What is a low power design?
  • Renesas partners with Tata to accelerate progress in advanced electronics
  • STMicroelectronics’ new touchscreen controller for smartphones enables longer runtime
  • Samsung unveils ISOCELL image sensor with industry’s smallest 0.56μm pixel

Most Popular

5G 555 timer circuit 8051 ai Arduino atmega16 automotive avr bluetooth dc motor display Electronic Part Electronic Parts Fujitsu ic infineontechnologies integratedcircuit Intel IoT ir lcd led maximintegratedproducts microchip microchiptechnology Microchip Technology microcontroller microcontrollers mosfet motor powermanagement Raspberry Pi remote renesaselectronics renesaselectronicscorporation Research samsung semiconductor sensor software STMicroelectronics switch Technology vishayintertechnology wireless

RSS EDABOARD.com Discussions

  • Interfacing LCD with PIC16F877 using CCS C Compiler
  • Effect of variable gain amplifier and LNA on the input RF signal's phase
  • How do you find the angle made by two isosceles triangles in a kite?
  • MWO - EM Structure missing
  • HF preamplifier with threshold?

RSS Electro-Tech-Online.com Discussions

  • Lighting a .010 green fiber optic with led
  • Help wanted to power an AC120v induction motor ( edited from Brushless motor - thank you @SHORTBUS= )
  • HELP NEEDED
  • NOR gate oscillator in LTspice not working
  • intro to PI
Engineers Garage
  • Analog IC TIps
  • Connector Tips
  • DesignFast
  • EDABoard Forums
  • EE World Online
  • Electro-Tech-Online Forums
  • Microcontroller Tips
  • Power Electronic Tips
  • Sensor Tips
  • Test and Measurement Tips
  • 5G Technology World
  • About Us
  • Contact Us
  • Advertise

Copyright © 2022 WTWH Media LLC. All Rights Reserved. The material on this site may not be reproduced, distributed, transmitted, cached or otherwise used, except with the prior written permission of WTWH Media
Privacy Policy | Advertising | About Us

Search Engineers Garage

  • Projects and Tutorials
    • Electronic Projects
      • 8051
      • Arduino
      • ARM
      • AVR
      • PIC
      • Raspberry pi
      • STM32
    • Tutorials
    • Circuit Design
    • Project Videos
    • Components
  • Articles
    • Tech Articles
    • Insight
    • Invention Stories
    • How to
    • What Is
  • News
    • Electronic Products News
    • DIY Reviews
    • Guest Post
  • Forums
    • EDABoard.com
    • Electro-Tech-Online
    • EG Forum Archive
  • Digi-Key Store
    • Cables, Wires
    • Connectors, Interconnect
    • Discrete
    • Electromechanical
    • Embedded Computers
    • Enclosures, Hardware, Office
    • Integrated Circuits (ICs)
    • Isolators
    • LED/Optoelectronics
    • Passive
    • Power, Circuit Protection
    • Programmers
    • RF, Wireless
    • Semiconductors
    • Sensors, Transducers
    • Test Products
    • Tools
  • EE Resources
    • DesignFast
    • LEAP Awards
    • Oscilloscope Product Finder
    • White Papers
    • Webinars
  • EE Learning Center
    • Design Guides
      • WiFi & the IOT Design Guide
      • Microcontrollers Design Guide
      • State of the Art Inductors Design Guide
  • Women in Engineering