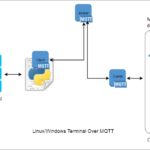
It’s possible to set up a do-it-yourself home automation system with an ESP board and Raspberry Pi (RPi). Both offer Wi-Fi connectivity and can easily communicate via a home network. However, a communication protocol is required for wireless communication for devices operating in a wider network.
Since conventional internet protocols like HTTP are typically too resource-extensive to implement with microcontroller boards, IoT protocols like MQTT provide an option. MQTT is a standard messaging protocol for the internet of things.
In this project, we’ll design an ESP-based weather monitor and configure it as an MQTT publisher. An MQTT broker (namely, Mosquitto) will be configured on RPi to communicate with the ESP device. An MQTT subscriber will be configured on the same RPi to read and log temperature and humidity readings.
The sensor used to read the temperature and humidity on ESP32/ESP8266 is DHT11. DHT22 can also be used if preferred.
Components required
1. Raspberry Pi x1
2. Display monitor x1
3. Micro-USB cable and power adaptor for Raspberry Pi x1
4. HDMI cable x1
5. Keyboard and Mouse x1
6. ESP8266/ESP32 x1
7. DHT11/DHT22 x1
8. Micro-USB cable for ESP8266/ESP32 x1
Configuring RPi as an MQTT broker
Mosquitto, the broker we are using, is responsible for all communication in the form of topic-associated messages between MQTT clients. The ESP32/ESP8266 is configured as the MQTT publisher. The subscriber is configured on Raspberry Pi.
Ensure RPi is set up as a desktop computer. Then, install Mosquitto on it. To do so, open the terminal and execute this command:
sudo apt-get install mosquitto

Next, install the Mosquitto command-line client by executing the following command in the terminal:
sudo apt-get install mosquitto-clients -y

After installing the MQTT broker, we’ll need to make changes to its configuration files. The default configuration file is stored in /etc/mosquitto/mosquitto.conf. Open the default configuration file in the nano editor by executing the following command in the terminal:
sudo nano /etc/mosquitto/mosquitto.conf

The configuration file should look similar to this…
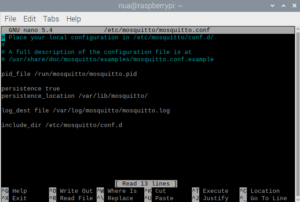
In the configuration file, we’ll disable the default configuration settings with this line:
include_dir /etc/mosquitto/conf.d
to
# include_dir /etc/mosquitto/conf.d
Next, we’ll disallow anonymous users to connect with the broker by adding this line:
allow_anonymous false
We’ll have to set a file to save the password by adding this line:
password_file /etc/mosquitto/pwfile
Then, we’ll set the listening port to 1883 by adding this line:
listener 1883
Save the changes by pressing Ctrl+S and exit by pressing Ctrl+X. The configuration file look similar to this after you’re done with these edits…

Now, let’s set username and password so MQTT clients can access the MQTT broker. To create a username or reset the password of an existing user, execute the following command in the terminal:
sudo mosquitto_passwd -c /etc/mosquitto/pwfile <username>
For this project, we set the username to “neo” and the password to “eglabs.” Be sure to choose a strong password. Note that when you type in the password, nothing is visible in the window.

You can remove an existing user by executing this command in the terminal:
sudo mosquitto_passwd -d /etc/mosquitto/pwfile <username>
After generating a username and password, reboot Raspberry Pi so these changes take effect. To do so, execute this command in the terminal:
sudo reboot
The Mosquitto broker can be started by executing the following command in the terminal:
sudo systemctl start mosquitto
Let’s ensure the Mosquitto broker is running by executing this command in the terminal:
sudo systemctl status mosquitto

The Mosquitto broker can be stopped by executing this command in the terminal:
sudo systemctl stop mosquitto
The Mosquitto broker can be restarted by executing this command in the terminal:
sudo systemctl restart mosquitto
The Mosquitto broker can be enabled at boot by executing this command in the terminal:
sudo systemctl enable mosquitto
The Mosquitto broker can be run in background by executing this command in the terminal:
mosquitto -d
Setting up the weather monitor
We’ll set up the weather station by using ESP32/ESP8266. To do so, you’ll need to interface DHT11/DHT22 with ESP32/ESP8266

DHT11 interfaced with ESP32 to make the weather station.
Configuring ESP32/ESP8266 as an MQTT publisher
Upload the following sketch to ESP32/ESP8266 to run ESP as a weather station. It will publish temperature and humidity values to the MQTT broker.
#include “DHT.h”
#include “PubSubClient.h”
#include “WiFi.h”
#define DHTPIN 4
#define DHTTYPE DHT11
DHT dht(DHTPIN, DHTTYPE);
// WiFi
const char* ssid = “SSID”;
const char* wifi_password = “PASSWORD”;
// MQTT
const char* mqtt_server = “192.168.*.*”;
const char* humidity_topic = “humidity”;
const char* temperature_topic = “temperature”;
const char* mqtt_username = “neo”; // MQTT username
const char* mqtt_password = “eglabs”; // MQTT password
const char* clientID = “Weather_Reporter”; // MQTT client ID
// Initialise the WiFi and MQTT Client objects
WiFiClient wifiClient;
// 1883 is the listener port for the Broker
PubSubClient client(mqtt_server, 1883, wifiClient);
// Custom function to connect to the MQTT broker via WiFi
void connect_MQTT(){
Serial.print(“Connecting to “);
Serial.println(ssid);
// Connect to the WiFi
WiFi.begin(ssid, wifi_password);
// Wait until the connection is confirmed
while (WiFi.status() != WL_CONNECTED) {
delay(500);
Serial.print(“.”);
}
// Debugging – Output the IP Address of the ESP8266
Serial.println(“WiFi connected”);
Serial.print(“IP address: “);
Serial.println(WiFi.localIP());
// Connect to MQTT Broker
if (client.connect(clientID, mqtt_username, mqtt_password)) {
Serial.println(“Connected to MQTT Broker!”);
}
else {
Serial.println(“Connection to MQTT Broker failed…”);
}
}
void setup() {
Serial.begin(9600);
dht.begin();
}
void loop() {
connect_MQTT();
Serial.setTimeout(2000);
float h = dht.readHumidity();
float t = dht.readTemperature();
Serial.print(“Humidity: “);
Serial.print(h);
Serial.println(” %”);
Serial.print(“Temperature: “);
Serial.print(t);
Serial.println(” *C”);
// MQTT can only transmit strings
String hs=”Hum: “+String((float)h)+” % “;
String ts=”Temp: “+String((float)t)+” C “;
// PUBLISH to the MQTT Broker (topic = Temperature)
if (client.publish(temperature_topic, String(t).c_str())) {
Serial.println(“Temperature sent!”);
}
else {
Serial.println(“Temperature failed to send. Reconnecting to MQTT Broker and trying again”);
client.connect(clientID, mqtt_username, mqtt_password);
delay(10); // This delay ensures that client.publish doesn’t clash with the client.connect call
client.publish(temperature_topic, String(t).c_str());
}
// PUBLISH to the MQTT Broker (topic = Humidity)
if (client.publish(humidity_topic, String(h).c_str())) {
Serial.println(“Humidity sent!”);
}
else {
Serial.println(“Humidity failed to send. Reconnecting to MQTT Broker and trying again”);
client.connect(clientID, mqtt_username, mqtt_password);
delay(10); // This delay ensures that client.publish doesn’t clash with the client.connect call
client.publish(humidity_topic, String(h).c_str());
}
client.disconnect(); // disconnect from the MQTT broker
delay(1000*60); // print new values after 1 Minute
}
How the ESP-based MQTT publisher works
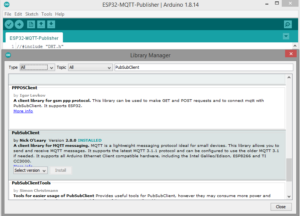
ESP32 is configured as an MQTT publisher. To work with DHT11/DHT22, DHT.h must first be imported. The library PubSubClient.h is also imported to configure ESP32 as the MQTT client. The library is written by Nick O’ Leary. It can be installed on Arduino IDE by navigating to Tools->Manage Libraries and search for PubSubClient.
Note:
- The library must be installed before importing it into the sketch. The WiFi.h must be imported to connect ESP32/ESP8266 to the WiFi network.
- DHT11’s output pin connects to the D04 pin.
- The DHT object is instantiated with DHTTYPE to DHT11 and DHTPIN to 4.
- The WiFi SSID and password are stored in the variables SSID and wifi_password. Be sure to replace “SSID” and “PASSWORD” with SSID and the WiFi network key of your own WiFi network.
- The variables are declared to store the IP of the MQTT server, the topic names, the MQTT username and password, and the client ID.
- The MQTT broker’s IP address is the same as Raspberry Pi’s IP address on the network.
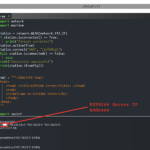
Raspberry Pi’s IP address can be obtained by executing the following command in the terminal:
hostname -I
The first string obtained when executing the above command is the IPv4 address, which must be used in the sketch. Replace the MQTT server IP (“192.168.*.*”) with the IP address of your own Raspberry Pi.
A WiFiClient object is instantiated and used to instantiate the MQTT client object. The function connect_MQTT() is defined to connect with the WiFi network and the MQTT broker.
In the setup() function, the baud rate for logging information on Arduino IDE’s Serial Monitor is set to 9600 and the DHT is initialized by calling the DHT.begin() method.
In the loop() function, the DH11’s temperature and humidity values are retrieved by calling the dht.readHumidity() and dht.readTemperature() methods. The retrieved values are wrapped as strings and passed as messages to the MQTT topics of ‘humidity’ and ‘temperature,’ respectively, by calling the client.publish() method.
Lastly, the client is disconnected by calling the client.disconnect() method. A delay of one minute is provided.
Configuring the MQTT subscriber on RPi
Install the paho-mqtt library to configure the MQTT client on Raspberry Pi. Execute the following command in the terminal to install this library:
sudo pip install paho-mqtt

Open the Thonny IDE and copy the following code in the editor:
import paho.mqtt.client as mqtt
MQTT_ADDRESS = ‘192.168.*.*’
MQTT_USER = ‘neo’
MQTT_PASSWORD = ‘eglabs’
MQTT_TOPIC_TEMP = ‘Temperature’
MQTT_TOPIC_HUMD = ‘Humidity’
def on_connect(client, userdata, flags, rc):
print(‘Connected with result code ‘ + str(rc))
client.subscribe(MQTT_TOPIC_TEMP)
client.subscribe(MQTT_TOPIC_HUMD)
def on_message(client, userdata, msg):
print(msg.topic + ‘ ‘ + str(msg.payload))
def main():
mqtt_client = mqtt.Client()
mqtt_client.username_pw_set(MQTT_USER, MQTT_PASSWORD)
mqtt_client.on_connect = on_connect
mqtt_client.on_message = on_message
mqtt_client.connect(MQTT_ADDRESS, 1883)
mqtt_client.loop_forever()
if __name__ == ‘__main__’:
print(‘MQTT to InfluxDB bridge’)
main()
Save the script as RPI-Sub.py and run the script.
How the MQTT subscriber works
The MQTT subscriber on RPi is run with the help of a Python script. The script imports the paho.mqtt.client library. The variables are declared to store the MQTT broker’s IP address (which is the same as RPi’s IP address), the MQTT username, the MQTT password, and the MQTT topics.
The client is subscribed to two topics, ‘temperature’ and ‘humidity,’ upon connecting with the broker. For this, the on_connect() function is defined and called in the main() loop. The messages published from the ESP-based MQTT publisher are printed to the console by calling the user-defined on_message() function.
In the main() loop, the MQTT client is initiated by calling the mqtt.Client() method. The MQTT username and password are set by calling the mqtt_client.username_pw_set() method. The client is connected to the broker by calling the mqtt_client.connect() method and is looped infinitely by calling the mqtt_client.loop_forever() method.
Upon connection with the MQTT broker, the user-defined function on_connect() is called, subscribing to the respective topics. Upon receiving messages from the ESP-based publisher, the user-defined function on_message() is called, which prints the messages to the console.
Results


You may also like:


Filed Under: IoT applications, Tutorials

Questions related to this article?
👉Ask and discuss on EDAboard.com and Electro-Tech-Online.com forums.
Tell Us What You Think!!
You must be logged in to post a comment.