Engineers Garage

  • Projects and Tutorials
    • Electronic Projects
      • 8051
      • Arduino
      • ARM
      • AVR
      • PIC
      • Raspberry pi
      • STM32
    • Tutorials
    • Circuit Design
    • Project Videos
    • Components
  • Articles
    • Tech Articles
    • Insight
    • Invention Stories
    • How to
    • What Is
  • News
    • Electronic Products News
    • DIY Reviews
    • Guest Post
  • Forums
    • EDABoard.com
    • Electro-Tech-Online
    • EG Forum Archive
  • Digi-Key Store
    • Cables, Wires
    • Connectors, Interconnect
    • Discrete
    • Electromechanical
    • Embedded Computers
    • Enclosures, Hardware, Office
    • Integrated Circuits (ICs)
    • Isolators
    • LED/Optoelectronics
    • Passive
    • Power, Circuit Protection
    • Programmers
    • RF, Wireless
    • Semiconductors
    • Sensors, Transducers
    • Test Products
    • Tools
  • EE Resources
    • DesignFast
    • LEAP Awards
    • Oscilloscope Product Finder
    • White Papers
    • Webinars
  • EE Learning Center
    • Design Guides
      • WiFi & the IOT Design Guide
      • Microcontrollers Design Guide
      • State of the Art Inductors Design Guide
  • Women in Engineering

Raspberry Pi Power Cat Feeder

By Samidha Verma

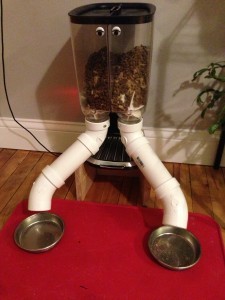
This article of David Bryan is for cat lovers especially for those who own a pet and also love travelling. The trouble of synchronizing both of them at same time seems hectic especially when it comes to feeding part.  But if you are a tech savvy, then here is the solution. David Bryan has come out with a Wi-Fi enabled human/cat feeder powered from raspberry pi

 Requirements

The list of specific parts and components that has to be acquired are easily available. Start with a drill and soldering Iron.  Then you will need a wire cutter and pliers along with a hot glue gun. For software section, have a working and installed OS on the raspberry pi along with Wi-Fi adaptor setup. Adafruit occidentalis or raspbian work well with them. Download codes from Github Repo and play around with the GPIO in and out. And then install GPIO.PWM module. Other stuffs will be mentioned along with the post. But if you are building it, then read the post, collect all the parts first and then begin your project. For detailed information, one can visit David Bryan’s blog.

Working of the project

Start your project by testing the servo that whether they are powerful enough to move the flapper handle. The servos that rotate continuously are attached to the handle to rotate the flapper wheel with the help of gaffer tape. Handle is fixed at the back side which can be easily rotated in a 360 degree circle.

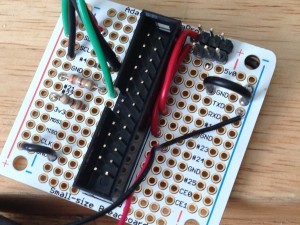
Next step is to cut out a channel for the servo head of about 2mm to make an outline for where the servo should sit. With the help of a hot glue, fix it. You can also use zip ties for better support. Now make a channel for the servo header and try to make the servo shaft to center as possible. It is time to wire up all things. David used a “small size Perma-proto raspberry Pi breadboard PCB kit” from Adafruit.

The back side is soldered with servo headers. It is made up of a 5V solder bridge and a ground solder bridge.  Wire the GPIO outs from PINs 18 and 23 in the first hole and subsequently add 390ohm resistor for the LED lights. Make sure to add some heat shrink tube before resistor is soldered. Another 390ohm resistor as “pull down” resistor is connected to ground as a pushing button that does something when a human pushes it.

After soldering everything and testing all pushing buttons, stick it all together with the help of USB power cable, the servo headers, a through hole and the side buttons. Then jam it all in one pillar and this is how it looks like.

Future improvements

A pi camera can be installed along with mobile WebUI and PiUI . You can also add a powered speaker for your cat to call them in your absence. So you are done with the project now. All the best with your experiments.


Filed Under: Reviews


Questions related to this article?
👉Ask and discuss on EDAboard.com and Electro-Tech-Online.com forums.


Tell Us What You Think!! Cancel reply

You must be logged in to post a comment.

HAVE A QUESTION?

Have a technical question about an article or other engineering questions? Check out our engineering forums EDABoard.com and Electro-Tech-Online.com where you can get those questions asked and answered by your peers!


Featured Tutorials

  • Introduction to Brain Waves & its Types (Part 1/13)
  • Understanding NeuroSky EEG Chip in Detail (Part 2/13)
  • Performing Experiments with Brainwaves (Part 3/13)
  • Amplification of EEG Signal and Interfacing with Arduino (Part 4/13)
  • Controlling Led brightness using Meditation and attention level (Part 5/13)
  • Control Motor’s Speed using Meditation and Attention Level of Brain (Part 6/13)

Stay Up To Date

Newsletter Signup

Sign up and receive our weekly newsletter for latest Tech articles, Electronics Projects, Tutorial series and other insightful tech content.

EE Training Center Classrooms

EE Classrooms

Recent Articles

  • What are the battery-selection criteria for low-power design?
  • Key factors to optimize power consumption in an embedded device
  • EdgeLock A5000 Secure Authenticator
  • How to interface a DS18B20 temperature sensor with MicroPython’s Onewire driver
  • Introduction to Brain Waves & its Types (Part 1/13)

Most Popular

5G 555 timer circuit 8051 ai Arduino atmega16 automotive avr bluetooth dc motor display Electronic Part Electronic Parts Fujitsu ic infineontechnologies integratedcircuit Intel IoT ir lcd led maximintegratedproducts microchip microchiptechnology Microchip Technology microcontroller microcontrollers mosfet motor powermanagement Raspberry Pi remote renesaselectronics renesaselectronicscorporation Research samsung semiconductor sensor software STMicroelectronics switch Technology vishayintertechnology wireless

RSS EDABOARD.com Discussions

  • Op amp non inverting amplifier not working
  • Making a ducted soldering fan?
  • Characterization values of a MOSFET in PDK
  • USBASP Programmer Mod
  • Measure AC current accurateley (100mA to 10A)

RSS Electro-Tech-Online.com Discussions

  • Need a ducted soldering fan for solder smoke extraction
  • How to search component to replace my burn RF inductor?
  • Question about ultrasonic mist maker
  • Someone please explain how this BMS board is supposed to work?
  • bluetooth jammer
Engineers Garage
  • Analog IC TIps
  • Connector Tips
  • DesignFast
  • EDABoard Forums
  • EE World Online
  • Electro-Tech-Online Forums
  • Microcontroller Tips
  • Power Electronic Tips
  • Sensor Tips
  • Test and Measurement Tips
  • 5G Technology World
  • About Us
  • Contact Us
  • Advertise

Copyright © 2022 WTWH Media LLC. All Rights Reserved. The material on this site may not be reproduced, distributed, transmitted, cached or otherwise used, except with the prior written permission of WTWH Media
Privacy Policy | Advertising | About Us

Search Engineers Garage

  • Projects and Tutorials
    • Electronic Projects
      • 8051
      • Arduino
      • ARM
      • AVR
      • PIC
      • Raspberry pi
      • STM32
    • Tutorials
    • Circuit Design
    • Project Videos
    • Components
  • Articles
    • Tech Articles
    • Insight
    • Invention Stories
    • How to
    • What Is
  • News
    • Electronic Products News
    • DIY Reviews
    • Guest Post
  • Forums
    • EDABoard.com
    • Electro-Tech-Online
    • EG Forum Archive
  • Digi-Key Store
    • Cables, Wires
    • Connectors, Interconnect
    • Discrete
    • Electromechanical
    • Embedded Computers
    • Enclosures, Hardware, Office
    • Integrated Circuits (ICs)
    • Isolators
    • LED/Optoelectronics
    • Passive
    • Power, Circuit Protection
    • Programmers
    • RF, Wireless
    • Semiconductors
    • Sensors, Transducers
    • Test Products
    • Tools
  • EE Resources
    • DesignFast
    • LEAP Awards
    • Oscilloscope Product Finder
    • White Papers
    • Webinars
  • EE Learning Center
    • Design Guides
      • WiFi & the IOT Design Guide
      • Microcontrollers Design Guide
      • State of the Art Inductors Design Guide
  • Women in Engineering