Engineers Garage

  • Projects and Tutorials
    • Circuit Design
    • Electronic Projects
      • 8051
      • Arduino
      • ARM
      • AVR
      • PIC
      • Raspberry pi
      • STM32
    • Tutorials
    • Components
  • Contributions
  • Articles
    • EG Blogs
    • Insight
    • Invention Stories
    • How to
  • What Is
  • Forums
    • EG Forum Archive
    • EDABoard.com
    • Electro-Tech-Online
  • Digi-Key Store
    • Cables, Wires
    • Connectors, Interconnect
    • Discrete
    • Electromechanical
    • Embedded Computers
    • Enclosures, Hardware, Office
    • Integrated Circuits (ICs)
    • Isolators
    • LED/Optoelectronics
    • Passive
    • Power, Circuit Protection
    • Programmers
    • RF, Wireless
    • Semiconductors
    • Sensors, Transducers
    • Test Products
    • Tools
  • News
    • EE Design News
    • DIY Reviews
    • Guest Post
    • Sponsored Content
  • EE Resources
    • DesignFast
    • LEAP Awards
    • Oscilloscope Product Finder
    • White Papers
    • Webinars
  • EE Classrooms
    • Grid Infrastructure
    • Aerospace & Defense
    • Building Automation
    • Power Delivery
    • Factory Automation
    • Motor Drives
    • Medical Technology
  • Video

Simple Raspberry Pi Game Pad for Ball Catching Game – (Part 36/38)

November 8, 2013 By Ajish Alfred

The Raspberry pi is a mini computer which is designed in a single board with all the essential components required for running an operating system. The board is provided with a RCA connector which can be used to connect it directly to a TV screen which is based on PAL and NTSC standard. The board also has a HDMI connector output which can be used to connect the board to a HD TV. One can also use remote login to access the Raspberry pi and view the GUI (Text User Interface) on the PC screen. The Raspberry pi board is also very easy to interface with external devices or circuits through its pin outs. This makes the Raspberry pi a suitable platform for playing and developing interesting games.

This article discusses how to develop a simple graphical game using the HTML5 and JavaScript language and to interface it with an external custom made game pad hardware connected to the pins of Raspberry pi board.
[[wysiwyg_imageupload:11064:]]


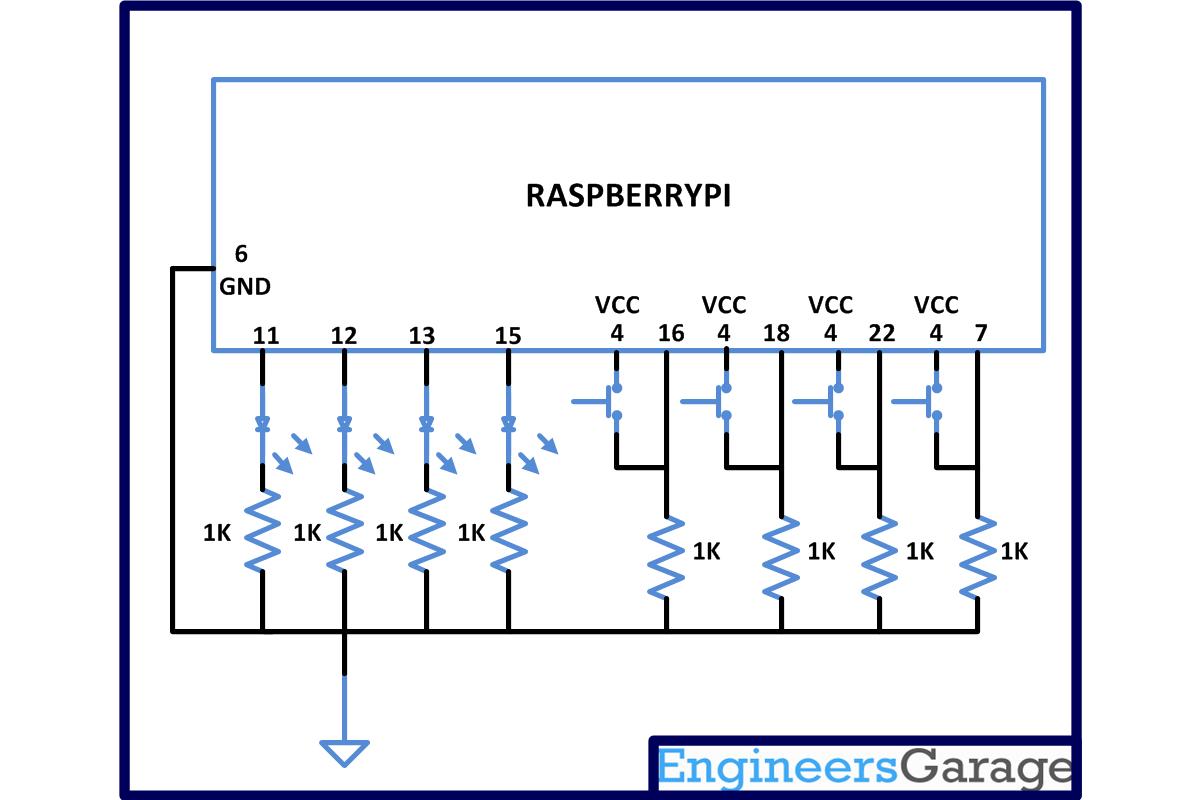
There are eight general purpose IO pins on the 13*2 pin connectors of the Raspberrypi board and among them four pins has been selected as input and then remaining four pins as output. The input pins are connected to push button and are pulled down using 1K resistors. The output pins are connected to the LEDs through another set of 1K resistors. For this project the Raspberry pi board is loaded with Ubuntu and is remotely accessed using VNC. To access the pins that coming out of the Broadcom controller the C library “bcm2835” has been downloaded and installed.

This game contains four balls and the movement of which can be controlled with the help of the four keys in the gamepad. The game can be opened in a browser window and played with the help of four buttons connected to the pins of the Raspberry pi board. One has to install the browser “Iceweasel” which is the Debian version of the Firefox. The following commands can install the software on the Raspberry pi;
sudo apt-get update
sudo apt-get install iceweasel
The game runs in a browser window and it communicates with the game pad through a Named Pipe or FIFO. There are multiple processes running which can read from the game pad and write the required commands to the FIFO for controlling the game. The JavaScript written in the game code simply reads from the FIFO for the input control data.
The parent process here creates four child processes which are dedicated for each of the keys in the gamepad. Whenever a key is pressed or released, they will generate a signal and send it to the parent process with a value. This method of sending a signal with value  helps the parent process to identify which key has been pressed or released. 
Block Diagram of Raspberry pi gamepad
Fig. 2: Block Diagram Of Raspberry Pi Gamepad
The NAMED PIPE or FIFO needs to be created using the following command in the same directory where the executable for the gamepad code written in C and the HTML game files written in HTML5 and JavaScript exist.
mkfifo xyz
The FIFO can also be created using the code itself by adding the function mkfifo(), open() as explained in a previous documentation.
As soon as the parent process detects a key press from the value it received along with the signal, it simply writes a particular character corresponding to that key to the NAMED PIPE or FIFO. The HTML game will be reading continuously from the FIFO every 500ms to get the input. Hence both the C code and the HTML file needs to be in the state of execution. The gamepad hardware communicates with the C code only and the C code communicates with the JavaScript using the NAMED PIPE.
The user can write data into the temporary file from the terminal itself using the ‘echo’ command as shown in the following example.
echo abcdef >> /tmp/my_fifo
The FIFO writing parent process is written in such a way that it will write some particular characters to the FIFO in respond to the signals received from the child processes. The commands that will be written to the FIFO for controlling the movement of the balls in the game are listed below;
u -> catch the ball in the first column
r -> catch the ball in the second column
l -> catch the ball in the third column
d -> catch the ball in the fourth column
These commands can be written into the FIFO with the help of the system() function.


system ( “echo u >> xyz );


system ( “echo r >> xyz );


system ( “echo l >> xyz );


system ( “echo d >> xyz );
Even if there is any key press the Parent process writes a character ‘x’ every 500ms to keep the JavaScript running.

Score of Ball Catching Game on screen using Raspberry pi

Fig. 3: Score Of Ball Catching Game On Screen Using Raspberry Pi
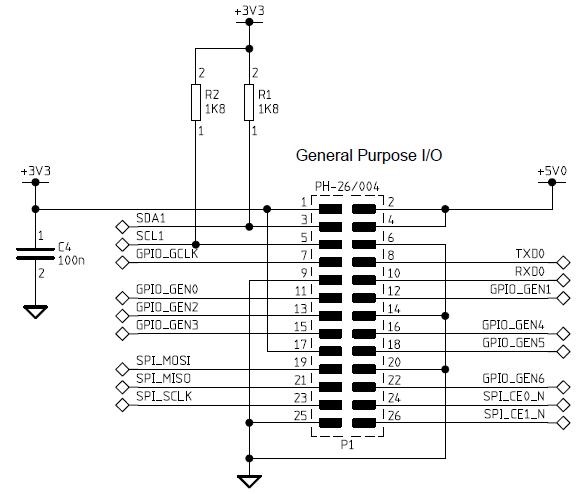
Circuit Diagrams

Circuit-Diagram-Of-Simple-Raspberry-Pi-Game-Pad-For-Ball-Catching-Game

Project Video

Related Articles Read More >

Raspberry Pi Models
RPI Python Programming 02 – Raspberry Pi Models
Raspberry Pi 4
RPi Python Programming 01 – Introduction to Raspberry Pi 4
Web Controlled LCD Display- (Part 9/12)
Web controlled Home Automation- (Part 11/12)

Stay Up To Date

Newsletter Signup

Popular Posts

GLCD 128×64 graphical lcd(GLCD) interfacing with 8051(89c51,89c52) microcontroller
Stm32f103 microcontroller controlling stepper motor by A4988 stepper motor driver module
How to measure Current using Arduino and ACS712 Current Sensor
Basic Electronics 20 – Types of inductors

EE Training Center Classrooms

“ee
“ee

Recent Articles

  • Renesas Electronics secures Bluetooth 5 connections with 32-bit RX23W MCU
  • iBASE introduces signaturePro 12-Port video wall signage player with outstanding capabilities
  • Microcontroller Project: STM32 low power modes analysis
  • Fujitsu starts shipping supercomputer Fugaku
  • RPi Python Programming 03 – Raspberry Pi as Linux System
Engineers Garage
  • Analog IC TIps
  • Connector Tips
  • DesignFast
  • EDABoard Forums
  • EE World Online
  • Electro-Tech-Online Forums
  • Microcontroller Tips
  • Power Electronic Tips
  • Sensor Tips
  • Test and Measurement Tips
  • 5G Technology World
  • About Us
  • Contact Us
  • Advertise

Copyright © 2019 WTWH Media LLC. All Rights Reserved. The material on this site may not be reproduced, distributed, transmitted, cached or otherwise used, except with the prior written permission of WTWH Media
Privacy Policy | Advertising | About Us

Search Engineers Garage

  • Projects and Tutorials
    • Circuit Design
    • Electronic Projects
      • 8051
      • Arduino
      • ARM
      • AVR
      • PIC
      • Raspberry pi
      • STM32
    • Tutorials
    • Components
  • Contributions
  • Articles
    • EG Blogs
    • Insight
    • Invention Stories
    • How to
  • What Is
  • Forums
    • EG Forum Archive
    • EDABoard.com
    • Electro-Tech-Online
  • Digi-Key Store
    • Cables, Wires
    • Connectors, Interconnect
    • Discrete
    • Electromechanical
    • Embedded Computers
    • Enclosures, Hardware, Office
    • Integrated Circuits (ICs)
    • Isolators
    • LED/Optoelectronics
    • Passive
    • Power, Circuit Protection
    • Programmers
    • RF, Wireless
    • Semiconductors
    • Sensors, Transducers
    • Test Products
    • Tools
  • News
    • EE Design News
    • DIY Reviews
    • Guest Post
    • Sponsored Content
  • EE Resources
    • DesignFast
    • LEAP Awards
    • Oscilloscope Product Finder
    • White Papers
    • Webinars
  • EE Classrooms
    • Grid Infrastructure
    • Aerospace & Defense
    • Building Automation
    • Power Delivery
    • Factory Automation
    • Motor Drives
    • Medical Technology
  • Video