Here to make a IR remote control I am using an ASIC codec chip ST12. Codec means coder+ decoder. That means same chip is used as encoder at transmitter side and as decoder at receiver side. It’s very nice chip and some of the major features of the chip are:
- Encode / Decode on single chip
- Built in Oscillator
- Minimum External Components
- Wide operating voltage range. (2.0 – 5.5V)
- Single chip Encoding Decoding Mode
- 40kHz carrier for infrared transmission medium
- 18 pin DIP package
The major applications of this chip
- Burglar alarm system
- Smoke and fire alarm system
- Garage door controllers
- Car door controllers
- Car alarm system
- Security system
- Cordless telephones
- Other remote control systems
Because both transmitter and receiver made up of only ST12 codec chip, let us first understand pin diagram, pin function and working of this chip and then go for transmitter and receiver.
Pin diagram: –

As shown in above figure, it is 18 pin chips with DIP. Pals refer the table given below for details
|
So now after going through above table one should have complete idea about the operation of this chip as transmitter (encoder) and as receiver (decoder).
Transmitter & Receiver
Transmitter: – As written above, the major advantage of this chip is that there is least requirement of external components
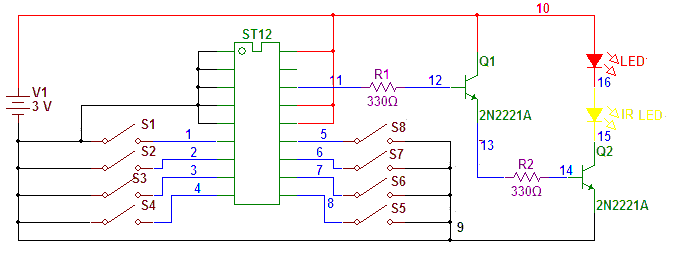
As shown in figure Circuit Diagram Tab1, it’s a single chip remote control with very few external components like switches, resistors, transistors and LEDs.
Connection: – all four address bits A0 – A3 are shorted to ground to setup an address 0000. 8 push button type switches are connected with data pins D0 – D7 as shown. The transmit data pin drives IR LED and red LED through Darlington configuration of Q1 & Q2. IR-RF pin is connected to Vcc to configure the chip in IR mode. enc-dec pin is also connected with Vcc to configure it as transmitter. A 3V battery (or 2 dry cells) provides power to the circuit.
Operation: – when any of the key is pressed data is transmitted via transmit data pin at 40KHz freq through IR LED. The address and data together modulated at 40 KHz freq with the help of built in oscillator. This data transmission can be seen on red LED as blinking o/p.
Receiver: –
As shown in Circuit Diagram Tab2 along with St12 we need current driver chip uLN2003A to drive relay coil.
Connections: – All four address bits A0-A3 are connected to ground to setup same address 0000. Keeping first data o/p D0 unconnected, rest all D1 – D7 are connected to input of ULN chip. Each one output of ULN chip drives one relay and one LED. So total there are seven relays that can switch on / off 7 different devices (instead of ULN2003 if one uses ULN2803 then all 8 data outputs can be used). The enc-dec pin is connected to ground to configure the chip as receiver. The lat-mom pin is tied to Vcc to get toggle output every time. The output of IR sensor TSOP 1738 is connected to receive data pin of ST12. Two different regulated supplies 5V and 12 V are used to give power to complete circuit.
Operation: – As a 40 KHz burst of data and address is detected by TSOP it will demodulate it and gives address and data to decoder chip. On getting valid address and data st12 will latch the data on D0-D7(inverted). Because its toggle output every time when same switch is pressed from TX, the relay will switch on / off. Also relay on / off is indicated by respective LED.
Project Source Code
Circuit Diagrams
Filed Under: Electronic Projects


Questions related to this article?
👉Ask and discuss on EDAboard.com and Electro-Tech-Online.com forums.
Tell Us What You Think!!
You must be logged in to post a comment.