Home automation is a term which means controlling the devices of a smart home which are connected to a computer. The computer could be a PC or any dedicated embedded device and the method of controlling could be fully automatic or remotely controlled. The demonstration of a small remote home automation system is done which can be used to control two lights and read temperature of a room from anywhere around the world using internet enabled devices. This project uses the Renesas microcontroller based development board called GR Sakura.
This article discusses the method of enabling the Ethernet module of the Sakura board, how to configure it as a server and also how to control them using a web page provided by the Sakura board for those who tries to connect with the board using an internet enabled PC, mobile phones etc. The LM35 temperature sensor is connected with the board for sensing the temperature and turning on/off the lights are demonstrated by the LEDs connected to the I/O port which can be easily replaced by a light driving circuit or relay.
DESCRIPTION
The Online compiler of the GR Sakura provides libraries which helps to enable the Ethernet port of the Sakura board. The board has given an IP address and a port number using the code and configured it as a Server. It is then connected to a router of a LAN network and then the particular port is ‘Port Forwarded’ so that the board can be accessed using other computers outside the LAN through the internet. The web page that the Sakura server provides to control itself is actually written as HTML text inside the code.
The Library files
The web based compiler is compatible with the Arduino codes and similar library files can be imported into the code for most of the hardware modules like, SPI, USB, Ethernet, SD card etc. To enable the Ethernet module and connect the board with the internet two libraries are required namely <Ethernet.h> and <SPI.h>. The library <rxduino.h> needs to be included with all the projects which help in performing most of the low level tasks with the Sakura board.
How to connect with a network
There are certain functions available in the <Ethernet.h> which can be used to connect the board with a LAN network using the Ethernet module. To initialize the Ethernet server library with a Port number use the following function:
EthernetServerserver(80);
Where 80 is the port number default for HTTP;
The following function can be used to enable Ethernet module of the Sakura board with a MAC address and an IP.
Ethernet.begin(mac, ip);
Where the IP and MAC are defined as byte arrays as shown in the following example:
byte mac[] = { 0xDE, 0xAD, 0xBE, 0xEF, 0xFE, 0xED };
byteip[] = {192,168,0,177};
Make sure that the IP choose for the Sakura board does not already exist in the network.
The following function configures the Sakura board in the internet Server mode:
server.begin();
A function is available which returns a 1, when a client connects with the Sakura server:
client.connected()
How to connect with the Sakura board
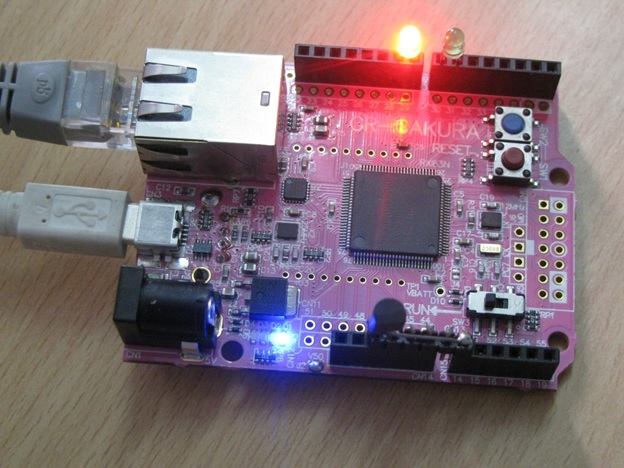
To connect with the Sakura board from anywhere in the same network, simply open a browser in the PC connected in the same network and type the IP of the Sakura board. Here the Sakura board is connected through a LAN cable to a Wifi router providing internet connection.

Fig. 1: Image of GR Sakura Board
How to read and data with the client
The <Ethernet.h> library also provides functions for processing the packets that comes from the client device and to read data from the client and write data to the client device.
The following function can be called to process the incoming packets from the client device:
Ethernet.processPackets();
The data can be read from the client device using the following function which returns one character at a time;
client.read();
There is a function print(), println() etc. can be used to write data to the client as shown in the following example.
client.print(“HELLO”);
Sending a Web page to the client
A simple web page can be created using HTML text and here the Sakura server provides the client with a web page by sending the corresponding HTML text using client.print() function. The following sample program shows how to provide a web page to the client by sending HTML text once it is connected with the Sakura.
while (!client.connected());
client.println(“<html>”);
client.println(“<head>”);
client.println(“<title>My Page</title>”);
client.println(“</head>”);
client.println(“<body bgcolor=”#FF0000″>”);
client.println(“HELLO CLIENT”);
client.println(“</body>”);
client.println(“</html>”);
client.println();
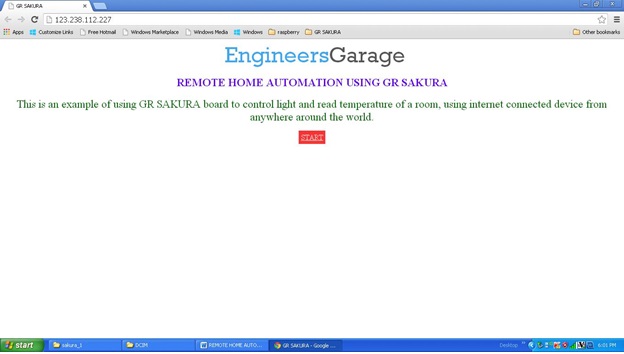
The web page created for this project has got two buttons and lot more complex than the above example.

Fig. 2: Screenshot of webpage used in Home Automation System
How the Button in the Web page works
The buttons in the web page when clicked will try to connect to the IP of the Sakura board with a character sending along with the query. For example when clicks the button to turn on the LIGHT 1, the browser actually connects with the Sakura board as 192.168.0.177/a; where the ‘a’ will be read by the Sakura board and performs the necessary action.
How to turn the lights ON/OFF
This can be easily done making an IO pin LOW or HIGH where the Relay for a Light is connected. In this project no actual Relay or Bulb is connected with a board, but is simulated by turning a couple of LEDs ON/OFF. In the code it can be done using the functions discussed below;
The following function sets the IO pin of a Sakura board as an output/input pin;
pinMode();
For example to set the pin as an output where an LED is connected use the following statement;
pinMode(PIN_LED0,OUTPUT);
The following function sets the IO pin of a Sakura board as an LOW/HIGH;
digitalWrite();
For example to set the pin as an HIGH where an LED is connected use the following statement:
digitalWrite(PIN_LED1, 1);
How to read the Temperature Sensor
The temperature sensor LM35 is connected with one of the Analog channels of the Sakura board. The analog equivalent of the room temperature can be read with the help of the following function;
analogRead(A0);
The above function call reads the analog value from the analog channel A0 of the Sakura board. The LM35 when provided with 5V power supply gives a voltage equivalent of the actual temperature in degrees, for example if the temperature is 35 degrees, the output voltage will be 0.35V.
Hence to convert that voltage into temperature value in degrees and store it in a variable ‘temperature’ the following statement is used;
temperature = (5.0 * analogRead(A0) * 100.0) / 1024;
where 1024 is the resolution of the built in ADC of the Sakura board.
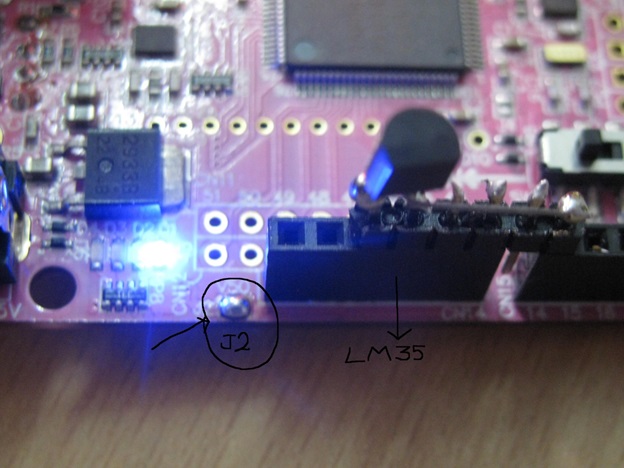
When connecting the LM35 with the 5V pin of the Sakura board the jumper J2need to be shorted.

Fig. 3: Image showing jumper and temperature sensor connected to GR Sakura
Port Forwarding
As mentioned before, the Sakura coded in such a way that it connects with the port number 80 of the Wi-Fi router. Only the devices in that network will be able to access the Sakura board until a technique called ‘Port Forwarding ’ is done. Login to the router using its ‘username’ and ‘password’ and there will be an option for forwarding the port. Enable the forwarding of the port 80 using the following details;
Port to be forwarded : 80
Starting port number : 80
End port number : 81
Protocol : ALL or TCP/UDP
How to access the Sakura anywhere from the world
How to access the Sakura anywhere from the world
Login to the router and find its public IP address and remember the same. If the public IP of the routr where the Sakura is connected and port forwarding is done, is say 123.238.112.227; then one can use the same IP to access the Sakura board from anywhere around the world using a web enabled device.

Fig. 4: Screenshot of webpage used in Home Automation System
*************************Code*************************
#include <rxduino.h>
#include <SPI.h>
#include <Ethernet.h>
TEthernet Ethernet;
// Enter a MAC address and IP address for your controller below.
// The IP address will be dependent on your local network:
byte mac[] = {0xDE, 0xAD, 0xBE, 0xEF, 0xFE, 0xED};
byte ip[] = {192,168,0,177};
// Initialize the Ethernet server library
// with the IP address and port you want to use
// (port 80 is default for HTTP):
EthernetServer server(80);
EthernetClient client = 0;
int val;
char query;
int home_page = 1;
int temperature = 0;
int light_1;
int light_2;
void setup()
{
pinMode(PIN_LED0,OUTPUT);
pinMode(PIN_LED1,OUTPUT);
pinMode(6,OUTPUT);
pinMode(7,OUTPUT);
pinMode(8,OUTPUT);
pinMode(9,OUTPUT);
digitalWrite(7, 0);
digitalWrite(9, 0);
digitalWrite(6, 0);
digitalWrite(8, 0);
// start the Ethernet connection and the server:
Ethernet.begin(mac, ip);
server.begin();
delay(500);
digitalWrite(PIN_LED0, 1);
}
void loop()
{
client = server.available();
if (client)
{
while (!client.connected());
digitalWrite(PIN_LED1, 1);
if(home_page)
{
client.println(“<html>”);
client.println(“<head>”);
client.println(“<style type=”text/css”>”);
client.println(“a{ padding: 5px 5px; background:#F33; color: #FFF;}”);
client.println(“</style>”);
client.println(“<title>GR SAKURA</title>”);
client.println(“</head>”);
client.println(“<body>”);
client.println(“<div align=”center”>
<span style=”font-family:Rockwell; font-size:48px; color:#3fa9f5;”> Engineers</span>
<span style=”font-family:Rockwell; font-size:48px; color:#595959;”>Garage</span>”);
client.println(“</div>”);
client.println(“<div align=”center” style=”font-size:24px; color:#60F; margin:20px;”>
<b>REMOTE HOME AUTOMATION USING GR SAKURA</b>”);
client.println(“</div>”);
client.println(“<div align=”center” style=”font-size:24px; color:#060; margin:20px;”>
This is an example of using GR SAKURA board to control light and read temperature of a room, using internet
connected device from anywhere around the world.<br>”);
client.println(“</div>”);
client.println(“<center><a href=”http://123.238.112.227:80/c”>START</a></center>”);
client.println(“</body>”);
client.println(“</html>”);
home_page = 0;
}
else
{
Ethernet.processPackets();
query = client.read();
Ethernet.processPackets();
query = client.read();
Ethernet.processPackets();
query = client.read();
Ethernet.processPackets();
query = client.read();
Ethernet.processPackets();
query = client.read();
Ethernet.processPackets();
query = client.read();
if(query == ‘a’)
{
digitalWrite(6, 1);
digitalWrite(8, 0);
light_1 = 1;
light_2 = 0;
client.println(“<html>”);
client.println(“<head>”);
client.println(“<title>My Page</title>”);
client.println(“</head>”);
client.println(“<body bgcolor=”#3fa9f5″>”);
client.println(“<div align=”center”>”);
client.println(“<form action=”http://123.238.112.227:80/a”>”);
client.println(“<input type=”submit” value=”LIGHT1″>”);
client.println(“</form>”);
if(light_1)
client.println(“LIGHT 1 is ON”);
else
client.println(“LIGHT 1 is OFF”);
client.println(“<form action=”http://123.238.112.227:80/b”>”);
client.println(“<input type=”submit” value=”LIGHT2″>”);
client.println(“</form>”);
if(light_2)
client.println(“LIGHT 2 is ON”);
else
client.println(“LIGHT 2 is OFF”);
client.println(“<form action=”http://123.238.112.227:80/c”>”);
client.println(“<input type=”submit” value=”TEMPERATURE”>”);
client.println(“</form>”);
client.println(“NO TEMPERATURE DATA”);
client.println(“</div>”);
client.println(“</body>”);
client.println(“</html>”);
}
else if(query == ‘b’)
{
digitalWrite(6, 0);
digitalWrite(8, 1);
light_1 = 0;
light_2 = 1;
client.println(“<html>”);
client.println(“<head>”);
client.println(“<title>My Page</title>”);
client.println(“</head>”);
client.println(“<body bgcolor=”#3fa9f5″>”);
client.println(“<div align=”center”>”);
client.println(“<form action=”http://123.238.112.227:80/a”>”);
client.println(“<input type=”submit” value=”LIGHT1″>”);
client.println(“</form>”);
if(light_1)
client.println(“LIGHT 1 is ON”);
else
client.println(“LIGHT 1 is OFF”);
client.println(“<form action=”http://123.238.112.227:80/b”>”);
client.println(“<input type=”submit” value=”LIGHT2″>”);
client.println(“</form>”);
if(light_2)
client.println(“LIGHT 2 is ON”);
else
client.println(“LIGHT 2 is OFF”);
client.println(“<form action=”http://123.238.112.227:80/c”>”);
client.println(“<input type=”submit” value=”TEMPERATURE”>”);
client.println(“</form>”);
client.println(“NO TEMPERATURE DATA”);
client.println(“</div>”);
client.println(“</body>”);
client.println(“</html>”);
client.println();
}
else if(query == ‘c’)
{
temperature = (5.0 * analogRead(A0) * 100.0) / 1024;
client.println(“<html>”);
client.println(“<head>”);
client.println(“<title>My Page</title>”);
client.println(“</head>”);
client.println(“<body bgcolor=”#3fa9f5″>”);
client.println(“<div align=”center”>”);
client.println(“<form action=”http://123.238.112.227:80/a”>”);
client.println(“<input type=”submit” value=”LIGHT1″>”);
client.println(“</form>”);
if(light_1)
client.println(“LIGHT 1 is ON”);
else
client.println(“LIGHT 1 is OFF”);
client.println(“<form action=”http://123.238.112.227:80/b”>”);
client.println(“<input type=”submit” value=”LIGHT2″>”);
client.println(“</form>”);
if(light_2)
client.println(“LIGHT 2 is ON”);
else
client.println(“LIGHT 2 is OFF”);
client.println(“<form action=”http://123.238.112.227:80/c”>”);
client.println(“<input type=”submit” value=”TEMPERATURE”>”);
client.println(“</form>”);
client.println(“ROOM TEMPERATURE = “);
client.print(temperature);
client.print(” Degrees”);
client.println(“</div>”);
client.println(“</body>”);
client.println(“</html>”);
client.println();
}
}
client.stop(); // send FIN packet
delay(500);
client = 0;
digitalWrite(PIN_LED1, 0);
}else;
}
********************Video******************************
Filed Under: Electronic Projects


Questions related to this article?
👉Ask and discuss on EDAboard.com and Electro-Tech-Online.com forums.
Tell Us What You Think!!
You must be logged in to post a comment.