Servo Control using Brain Wave
SUMMARY
After applying brainwaves to the RGB LEDs, now it is time to check extensions on some more real time applications and determine the efficiency as well as flexibility that can be achieved using this module. I am now planning to use it in some robotic field now.
In this article, I am planning to make use of Brain Wave for some health applications along with robotics. While studying about robotic arms, I found that they are controlled by servo motor. What if we can control the servo motor using our Brainwave? I was not sure about this as the results of Brainwave are often random and I wanted to check if we can control the angle by our thoughts. So, to check the accuracy I gave it a try.

Fig. 1: Image showing a user using brainwave to control servo motor
DESCRIPTION
To control any robotic arm, we need to control the servo motor. The mechanism of robotic arm is that there is a servo motor fix on the edge of the arm. The movement of the robotic arms totally depends on the angle of Servo motor. You can read more about Servo motor (here) to know how it works. In brief, I Servo motor is used basically where we need precise angle. So, to control the servo angle, a PWM wave is produced. The PWM wave decides the angle of servo motor by the variation in Duty Cycle, much similar like we did it in motor speed control. Here, we are controlling motor angle. The motor can turn 180 degrees depending on the duty cycle. We will use alpha wave again as that can be used to see real time results based on our thoughts. So we will transform the alpha waves values and restrict them to be between 0,255 which will turn into an angle of 0 to 180. Please find the Block Diagram attached below.

Fig. 2: Block Diagram of Arduino and Mindflex Sensor based Brainwave controlled Servo
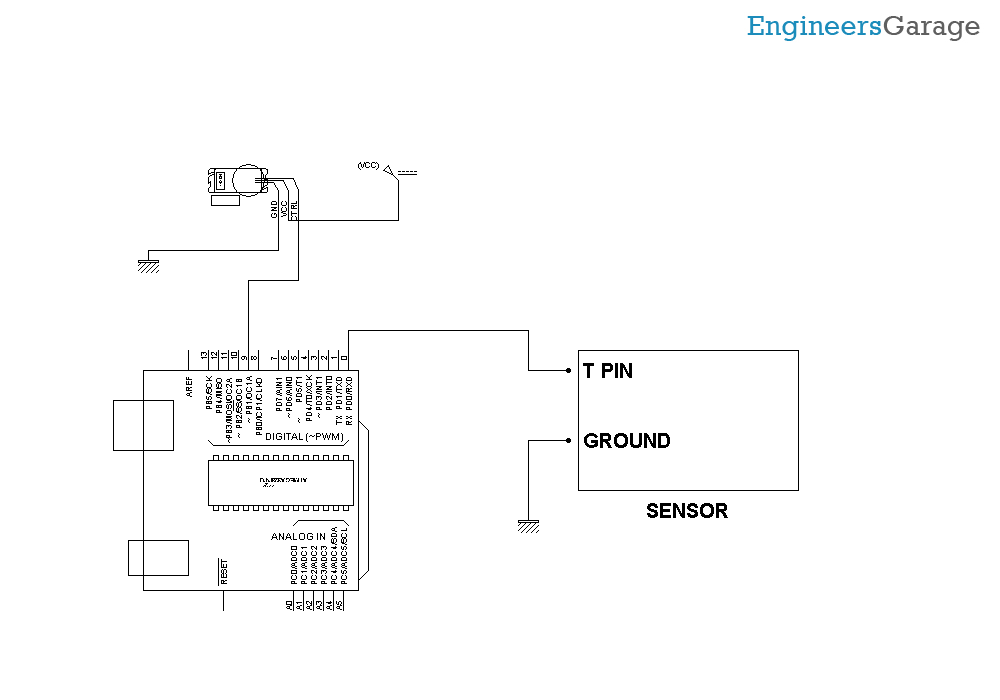
Hardware: Please find the attached circuit diagram of the connections that are to be done. We have taken a pin from T pin of the mindflex sensor and connected that pin to the Rx pin of our Arduino UNO. Also, we have shorted the ground of both the Sensor and UNO by a wire. Please take special care while soldering anything to the Mindflex sensor as pins are very close to each other. For Servo Connections, we have connected the Servo VCC and GND to the 3.3 V and GND of arduino. We have connected the 9th pin of the Arduino to the Servo for angle control.
Softwares: Let us come to the software part. We have been receiving the values from the sensor to our arduino via T pin. Once we have received the value at any particular point, we just need to convert that value level to the angle of the servo.
We are using the inbuilt servo library of the arduino here to control the servo motor.
Here is a small section of the code.
Serial.print(“alpha = “);
Serial.println(num1);
output = map(num1,0,999999,0,180);
myservo.write(output);
First we extract the alpha values from the string and store them in a variable named as num1. After that we just map the alpha values in the range of 0 to 180 by using map function of the arduino.
And then we send the values stored in “output” variable here to the servo by using myservo.write , an inbuilt function of the arduino.
Few points to Note :
The sensor usually gives the strength from 60 – 80% due to its orientation and the place where we locate it. Try to keep the metal sensor exactly above your left eye. I have also applied salt water at my forehead for better connectivity to the sensor. If you do not find it 100%, then it is normal.
The signal strength also disrupts about how we solder the wire to the T pin. Try to shield this wire and also make sure that the references probes are correctly connected. If you have any wire connected to the EEG pin of the sensor, please disconnect that wire as that will create much noise in the sensor values.
Try out this experiment and stay tuned to the brainwaves series. In the forthcoming part, we will be dealing with the experiment on hyperterminal.
You may also like:


Project Source Code
//Program to


// Arduino Brain Library - Brain Serial Test

// Description: Grabs brain data from the serial RX pin and sends CSV out over the TX pin (Half duplex.)
// More info: https://github.com/kitschpatrol/Arduino-Brain-Library
// Author: Eric Mika, 2010 revised in 2014

#include
#include

// Set up the brain parser, pass it the hardware serial object you want to listen on.
Brain brain(Serial);
Servo myservo;  // create servo object to control a servo
//char a[400];
String a,a1;
int v = 0;
int z=0,output;
uint32_t num=0;
uint32_t num1=0;
void setup() {
    // Start the hardware serial.
    Serial.begin(9600);
    myservo.attach(9);  // attaches the servo on pin 9 to the servo object
     pinMode(12, OUTPUT);
     pinMode(11, OUTPUT);
}

void loop() {
    // Expect packets about once per second.
    // The .readCSV() function returns a string (well, char*) listing the most recent brain data, in the following format:
    // "signal strength, attention, meditation, delta, theta, low alpha, high alpha, low beta, high beta, low gamma, high gamma"
    if (brain.update()) {
      //  Serial.println(brain.readErrors());
      //  Serial.println(brain.readCSV());
        //sprintf(a, "%c",brain.readCSV());
        a = brain.readCSV();
        v = a.indexOf(',');
        v = a.indexOf(',',v+1);
        v = a.indexOf(',',v+1);
        v = a.indexOf(',',v+1);
        z = a.indexOf(',',v+1);

        a1 = a.substring(v+1,z);
        num = a1.toInt();

        v = a.indexOf(',',z+1);


        a = a.substring(z+1,v);

        num1 = a.toInt();
        Serial.print("alpha = ");
        Serial.println(num1);

        output = map(num,0,999999,0,180);


       myservo.write(output);              // tell servo to go to position in variable 'pos'
       delay(15);

       // analogWrite(12,output)

        //brain.readCSV().toCharArray(a,200);
    }
}
Circuit Diagrams
Project Video
Filed Under: Brainwave, Electronic Projects, Tech Articles, Tutorials
Filed Under: Brainwave, Electronic Projects, Tech Articles, Tutorials

Questions related to this article?
👉Ask and discuss on Electro-Tech-Online.com and EDAboard.com forums.
Tell Us What You Think!!
You must be logged in to post a comment.