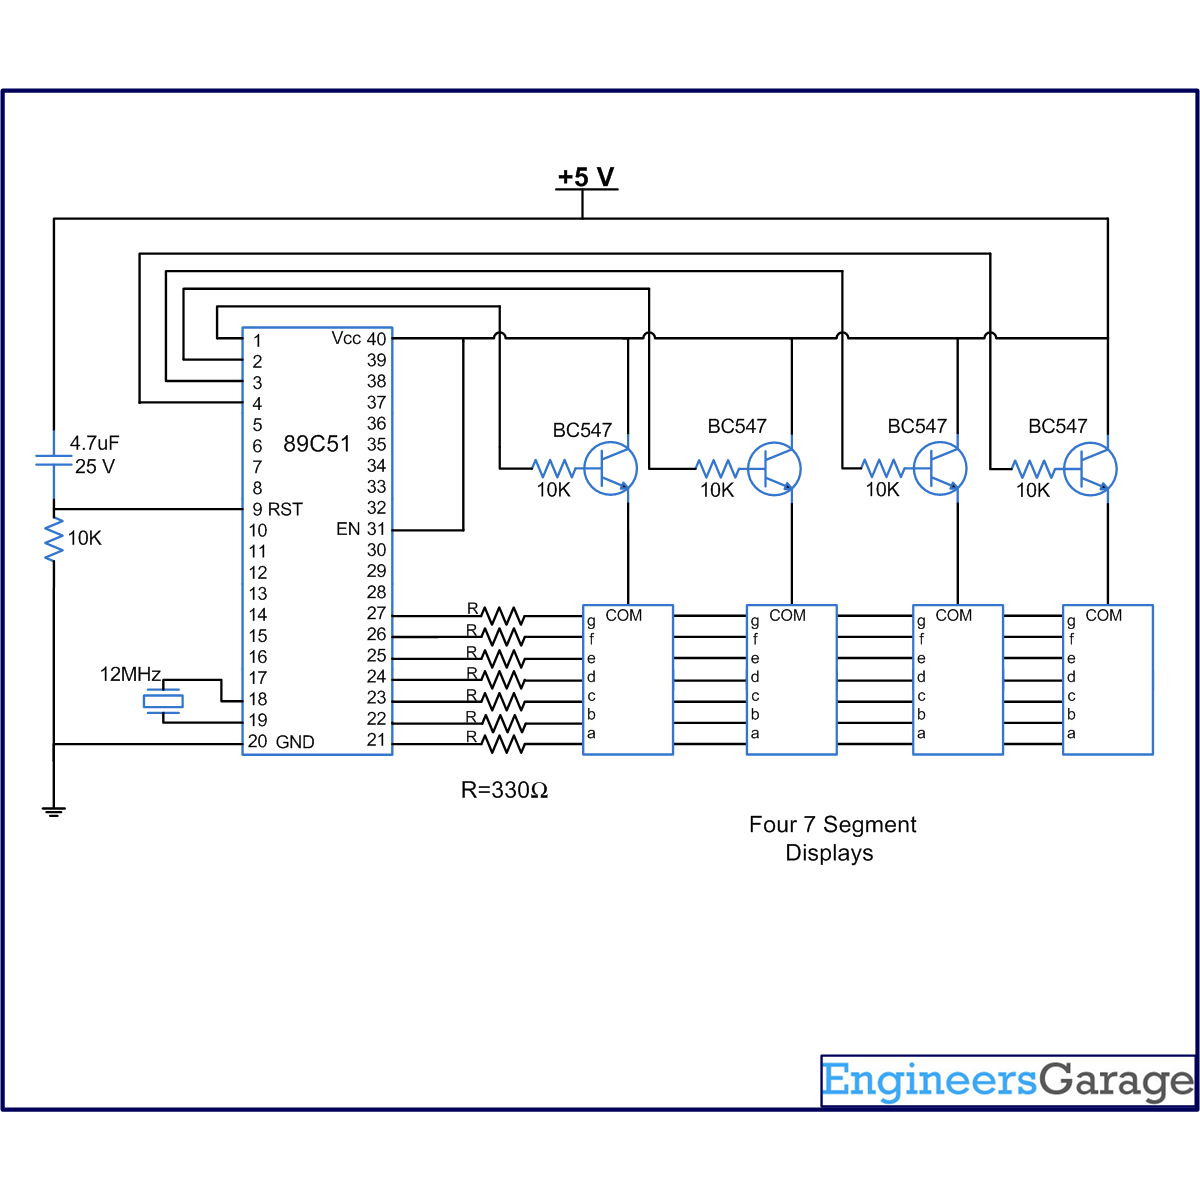
Many electronic devices use four seven segment displays to display their output. The four seven segment displays can be connected in two ways. One way is to connect the four displays to the four ports of the microcontroller. However this is not a good way, as this will block all the ports and we cannot use microcontroller for any other purpose.
To overcome this problem, we use multiplexing of seven segment display. In multiplexing we use the concept of persistence of vision i.e., human brain cannot differentiate between two events occurring at a time difference of less than .04 sec. In this case the four digits are displayed one after the other so fast that the human brain cannot detect the difference. Although only one digit is displayed at a time it appears as a four digit number.
The four seven segments are connected as shown in the circuit diagram. The ‘a’ to ‘g’ pins of all the segments are interconnected to each other and connected to the data port P2 of the microcontroller. All the ‘a’ pins are connected to the pin P2.0, ‘b’ to P2.1 and so on. The four control pins from the controller AT89C51 are connected to the four pins of the port P1 as per the diagram.
The control pins are used to enable the seven segments. Whenever a high is given to any of the control pin, the corresponding seven segment gets activated. As a result the data corresponding to the first digit is sent on the port P2, which gets displayed. To display the next digit, the next seven segment is activated and the corresponding data is loaded on port P2. Similarly the third and four digits are displayed and the process keeps repeating.
Project Source Code
###
// Program to demonstrate the principle of seven segment multiplexing. The program uses a counter which counts from 0 to 9999 //to demonstrate the above principle #include<reg51.h> sbit dig_ctrl_4=P1^0; // Control pins for the seven segments sbit dig_ctrl_3=P1^1; sbit dig_ctrl_2=P1^2; sbit dig_ctrl_1=P1^3; unsigned char dig_disp=0; int min2; int min1; int sec2; int sec1; char digi_val[10]={0x40,0xF9,0x24,0x30,0x19,0x12,0x02,0xF8,0x00,0x10}; void delay() // Function to provide time delay using Timer 1. { int i; for(i=0;i<20;i++) { TL1=0xFD; TH1=0x4B; TR1=1; while(TF1==0); TR1=0; TF1=0; } } void display() interrupt 1 // Function to display the four digit number using multiplexing on seven segment. It uses Timer 0 interrupt to display the four digits one by one after a time delay of 2.5 milli second { TL0=0x36; TH0=0xf6; P2=0xFF; dig_ctrl_1 = dig_ctrl_3 = dig_ctrl_2 = dig_ctrl_4 = 0; dig_disp++; dig_disp=dig_disp%4; switch(dig_disp) { case 0: P2=digi_val[sec1]; dig_ctrl_1 = 1; break; case 1: P2= digi_val[sec2]; dig_ctrl_2 = 1; break; case 2: P2= digi_val[min1]; dig_ctrl_3 = 1; break; case 3: P2= digi_val[min2]; dig_ctrl_4 = 1; break; } } void main() { TMOD=0x11; // Intialize Timer 0 TL0=0x 36; TH0=0xF6; IE=0x82; TR0=1; //Start timer0 while(1) // Forward counting { min2=min1=sec2=sec1=0; for(min2=0;min2<10;min2++) { for(min1=0;min1<10;min1++) { for(sec2=0;sec2<10;sec2++) { for(sec1=0;sec1<10;sec1++) { delay(); } } } } } }###
Circuit Diagrams
Project Components
Project Video
Filed Under: 8051 Microcontroller.
Filed Under: 8051 Microcontroller.


Questions related to this article?
👉Ask and discuss on Electro-Tech-Online.com and EDAboard.com forums.
Tell Us What You Think!!
You must be logged in to post a comment.