Engineers Garage

  • Electronics Projects and Tutorials
    • Electronic Projects
      • Arduino Projects
      • AVR
      • Raspberry pi
      • ESP8266
      • BeagleBone
      • 8051 Microcontroller
      • ARM
      • PIC Microcontroller
      • STM32
    • Tutorials
      • Audio Electronics
      • Battery Management
      • Brainwave
      • Electric Vehicles
      • EMI/EMC/RFI
      • Hardware Filters
      • IoT tutorials
      • Power Tutorials
      • Python
      • Sensors
      • USB
      • VHDL
    • Circuit Design
    • Project Videos
    • Components
  • Articles
    • Tech Articles
    • Insight
    • Invention Stories
    • How to
    • What Is
  • News
    • Electronic Product News
    • Business News
    • Company/Start-up News
    • DIY Reviews
    • Guest Post
  • Forums
    • EDABoard.com
    • Electro-Tech-Online
    • EG Forum Archive
  • DigiKey Store
    • Cables, Wires
    • Connectors, Interconnect
    • Discrete
    • Electromechanical
    • Embedded Computers
    • Enclosures, Hardware, Office
    • Integrated Circuits (ICs)
    • Isolators
    • LED/Optoelectronics
    • Passive
    • Power, Circuit Protection
    • Programmers
    • RF, Wireless
    • Semiconductors
    • Sensors, Transducers
    • Test Products
    • Tools
  • Learn
    • eBooks/Tech Tips
    • Design Guides
    • Learning Center
    • Tech Toolboxes
    • Webinars & Digital Events
  • Resources
    • Digital Issues
    • EE Training Days
    • LEAP Awards
    • Podcasts
    • Webinars / Digital Events
    • White Papers
    • Engineering Diversity & Inclusion
    • DesignFast
  • Guest Post Guidelines
  • Advertise
  • Subscribe

Single phase AC Motor speed controller

By Ashutosh Bhatt December 22, 2012

Here is a very simple example of AC motor speed control given by changing firing angle of TRIAC with the help of micro controller 89C2051. Varying speed of AC motor by means of changing firing angle of any thyristor is very widely used method. One very nice example is fan regulator in which a fan motor is 1 AC motor used and its speed is varied using DIAC-TRIAC method. Here instead of using DIAC and other components for firing TRIAC here I am using micro controller 89C51 for this purpose.

A zero crossing detector circuit is used here to interrupt 89C2051 after every 10 ms. After getting an interrupt 89C51 will fire TRIAC after some delay from 1 to 9 ms. This will cut the current supplied to motor and so the speed of motor will reduce. Thus by varying the delay after which the TRIAC is triggered one can change the speed of motor.

Main circuit is a combination of two sub circuits.

  1. Zero crossing detector circuit
  2. Firing angle control circuit


Zero crossing detector circuit: –


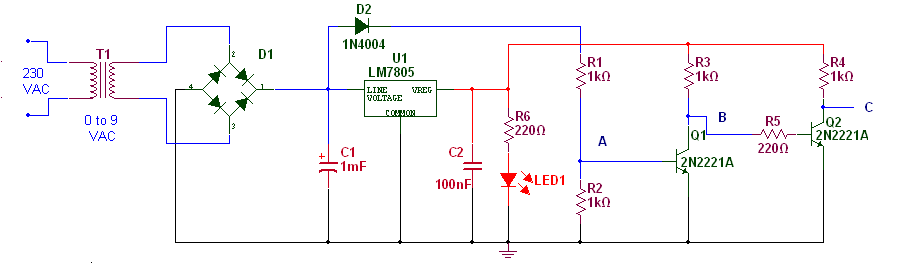
Connections: – as shown in Circuit Diagram Tab1 transformer T1 step downs 230 VAC in to 9 VAC and this is given to bridge rectifier D1. This rectified output is directly fed to base of Q1 through resistors R1 & R2. Same rectified output is filtered through C1 and given to voltage regulator IC 7805. Output of 7805 is regulated 5 VDC that is given as biasing voltage for both transistors Q1 & Q2 (same regulated 5 V supply is given to main control section also). Both transistors are connected in switch configuration. The final output ‘C’ is given to main control section.


Firing angle control circuit: –


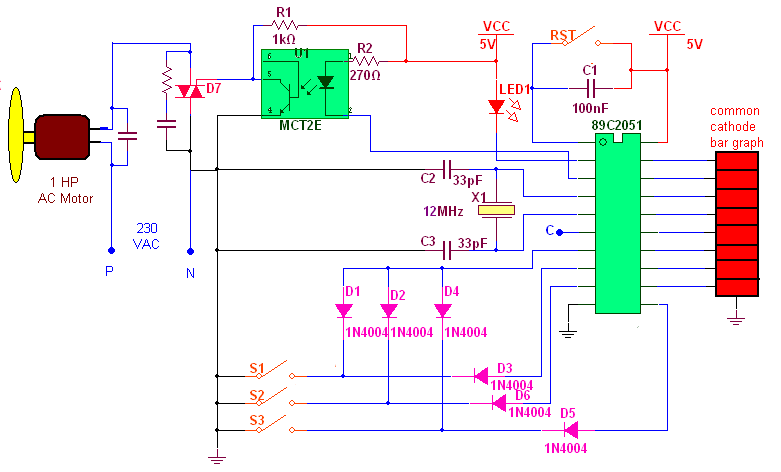
Connections: – as shown in Circuit Diagram tab2 micro controller 89C2051 along with opto coupler MCT2E (for triggering TRIAC) and common cathode type bar graph display (for indicating angle) are used for changing firing angle of TRIAC. Signal ‘C’ from zero crossing detector circuit is directly given to pin no. 6 that is external interrupt 0 (P3.2) pin. All port P1 pins are connected with anodes of bar graph display and common cathode of bar graph is grounded. One led LED1 is connected with P3.0 as shown. Pin P3.1 is connected with input of opto-coupler MCT2E. Output of MCT2E is connected with gate of TRIAC. TRIAC is connected in loop with AC motor and 230 VAC supply as shown. RC snubber circuit is connected is connected in parallel with TRIAC. Three push buttons S1 – S3 are connected with P3.4, P3.5 & P3.7 respectively through diodes. Pin P3.3 (external interrupt 1) is connected with all three push buttons through diodes D1, D2 & D4 as shown. A 12 MHz crystal along with 2 33pf capacitor is connected with crystal input pins. Capacitor C1 with push buttons RST forms power on reset circuit.

 Operation

Operation: – to understand operation let us take a help of waveforms.

  • Phase Angle
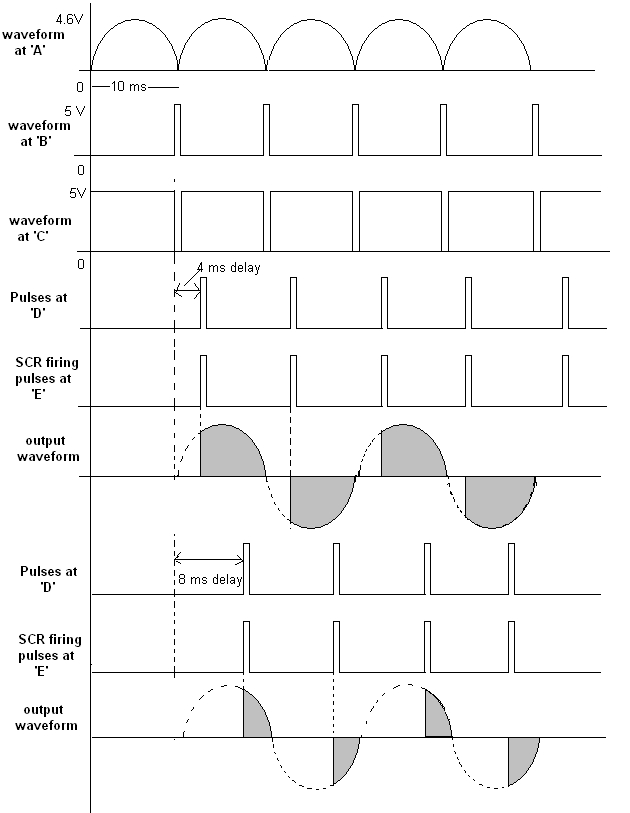
  • As shown in figure the first wave form is full rectified wave that is fed to the base of Q1. Whenever this voltage falls below 0.7 V Q1 is switched off. So its output goes high.
  • This will produce one very short positive pulse at ‘B’ as shown in figure as second waveform
  • As this positive pulses are fed to Q2 which is again connected in switch configuration, it will produce one negative pulse at ‘C’ of same width of positive pulse. This is shown as third waveform
    • Now as this negative pulse output is given to interrupt pin of micro controller. It will generate interrupt every time.
    • After getting an interrupt micro controller will generate a positive pulse on P3.1 after some delay. This will turn off internal LED and due to that a positive pulse is produced at output. This is used to trigger (fire) TRIAC
    • Depending upon the time delay in between interrupt and pulse on P3.1, the TRIAC is fired earlier or later.
    • As shown In figure I have given wave forms for two different cases one for 4 ms delay and second for 8 ms delay
    • In the first case for 4 ms delay the output positive cycle of AC wave is 60% of  input so only 60% current is delivered to load (the dotted line shows part of wave form that has been cut)
    • For second case 8 ms delay output cycle is 20% of input cycle so only 20% current is supplied to load

This change in delay is done through push buttons given. So let us see the functions of push button

 Switch

 Functions

 S1

 to switch on / off TRIAC

 S2

 to increase delay by 1 ms

 S3

 to decrease delay by 1 ms


Led LED1 is used to indicate the TRIAC is on. Variation in angle is displayed on bar graph display. If angle is more, less current supplied to motor and motor speed is reduced less bars appears on display. If angle is decreased, current supplied will be more, speed of motor is increased and more bar appears on display. 

The diodes D2 – D7 are connected in such a manner that whenever any of three push buttons, is pressed it will generate external interrupt 1.

When S1 is pressed first time it will enable external interrupt 0. So after every 10 ms external interrupt 0 is generated and that will start the entire operation. Pressing S1 again will disable external interrupt 0. Now no more interrupt is generated and complete operation is shut off.

On pressing S2 will increase delay by 1 ms (firing angle by 18o deg). So firing of TRIAC is delayed by 1 ms and amount of current supplied to load is decreased by 10%. Maximum delay is 9 ms (max angle is 162o deg). Bar is increased by 1 step.

In same manner when S3 is pressed delay is decreased by 1ms (firing angle by 18o deg) and load current increases by 10%. Minimum delay is 0 means full positive cycle is applied. Bar is decreased by 1 step.

The bar graph displays the variation in phase angle. More bars means angle is big and motor speed is low and vice versa.

Software logic: –

The complete operation is based on the software embedded in micro controller 89C2051. The software is written in C language. Different functions are used for different operations like ext1, ext0, delay and keydly etc. Here is the code with necessary comments which it elf explains all above functions.


Project Source Code


Project Source Code

###


#include<reg51.h>


#include <string.h>


sbit led1 = P3^0;


sbit s1 = P3^4;


sbit s2 = P3^5;


sbit s3 = P3^7;


unsigned int d1=0;


unsigned int d2=0;


unsigned int c=0;


bdata unsigned char byte;


sbit b0 = byte^0;


sbit b1 = byte^1;


sbit b2 = byte^2;


sbit b3 = byte^3;


sbit b4 = byte^4;


sbit b5 = byte^5;


sbit b6 = byte^6;


sbit b7 = byte^7;


void dely(void);


void incangle(void);


void decangle(void);


void delay(int d);


void shiftup()                                // raise the bar graph by one step


  {


         b7=b6;                              // shitf the bits one by one to up


         b6=b5;


         b5=b4;


         b4=b3;


         b3=b2;


         b2=b1;


         b1=b0;


         b0=1;                             // insert 1 to first bit


  }


void shiftdown()                       // decrease bar graph by one step


  {


         b0=b1;                           // shift all the bits down one by one


         b1=b2;


         b2=b3;


         b3=b4;


         b4=b5;


         b5=b6;


         b6=b7;


         b7=0;                          // insert 0 to last bit


  }


void keydly(void)                                              //key debounce delay


  {


                     unsigned int x,y;


                     for(x=0;x<100;x++)


                         for(y=0;y<1000;y++);


  }               


void decangle()                                     //decrease delay by 1ms


  {


                     EX1=0;                                       //first disable all interrupts


                     if(d1>0)                                     


                       {


                             d1--;                                        // decrease delay


                             shiftdown();


                             P1=byte;


                        }                                                                      


                    EX1=1;                                      // enable interrupts before leaving


  }


void incangle()                          // increase delay by 1 ms


  {


                     EX1=0;                           // all other things remains same as above


                     if(d1<9)


                       {


                             d1++;


                             shiftup()


                             P1=byte;


                        }


                    EX1=1;


  }


void delay(int d)                                    // generates delay from 1 to 9 ms


 {


                     int k;


                     TL0 = 0x17;                    // load timer 0 with 64535 = FC17h


                     TH0 = 0xFC;                   // so it will overflow after 1000 counts


                     TR0 = 1;                          // start timer


                     for(k=0;k<d;k++)            // count overflows of timer 0 till


                       {                                    // desire delay is required


                        while(TF0==0);


                        TF0 = 0;


                        TL0 = 0x17;


                        TH0 = 0xFC;


                       }


                     TR0 = 0;


}


void int0(void) interrupt 2                                  // external interrupt 1 subroutine


  {


                 keydly();                       // after key debounce delay


                 if(s1==0)                     // for first key


                  {


                                                                       c++;                             // increase counter


                                    if((c%2)==1)                // check even or odd


                                      {


                                               EX0 = 1;                                  // enable external interrupt 1 if odd


                                      }


                                    else


                                      {


                                                EX0 = 0;                                  // disable external interrupt 1


                                      }


                           }       


                       else if(s2==0)                               // for second key


                           {                            


                                    incangle();                     // increase phase angle


                            }      


                       else if(s3==0)                               // for third key


                           {


                                decangle();                   // decrease phase angle


                            }


      }


 void int1(void) interrupt 0                                 // external interrupt 1 subroutine


   {


                        int t;


                        led1=0;                                    // led1 is on


                        delay(d1);                                 // after desired delay


                        pulse=1;                                   // send pulse on p2.0


                        for(t=0;t<200;t++);


                        pulse=0;


                        led1 = 1;                                  // led1 off


   }


void main()


  {


                     TMOD = 0x01;                           // initialize timer0 as 16 bit timer


                     P1=0x00;                                    // P1 as output ports


                     P3=0xFF;                                    // P3 as input port                   


                     IE=0x84;                                     // enable external interrupt 1


         while(1);                                      // continuous loop                   


  }


###


Circuit Diagrams

zero-cross-det-1
triac-angle-ckt-2


Filed Under: Electronic Projects
Tagged With: ac motor, motor, single phase
 

Next Article

← Previous Article
Next Article →

Questions related to this article?
👉Ask and discuss on EDAboard.com and Electro-Tech-Online.com forums.


Tell Us What You Think!! Cancel reply

You must be logged in to post a comment.

EE TECH TOOLBOX

“ee
Tech Toolbox: Internet of Things
Explore practical strategies for minimizing attack surfaces, managing memory efficiently, and securing firmware. Download now to ensure your IoT implementations remain secure, efficient, and future-ready.

EE Learning Center

EE Learning Center
“engineers
EXPAND YOUR KNOWLEDGE AND STAY CONNECTED
Get the latest info on technologies, tools and strategies for EE professionals.

HAVE A QUESTION?

Have a technical question about an article or other engineering questions? Check out our engineering forums EDABoard.com and Electro-Tech-Online.com where you can get those questions asked and answered by your peers!


RSS EDABOARD.com Discussions

  • RFsoc4x2 fpga diagram request
  • BOM sent to Contract assemblers doesnt correspond to schem
  • Half-bridge LLC resonant converter using UCC25600
  • Lightbox circuit help
  • Transistor circuit in audio

RSS Electro-Tech-Online.com Discussions

  • Kawai KDP 80 Electronic Piano Dead
  • An Update On Tarrifs
  • Trying to use a L9110s motor driver chip
  • I want to make a CRT with some modifications But i have no Idea where to start
  • Funny Images Thread!

Featured – Designing of Audio Amplifiers part 9 series

  • Basics of Audio Amplifier – 1/9
  • Designing 250 Milli Watt Audio Power Amplifier – 2/9
  • Designing 1 Watt Audio Power Amplifier – 3/9
  • Designing a Bass Boost Amplifier – 4/9
  • Designing a 6 Watt Car Audio Amplifier – 5/9
  • Design a low power amplifier for headphones- 6/9

Recent Articles

  • Fischer connector system adds ratchet locking system designed for 300g shock resistance
  • Littelfuse introduces tactile switch with enhanced bracket peg design for mounting strength
  • Infineon releases GaN switch with monolithic bidirectional design
  • Sienna Semiconductor data converters feature sample rates from 20 to 250 Msps
  • Delta’s 5,500 W power supplies achieve 97.5% energy efficiency for AI servers

EE ENGINEERING TRAINING DAYS

engineering

Submit a Guest Post

submit a guest post
Engineers Garage
  • Analog IC TIps
  • Connector Tips
  • Battery Power Tips
  • DesignFast
  • EDABoard Forums
  • EE World Online
  • Electro-Tech-Online Forums
  • EV Engineering
  • Microcontroller Tips
  • Power Electronic Tips
  • Sensor Tips
  • Test and Measurement Tips
  • 5G Technology World
  • Subscribe to our newsletter
  • About Us
  • Contact Us
  • Advertise

Copyright © 2025 WTWH Media LLC. All Rights Reserved. The material on this site may not be reproduced, distributed, transmitted, cached or otherwise used, except with the prior written permission of WTWH Media
Privacy Policy

Search Engineers Garage

  • Electronics Projects and Tutorials
    • Electronic Projects
      • Arduino Projects
      • AVR
      • Raspberry pi
      • ESP8266
      • BeagleBone
      • 8051 Microcontroller
      • ARM
      • PIC Microcontroller
      • STM32
    • Tutorials
      • Audio Electronics
      • Battery Management
      • Brainwave
      • Electric Vehicles
      • EMI/EMC/RFI
      • Hardware Filters
      • IoT tutorials
      • Power Tutorials
      • Python
      • Sensors
      • USB
      • VHDL
    • Circuit Design
    • Project Videos
    • Components
  • Articles
    • Tech Articles
    • Insight
    • Invention Stories
    • How to
    • What Is
  • News
    • Electronic Product News
    • Business News
    • Company/Start-up News
    • DIY Reviews
    • Guest Post
  • Forums
    • EDABoard.com
    • Electro-Tech-Online
    • EG Forum Archive
  • DigiKey Store
    • Cables, Wires
    • Connectors, Interconnect
    • Discrete
    • Electromechanical
    • Embedded Computers
    • Enclosures, Hardware, Office
    • Integrated Circuits (ICs)
    • Isolators
    • LED/Optoelectronics
    • Passive
    • Power, Circuit Protection
    • Programmers
    • RF, Wireless
    • Semiconductors
    • Sensors, Transducers
    • Test Products
    • Tools
  • Learn
    • eBooks/Tech Tips
    • Design Guides
    • Learning Center
    • Tech Toolboxes
    • Webinars & Digital Events
  • Resources
    • Digital Issues
    • EE Training Days
    • LEAP Awards
    • Podcasts
    • Webinars / Digital Events
    • White Papers
    • Engineering Diversity & Inclusion
    • DesignFast
  • Guest Post Guidelines
  • Advertise
  • Subscribe