Engineers Garage

  • Projects and Tutorials
    • Circuit Design
    • Electronic Projects
      • 8051
      • Arduino
      • ARM
      • AVR
      • PIC
      • Raspberry pi
      • STM32
    • Tutorials
    • Components
  • Articles
    • EG Blogs
    • Insight
    • Invention Stories
    • How to
    • What Is
    • News
      • EE Design News
      • DIY Reviews
      • Guest Post
      • Sponsored Content
  • Forums
    • EDABoard.com
    • Electro-Tech-Online
    • EG Forum Archive
  • Digi-Key Store
    • Cables, Wires
    • Connectors, Interconnect
    • Discrete
    • Electromechanical
    • Embedded Computers
    • Enclosures, Hardware, Office
    • Integrated Circuits (ICs)
    • Isolators
    • LED/Optoelectronics
    • Passive
    • Power, Circuit Protection
    • Programmers
    • RF, Wireless
    • Semiconductors
    • Sensors, Transducers
    • Test Products
    • Tools
  • EE Resources
    • DesignFast
    • LEAP Awards
    • Oscilloscope Product Finder
    • Video
    • White Papers
    • Webinars
  • EE Learning Center
  • Women in Engineering

Blink Led with Stm32f103c8 microcontroller keil and Stmcubemx

October 27, 2020 By EG Projects

After working a lot with 8-bit microcontrollers and learning all the protocols and functions they offer, now i thought to switch to 32-bit microcontrollers. I decided to go with arm 32-bit processors, because of their popularity in the market. I choose arm cortex-m3 processor series for my new hobby/learning projects. The reason behind choosing the arm cortex-m3 series is cortex-m3 processors are especially made for connected embedded applications, and the microcontrollers built with this series are used in many mid level of embedded projects/applications/products.  After so much googling i finally took decision to move forward with stm32 microcontrollers. Stm32 is a family of 32-bit microcontrollers offered by STMicroelectronics. Stm32 microcontrollers are built around Cortex-M7, Cortex-M4F, Cortex-M3, Cortex-M0+, and Cortex-M0 processors.

After decided to go with stm32, i started to took initial tutorials on how to get started with stm32. I found much information on getting started but non of it is well organized. So i decided to make series of tutorials on getting started with stm32 microcontrollers. In this whole series i will discuss all the protocols/functions stm32 microcontrolles offered. I will present a working example of easy protocol/interface/function with source code and circuit diagram.
​

Their are many IDE’s(Integrated development environments) that supports stm32 series and you can use any one of them to program your stm32 microcontroller. Some Ide’s are Coocox, keil, mBed, Attolic, microC for Arm. I decide to go with keil and stm32CubeMx. Keil gives you in depth knowledge of the microcontroller and its interface. If you don’t want to go in depths and want a piece of cake then go with MikroElectronica microC for Arm. Its very easy to work with microC ide, it has plenty of example and libraries you only need to call the functions and its all done. Stm32CubeMx is a microcontroller peripheral configurater. By using stm32cube you don’t need to write configuration code for your stm32 microcontroller. Its a visual platform where you can make the microcontroller pins input, output, enable pull-ups and pull-down can define the operating frequency of microcontroller visually and lot more. After the visual configuration you can generate code for the configuration you made. I prefer to work with stmCube because it is provided by officially STMicroelectronics and its good to work with the stuff provided by the owner.  

Note: Stm32CubeMx is not an Ide its a configuration manager. You make your stm32 microcontroller configuration in it and then generate code for the configuration you done to be used with any other ide. You can directly generate the keil ide project with stmCubeMx by slecting the option from stmCubeMx to translate the configuration in to keil ide project.

Installing StmCubeMx and Keil MDK ARM

Installing Keil Ide is pretty straight forward. Download the MDK ARM kit it contains the keil Ide in it you don’t need the ide to install it separately. Just download the file from the link and install the ide. ​http://www2.keil.com/mdk5 . Arm mdk is available in many editions latest is mdk5. I am using mdk5 for my projects and this tutorial is also based on mdk5 and keil uvision-5 ide.
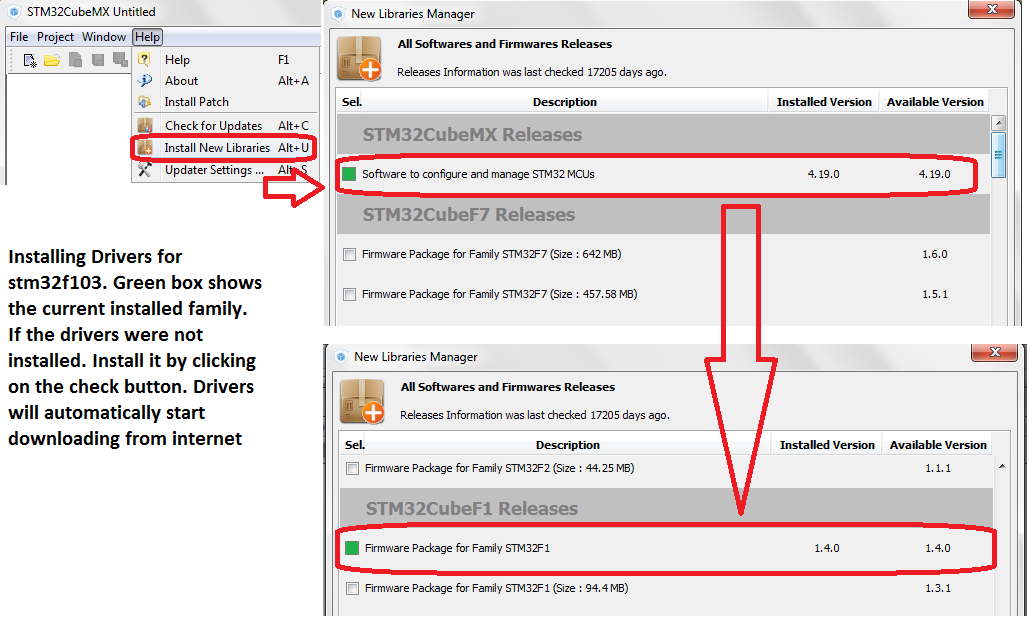
Installing the StmCubeMx is also straight froward. Download the StmCube from the link 
http://www.st.com/en/development-tools/stm32cubemx.html. You might be popped up to sign in. Sign in and you are their. Once StmCubeMx is installed you now have to install the packages for each stm32 series or for series that you want to work with. StmCubeMx and the stm32 series packages are two different things. Package for each stm32 series must be installed separately. Their is also an option in StmCubeMx software that installs the series packages. Its under the Help> Install New Libraries. Since we are getting started with stm32f103 so wee need to install the package for stm32f1 series. The diagram below explains well about the packages installation.

Installing stm32f103 drivers/packages for StmCubeMx

Installing stm32f1 drivers/packages for StmCubeMx
I bought a cheap stm32f103c8x module from aliexpress. Its cost me about $4.5 with free shipping to Pakistan. Shipping took almost about 1.5 months 45 days. The board is cool and offer almost all the features necessary for getting started with stm32 microcontrollers. Pin out of the board is given below.  

Stm32f103 cheap development board pin out and features offered

Stm32f103 cheap development board pin out and features offered

Blink led with stm32f103 keil and stmcubemx

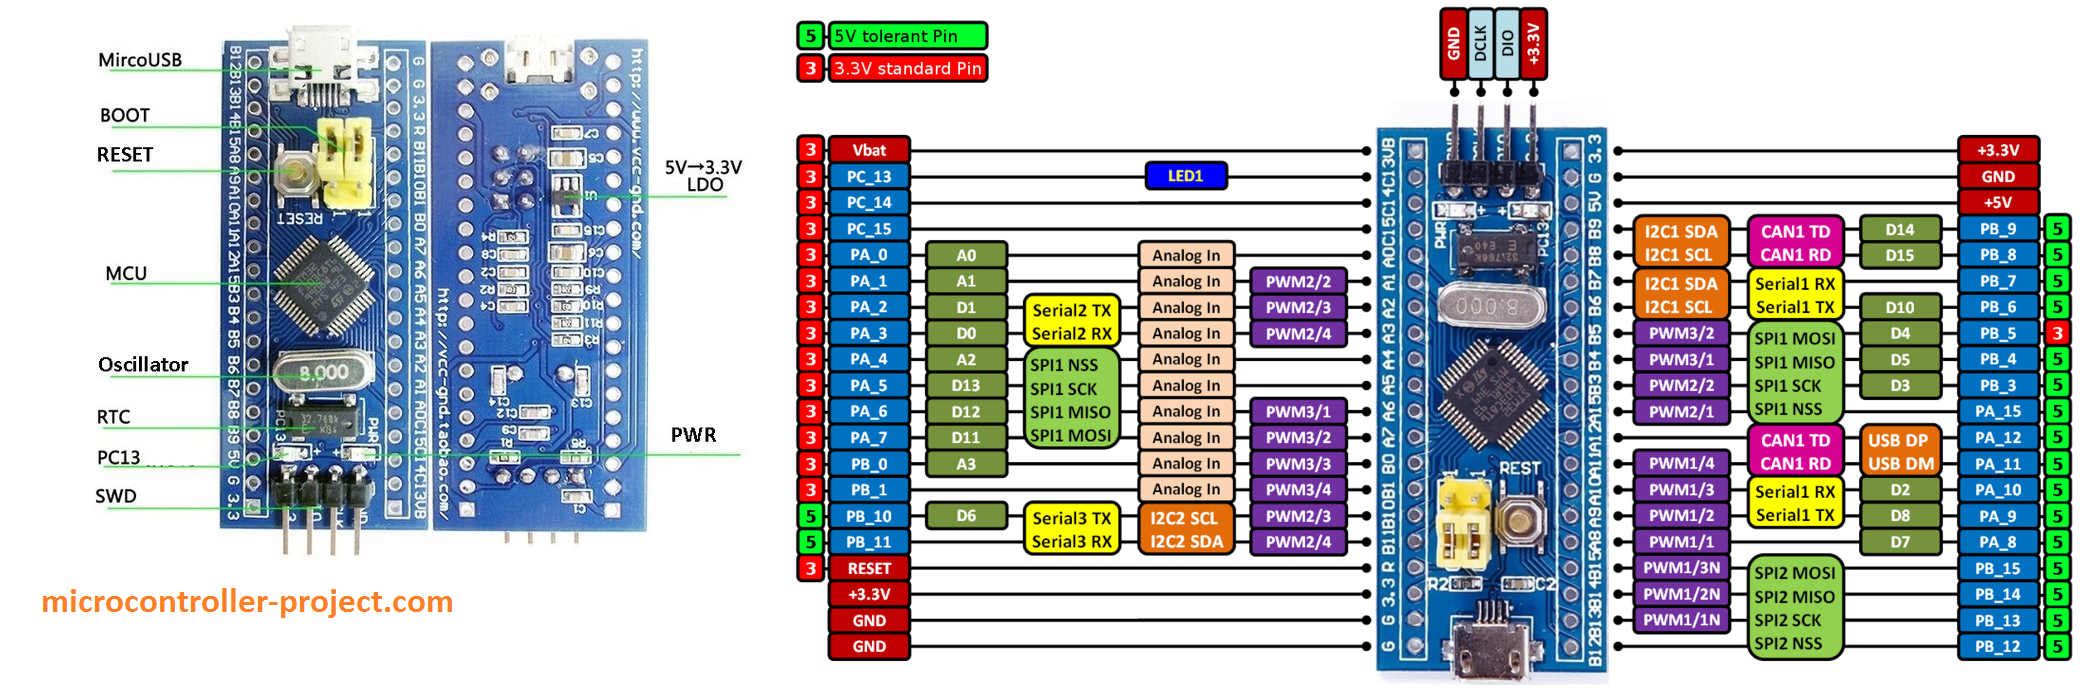
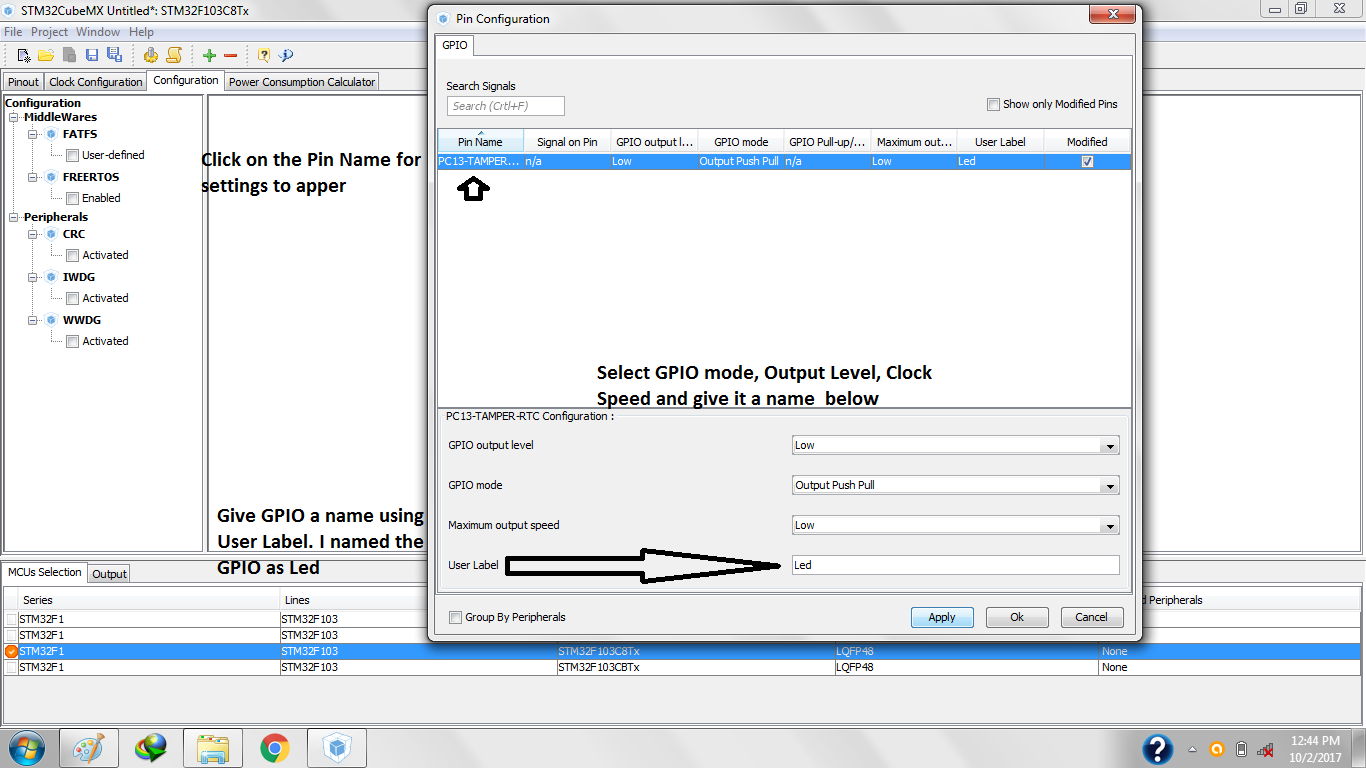
The upper module has an led connected to port-c pin#13. In getting started we are going to blink it. Stm32 microcontroller pins offers multiple features on a single pin. Selecting one and disabling others should be handled carefully. Stm32 microcontrollers I/O pins can be used in five modes

  • Input mode
  • Analog mode
  • Output mode
  • Alternate function mode
  • External interrupt/event lines

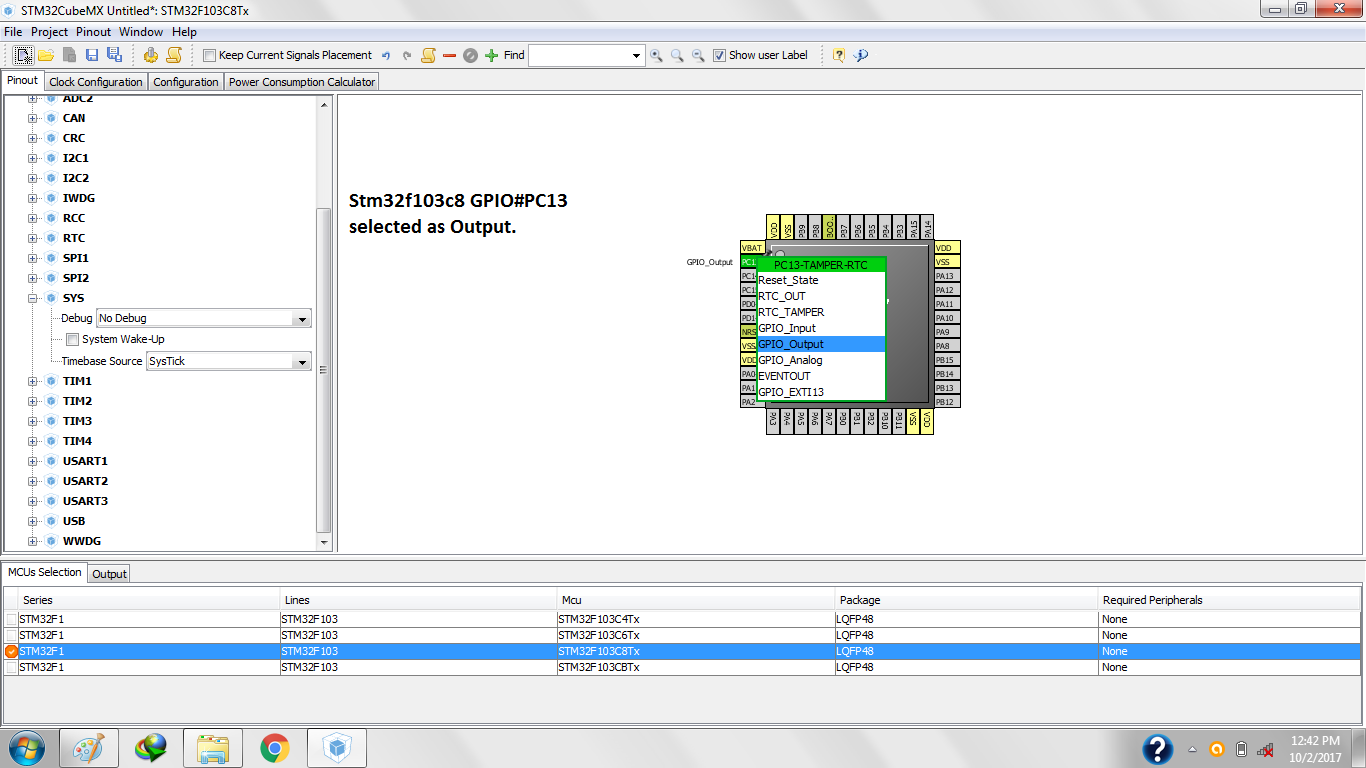
For our purpose we are going to use port-c pin#13 as output. Almost all the stm32 pins have internal pull up and pull down resistors. Since we are not using the gpio in input mode, so we are not using pull up and down resistors. Stm32 pins can work at different frequencies, we are going to operate the pin at low frequency. Stm32 pins can also be initialized as low or high after booting. I made pin#13 low.

Note: I am going to use the internal 8Mhz RC oscillator of the microcontroller. The upper board has an external 8Mhz crystal but i am not going to use it. In later tutorials we will use it.

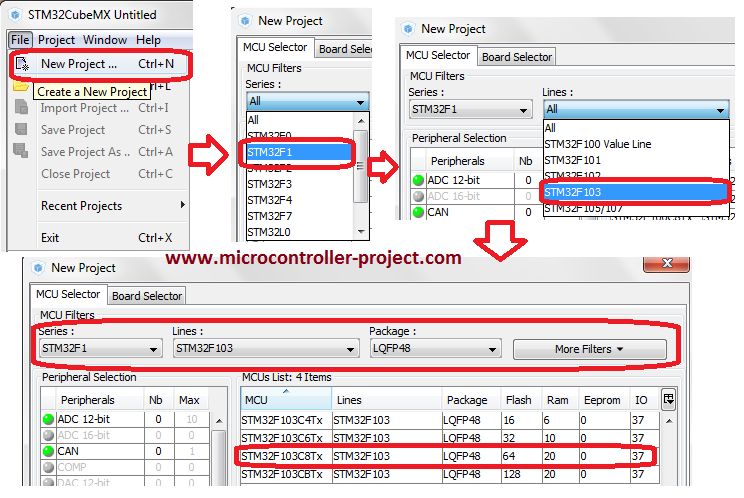
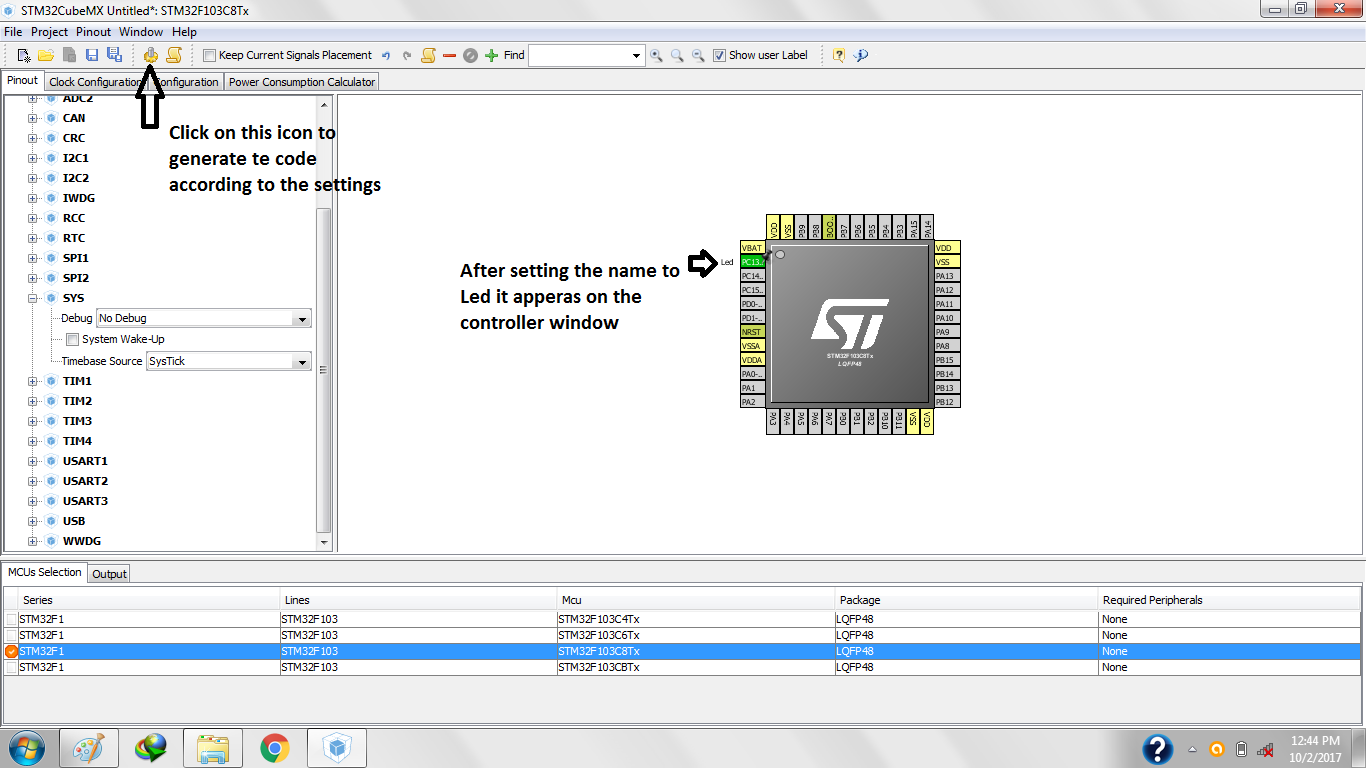
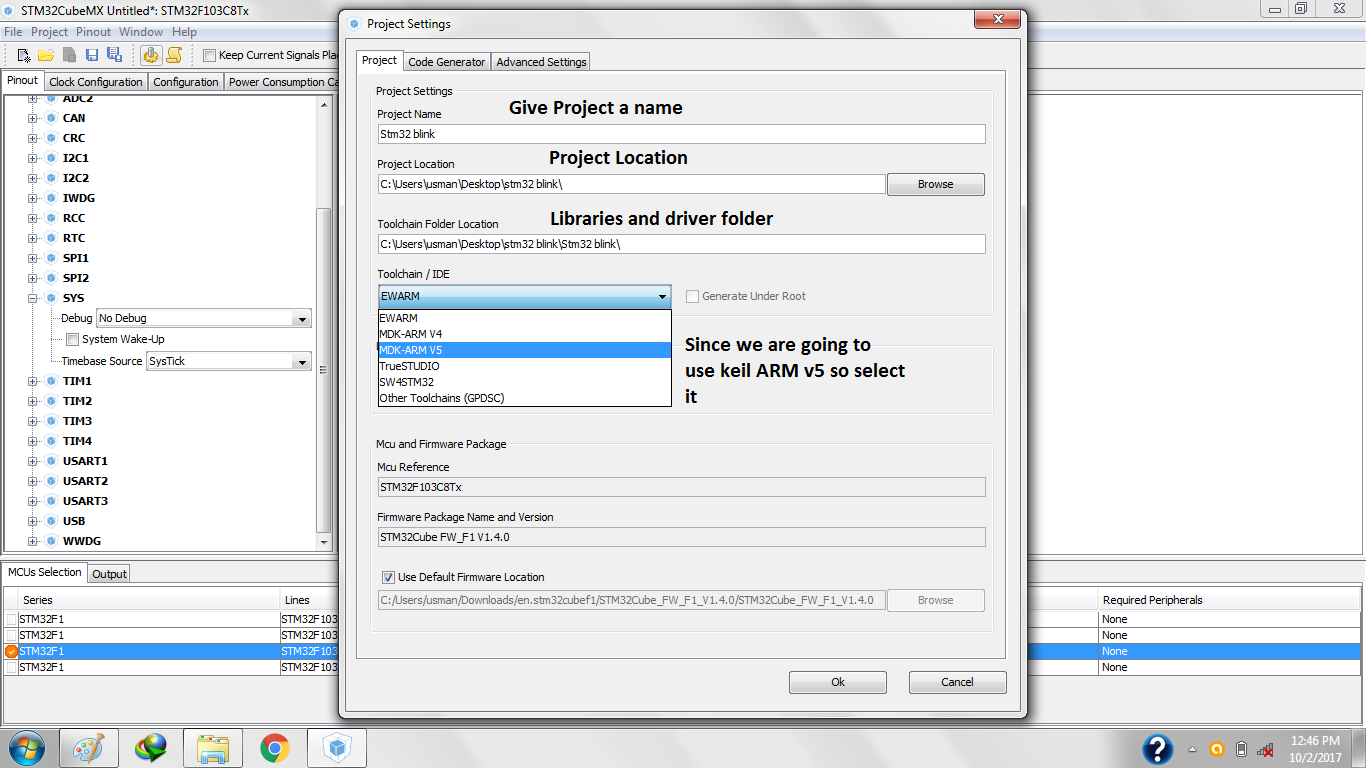
Creating new project in StmCubeMx

Creating new project is straight forward. Go to File> New Project. A window will appear select your microcontroller series, series lines and package. After selecting the package click on the microcontroller that you are using for your project. In our case its STM32f103C8Tx. 

StmCubeMx creating new Project

StmCubeMx creating new Project
After Selecting the microcontroller stm32f103c8 a window will appear containing the mcu diagram. Click on the pin#13 and set the gpio as output. 

StmCubeMx Selecting the microcontroller stm32f103c8 gpio asoutput

StmCubeMx Selecting the microcontroller stm32f103c8 gpio asoutput
For configuring the gpio click the configuration tab and then GPIO button. 

Configuring Gpio of stm32f103 in stmcubemx

Configuring Gpio of stm32f103 in stmcubemx
Click on the pin names for its settings to appear. In setting window set the gpio mode, output level, clock speed and give gpio a name. Press apply to apply to apply the changes.

Stmcube Gpio Configuration

Stmcube Gpio Configuration
The name we gave to pin now appears on the pin. We can use the gpio in code with this name. Now its time to generate the code. Click on the gear icon for generating code.

stmcubemx gpio name changed and generating code

stmcubemx gpio name changed and generating code
A window appears after clicking on the gear icon.Name the project and selecte the location for the project files. Since we are using MDK-ARM V5 so in ToolChain/IDE select mdk-arm. Click OK to generate the code.

stmcube project location and keil code geration

stmcube project location and keil code geration
Click OK after all the settings and code will be generated at the location specified by you. Four folders will appear at the location. MDK-ARM contains the keil ide code. stmcubemx project files are also present at the location .ico extension file is of stmcubemx. Open the MDK-ARM folder it contains some file. The file with extension .uvprojx is keil ide file. Now you can open the file to make some more changes in the code.

stmcube and keil ide files

stmcube and keil ide files
StmCubeMx translate code which contains the HAL libraries functions with it. HAL are libraries that are released by stm to work with its microcontrollers. HAL libraries functions and their definition datasheet is available at http://www.st.com/en/development-tools/stm32cubemx.html The User manual given 19MB file is actually the HAL libraries function definition explanation document. The code that is generated by the stmcubemx has statements listed below. I write the meaning of each statement with it.       
 For blinking the led add the lines to the empty while function. Recall that stmcube only generates the configuration code. We have to write our logic by our self. So in while(1) function add the toggle function.
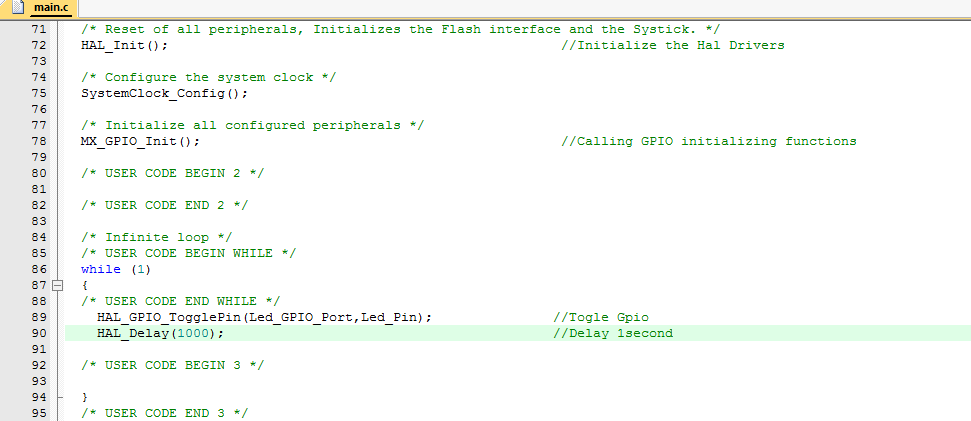
​HAL_GPIO_TogglePin(Led_GPIO_Port,Led_Pin);               
HAL_Delay(1000);   

Stm32 blink led code

Stm32 blink led code

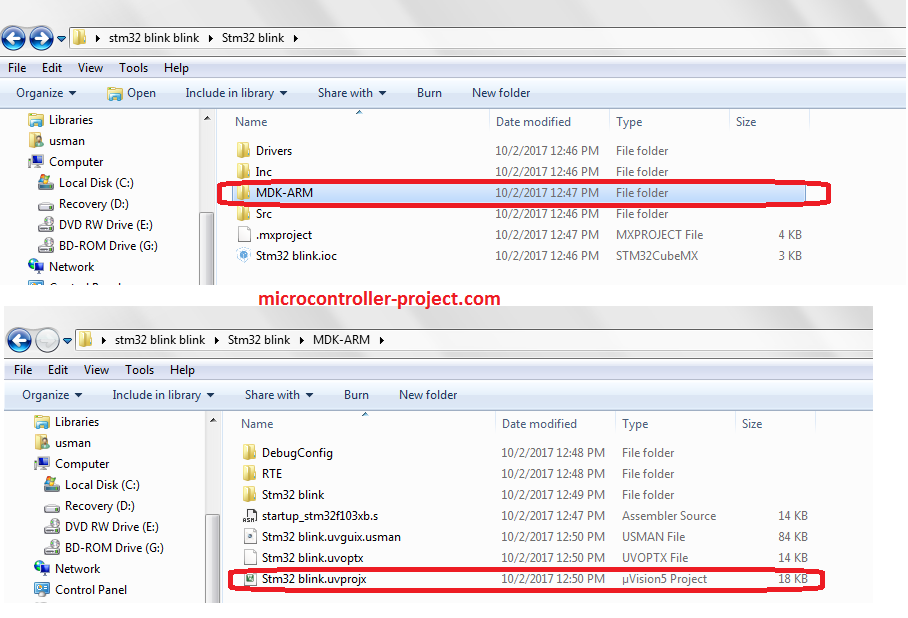
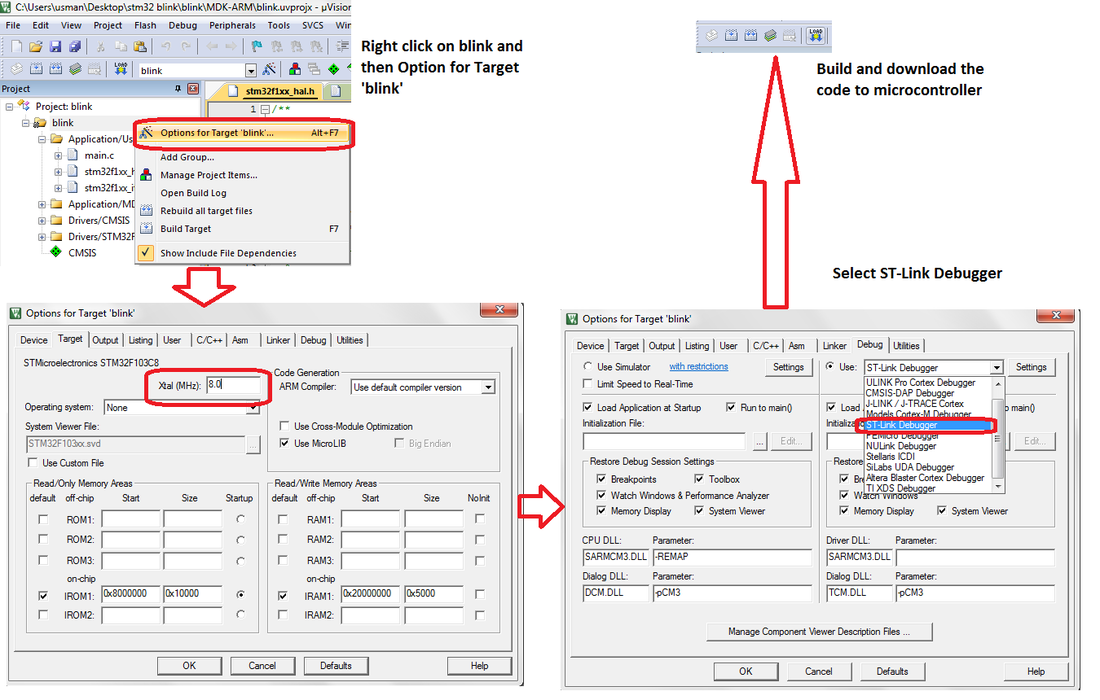
Upolad code to stm32 microcontroller

 Since the development board has no on build programmer so i used an external St Link Programmer to upload the code on the board. For uploading the code you have to make some settings in keil. Follow the below steps to upload the code.

Keil upload code to stm32 development board using stlink debugger

Keil upload code to stm32 development board using stlink debugger
Note: After uploading the code press the reset button on the board. The code will not work unless you reset the board by pressing the reset button.
Project Files/Code Folder

Related Articles Read More >

Wireless distance measurement using ultrasonic sensor
Computerized wireless Pick and Place Robot
Designing an Arduino-based ECG monitor using an AD8232 ECG sensor
Controlling Appliances Wirelessly using RF Technology

Featured Tutorials

  • Screenshot of Raspbian OS on Raspberry Pi RPi Python Programming 03: Raspberry Pi as Linux System
  • Raspberry Pi Models RPI Python Programming 02: Raspberry Pi Models
  • Raspberry Pi 4 RPi Python Programming 01: Introduction to Raspberry Pi 4
  • RPi Python Programming 05: Introduction to Python
  • RPi Python programming 04 RPi Python programming 04: Setting up Raspberry Pi Linux computer
  • Python Basics RPi Python Programming 06: Python basics

Stay Up To Date

Newsletter Signup

EE Training Center Classrooms

“ee

“ee

“ee

“ee

Recent Articles

  • Arduino’s L293D motor driver shield guide
  • NXP launches its first Wi-Fi 6E Tri-Band system-on-chip
  • Nexperia launches industry’s first 80 V RETs for high-voltage bus circuits
  • TDK releases low-profile medical sensors
  • Getting started with Raspberry Pi
...

RSS EDABOARD.com Discussions

  • hysteresis variation mc sim
  • Need help with Audio intercom design circuit?
  • complex bjt transfer function amplifier
  • Creepage distance from primary to secondary of offline SMPS
  • FT232 > Package

RSS Electro-Tech-Online.com Discussions

  • new to Ardunio but trying to compile
  • Engine Temperature using an AD590 on the Oil Pressure Wire to the engine
  • Dead Battery circuits.
  • electrolytic capacitor depolarizes
  • Symphonic TV/VCR problems (potentially loose yoke)...
Engineers Garage
  • Analog IC TIps
  • Connector Tips
  • DesignFast
  • EDABoard Forums
  • EE World Online
  • Electro-Tech-Online Forums
  • Microcontroller Tips
  • Power Electronic Tips
  • Sensor Tips
  • Test and Measurement Tips
  • 5G Technology World
  • About Us
  • Contact Us
  • Advertise

Copyright © 2021 WTWH Media LLC. All Rights Reserved. The material on this site may not be reproduced, distributed, transmitted, cached or otherwise used, except with the prior written permission of WTWH Media
Privacy Policy | Advertising | About Us

Search Engineers Garage

  • Projects and Tutorials
    • Circuit Design
    • Electronic Projects
      • 8051
      • Arduino
      • ARM
      • AVR
      • PIC
      • Raspberry pi
      • STM32
    • Tutorials
    • Components
  • Articles
    • EG Blogs
    • Insight
    • Invention Stories
    • How to
    • What Is
    • News
      • EE Design News
      • DIY Reviews
      • Guest Post
      • Sponsored Content
  • Forums
    • EDABoard.com
    • Electro-Tech-Online
    • EG Forum Archive
  • Digi-Key Store
    • Cables, Wires
    • Connectors, Interconnect
    • Discrete
    • Electromechanical
    • Embedded Computers
    • Enclosures, Hardware, Office
    • Integrated Circuits (ICs)
    • Isolators
    • LED/Optoelectronics
    • Passive
    • Power, Circuit Protection
    • Programmers
    • RF, Wireless
    • Semiconductors
    • Sensors, Transducers
    • Test Products
    • Tools
  • EE Resources
    • DesignFast
    • LEAP Awards
    • Oscilloscope Product Finder
    • Video
    • White Papers
    • Webinars
  • EE Learning Center
  • Women in Engineering