Engineers Garage

  • Projects and Tutorials
    • Electronic Projects
      • 8051
      • Arduino
      • ARM
      • AVR
      • PIC
      • Raspberry pi
      • STM32
    • Tutorials
    • Circuit Design
    • Project Videos
    • Components
  • Articles
    • Tech Articles
    • Insight
    • Invention Stories
    • How to
    • What Is
  • News
    • Electronic Products News
    • DIY Reviews
    • Guest Post
  • Forums
    • EDABoard.com
    • Electro-Tech-Online
    • EG Forum Archive
  • Digi-Key Store
    • Cables, Wires
    • Connectors, Interconnect
    • Discrete
    • Electromechanical
    • Embedded Computers
    • Enclosures, Hardware, Office
    • Integrated Circuits (ICs)
    • Isolators
    • LED/Optoelectronics
    • Passive
    • Power, Circuit Protection
    • Programmers
    • RF, Wireless
    • Semiconductors
    • Sensors, Transducers
    • Test Products
    • Tools
  • EE Resources
    • DesignFast
    • LEAP Awards
    • Oscilloscope Product Finder
    • White Papers
    • Webinars
  • EE Learning Center
    • Design Guides
      • WiFi & the IOT Design Guide
      • Microcontrollers Design Guide
      • State of the Art Inductors Design Guide
  • Women in Engineering

Streaming Videos using Webcam- (Part 10/12)

By Prabakaran P.M

This article is to provide step by step instructions for making Raspberry Pi as a webcam server where we can live stream video over a local network using python scripts and some required packages. A software package used in this tutorial is Motion which is an open source software with a number of configuration options which can be changed according to our needs. Here configurations are to be made so that it allows you to create a remote webcam for your Raspberry Pi so that you can view it from any computer on the local network.


Prerequisites & Equipment:

You are going to need the following:

  1. A Raspberry Pi Model B or greater.

  2. A USB WiFi Adapter (Edimax – Wireless 802.11b/g/n nano USB adapter is used here).

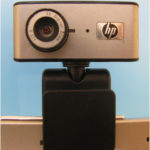
  3. A USB webcam with microphone / USB microphone (Logitech USB Webcam is used here).

  4. An SD Card flashed with the Raspbian OS (Here is a guide if you need)

  5. Access to the Raspberry either via a keyboard and a monitor or remotely.

Make sure you’re up-to-date:

To check for update and to install them enter the following command:

sudo apt-get update

Step 1: Installing the Motion.

Now, We need to install Motion package using the command line, Following Command can be used

sudo apt-get install motion

Installation of Motion Package for Raspberry Pi

Fig. 2: Installation Of Motion Package For Raspberry Pi

This will take a few minutes to download and install. Just type “y” to proceed with the installation since some supporting packages will be installed during the installation process.

Note: If you are going to use Raspberry Pi camera module, since current version of motion does not yet support the Raspberry Pi camera module, we need to download and install a special build with support for this camera module by using these commands.

cd /tmp

sudo apt-get install -y libjpeg62 libjpeg62-dev libavformat53 libavformat-dev libavcodec53 libavcodec-dev libavutil51 libavutil-dev libc6-dev zlib1g-dev libmysqlclient18 libmysqlclient-dev libpq5 libpq-dev

Step 2: Configure the software.

After installation of the package next step is to edit some of the config files so that the motion service will start to run up and be available on the local network.

First thing we have to edit is the motion.conf file. Type the below command

sudo nano /etc/motion/motion.conf

This is quite a large conf file but the points you need to edit are:

Configuring Motion Software for Raspberry Pi

Fig. 3: Configuring Motion Software For Raspberry Pi

DAEMON = OFF (change to ON)

Editing Motion Configuration File

Fig. 4: Editing Motion Configuration File

Webcam_localhost = ON (Change to OFF)

Next we need to enable the Daemon (service):

sudo nano /etc/default/motion

Command to enable Daemon Service for Raspberry Pi

Fig. 5: Command To Enable Daemon Service For Raspberry Pi

start_motion_daemon = no (change to yes)

Step 3: Start the webcam server.

 Start the Webcam Server for Raspberry Pi

Fig. 6: Start The Webcam Server For Raspberry Pi

Ensure your webcam is plugged into the USB port on your Raspberry Pi and start the service:

sudo service motion start

If you want to stop the service, then use the command:

sudo service motion stop

To restart the service, then use the command:

sudo service motion restart

With the service started you can now open a web page on your normal computer and by going to the IP of the Raspberry Pi on port 8081 (in the address bar) you should be able to view your webcam.


Filed Under: Electronic Projects, Raspberry pi


Questions related to this article?
👉Ask and discuss on Electro-Tech-Online.com and EDAboard.com forums.


Tell Us What You Think!! Cancel reply

You must be logged in to post a comment.

HAVE A QUESTION?

Have a technical question about an article or other engineering questions? Check out our engineering forums EDABoard.com and Electro-Tech-Online.com where you can get those questions asked and answered by your peers!


Featured Tutorials

  • Introduction to Brain Waves & its Types (Part 1/13)
  • Understanding NeuroSky EEG Chip in Detail (Part 2/13)
  • Performing Experiments with Brainwaves (Part 3/13)
  • Amplification of EEG Signal and Interfacing with Arduino (Part 4/13)
  • Controlling Led brightness using Meditation and attention level (Part 5/13)
  • Control Motor’s Speed using Meditation and Attention Level of Brain (Part 6/13)

Stay Up To Date

Newsletter Signup

Sign up and receive our weekly newsletter for latest Tech articles, Electronics Projects, Tutorial series and other insightful tech content.

EE Training Center Classrooms

EE Classrooms

Recent Articles

  • What is a loop calibrator? 
  • What are the battery-selection criteria for low-power design?
  • Key factors to optimize power consumption in an embedded device
  • EdgeLock A5000 Secure Authenticator
  • How to interface a DS18B20 temperature sensor with MicroPython’s Onewire driver

Most Popular

5G 555 timer circuit 8051 ai Arduino atmega16 automotive avr bluetooth dc motor display Electronic Part Electronic Parts Fujitsu ic infineontechnologies integratedcircuit Intel IoT ir lcd led maximintegratedproducts microchip microchiptechnology Microchip Technology microcontroller microcontrollers mosfet motor powermanagement Raspberry Pi remote renesaselectronics renesaselectronicscorporation Research samsung semiconductor sensor software STMicroelectronics switch Technology vishayintertechnology wireless

RSS EDABOARD.com Discussions

  • Measure AC current accurateley (100mA to 10A)
  • 74HC595 creating Fake output
  • What was before microcontrollers ?
  • NEED HELP FOR OP-AMP IN BGR
  • Check undesired substrate mode...

RSS Electro-Tech-Online.com Discussions

  • Control Bare LCD With ATmega328p
  • Need a ducted soldering fan for solder smoke extraction
  • Sla ir li ion
  • Question about ultrasonic mist maker
  • Best way to reduce voltage in higher wattage system?
Engineers Garage
  • Analog IC TIps
  • Connector Tips
  • DesignFast
  • EDABoard Forums
  • EE World Online
  • Electro-Tech-Online Forums
  • Microcontroller Tips
  • Power Electronic Tips
  • Sensor Tips
  • Test and Measurement Tips
  • 5G Technology World
  • About Us
  • Contact Us
  • Advertise

Copyright © 2022 WTWH Media LLC. All Rights Reserved. The material on this site may not be reproduced, distributed, transmitted, cached or otherwise used, except with the prior written permission of WTWH Media
Privacy Policy | Advertising | About Us

Search Engineers Garage

  • Projects and Tutorials
    • Electronic Projects
      • 8051
      • Arduino
      • ARM
      • AVR
      • PIC
      • Raspberry pi
      • STM32
    • Tutorials
    • Circuit Design
    • Project Videos
    • Components
  • Articles
    • Tech Articles
    • Insight
    • Invention Stories
    • How to
    • What Is
  • News
    • Electronic Products News
    • DIY Reviews
    • Guest Post
  • Forums
    • EDABoard.com
    • Electro-Tech-Online
    • EG Forum Archive
  • Digi-Key Store
    • Cables, Wires
    • Connectors, Interconnect
    • Discrete
    • Electromechanical
    • Embedded Computers
    • Enclosures, Hardware, Office
    • Integrated Circuits (ICs)
    • Isolators
    • LED/Optoelectronics
    • Passive
    • Power, Circuit Protection
    • Programmers
    • RF, Wireless
    • Semiconductors
    • Sensors, Transducers
    • Test Products
    • Tools
  • EE Resources
    • DesignFast
    • LEAP Awards
    • Oscilloscope Product Finder
    • White Papers
    • Webinars
  • EE Learning Center
    • Design Guides
      • WiFi & the IOT Design Guide
      • Microcontrollers Design Guide
      • State of the Art Inductors Design Guide
  • Women in Engineering