In this tutorial i am going to teach you how we can measure the visible light intensity using arduino and sparkfun Luminosity Sensor Tsl2561. Light intensity value will be displayed on 16×2 lcd interfaced with arduino uno. Visible light intensity is also know as lux. Typically lux is a measure of how bright any illumination will appear to the human eye. Lux is a very complex quantity and it was not easy to measure the lux of particular area using ordinary sensors like photoresitors and photodiodes. To learn more about lux and its measuring perimeters just google for it, its a comprehensive topic. For this tutorial embrace lux as visible light measurement unit.
TSL2561 Light Sensor
Tsl2561 is a luminosity sensor that measures both the visible light and infrared(invisible) to better approximate the lux value. It can measure a huge range of lux values from 0.1 – 40 k lux. Tsl2561 outputs data on I2C interface. The sensor is available at both sparkfun and adafruit website. It costs around $5.59. I bought it from aliexpress at $2.70 wow Chinese version.
TSL2561 Pin out
Since the sensor works on I2C interface. Its pins are same required by any I2C interface.
- SDA(I2C Data pin)
- SCL(I2C Clock pin)
- Vcc(Voltage input +3.3 to 5 volts)
- GND(Ground this pin)
- INT(Interrupt pin – It can also output an interrupt signal on special ocasions)
Sparkfun, Adafrauit and Chinese clones have same pins only the orientation of the pins are changed. So make sure the pin out of the sensor you are using is correct before wiring and powering the module.
TSL2561 with Arduino DIY Project
I am going to measure the visible light intensity using tsl2561 and arduino. Measured visible light value is than displayed on a 16×2 lcd. I am using arduino lcd shield that can easily be mounted on the arduino boards. I am using lcd shield because it reduces the time to make circuit and wiring the connections. I used arduino uno board for this project.
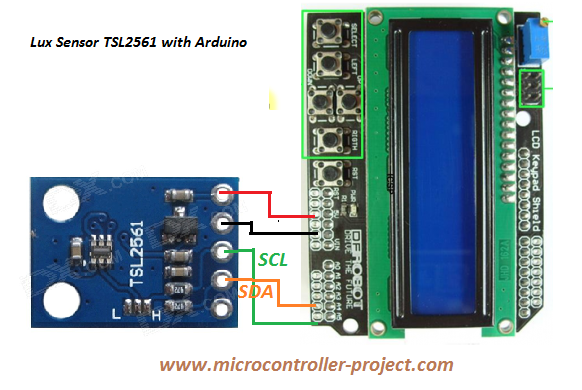
TSL2561 with Arduino Circuit Diagram
TSL2561 works on I2C interface. Arduino uno offers one I2C interface on pins A4 and A5. Pin A4 is SDA(I2C data pin). Connect the SDA pin of TSL2561 with arduino pin#A4. Pin A5 is SCL(I2C clock). Connect TSL2561 SCL with pin#A5 of arduino. I powered the light sensor with arduino power output pins. TSL2561 can work on both +3.3 volts and 5 volts. I supplied 5 volts to vcc pin of tsl2561.
You can use other arduino boards as well. The code is universal and can be used with any other arduino development board. Only the I2C connections are needed to be changed. On popular arduino development boards I2C pins are found on.
Any Arduino “SDA” “SCL”
Uno, Redboard, Pro A4 A5
Mega2560, Due 20 21
Leonardo 2 3
Project Code
If you go through the datasheet of tsl2561 you will find out that its a very complex sensor to work with. Many constant and other quantities are to be manipulated in order to get final and stable lux value. Thanks to the sparkun team. They created a library for interfacing tsl2561 with arduino and now we do not need to care about any thing. We just need to install the library and we are ready to measure the visible light. I am also working with sparkfun library. You can download the library from this Link…
Download the Project Code arduino .ino file. Please give us your feed back on the project. If you have any queries write them below in the comments section.
Watch the Project video Here….
Filed Under: Arduino, Microcontroller Projects


Questions related to this article?
👉Ask and discuss on Electro-Tech-Online.com and EDAboard.com forums.
Tell Us What You Think!!
You must be logged in to post a comment.