Engineers Garage

  • Electronic Projects & Tutorials
    • Electronic Projects
      • Arduino Projects
      • AVR
      • Raspberry pi
      • ESP8266
      • BeagleBone
      • 8051 Microcontroller
      • ARM
      • PIC Microcontroller
      • STM32
    • Tutorials
      • Audio Electronics
      • Battery Management
      • Brainwave
      • Electric Vehicles
      • EMI/EMC/RFI
      • Hardware Filters
      • IoT tutorials
      • Power Tutorials
      • Python
      • Sensors
      • USB
      • VHDL
    • Circuit Design
    • Project Videos
    • Components
  • Articles
    • Tech Articles
    • Insight
    • Invention Stories
    • How to
    • What Is
  • News
    • Electronic Product News
    • Business News
    • Company/Start-up News
    • DIY Reviews
    • Guest Post
  • Forums
    • EDABoard.com
    • Electro-Tech-Online
    • EG Forum Archive
  • DigiKey Store
    • Cables, Wires
    • Connectors, Interconnect
    • Discrete
    • Electromechanical
    • Embedded Computers
    • Enclosures, Hardware, Office
    • Integrated Circuits (ICs)
    • Isolators
    • LED/Optoelectronics
    • Passive
    • Power, Circuit Protection
    • Programmers
    • RF, Wireless
    • Semiconductors
    • Sensors, Transducers
    • Test Products
    • Tools
  • Learn
    • eBooks/Tech Tips
    • Design Guides
    • Learning Center
    • Tech Toolboxes
    • Webinars & Digital Events
  • Resources
    • Digital Issues
    • EE Training Days
    • LEAP Awards
    • Podcasts
    • Webinars / Digital Events
    • White Papers
    • Engineering Diversity & Inclusion
    • DesignFast
  • Guest Post Guidelines
  • Advertise
  • Subscribe

Typing Assistant based on 8051 microcontroller

By Dimpal Kumar Kalita November 5, 2012

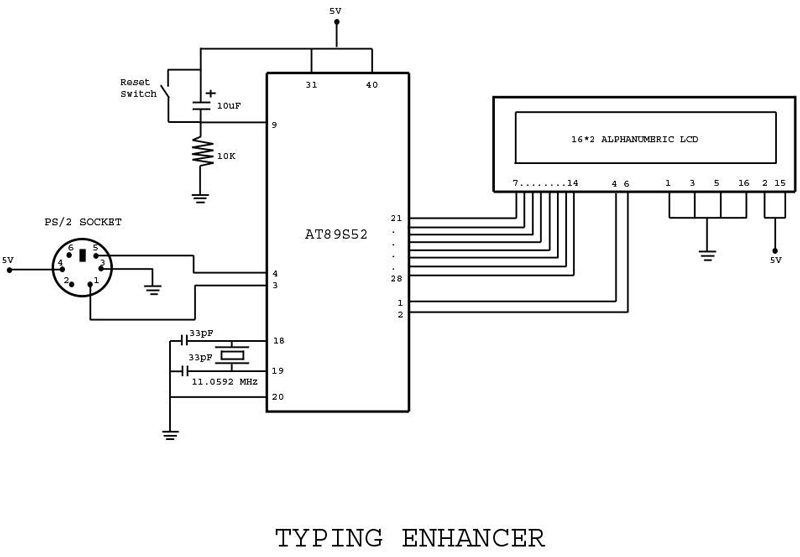
Just as a PC software, that are being used in PCs to increase the typing skill and speed in a computer keyboard, this device has been developed to do the same job but without any PC. The device has a PS/2 keyboard port to connect a computer PS/2 keyboard (not an USB keyboard) and a LCD screen to display. When the circuit is assembled and programmed, a PS/2 keyboard has to be connected at the PS/2 socket provided in the device and it then serves as a portable TYPING ENHANCER. It needs only a 5V power supply and nothing else. It has no connection with PC.

 
OPERATION:
 
When the device is powered up by a 5V power supply, it prompts as “PLEASE PRESS ANY ALPHABET TO PLAY”. If the user presses a non-alphabet key, the device will continue prompting the same. When an alphabet is pressed, it will prompt “PRESS THE LETTER” in the upper line of the LCD screen and an alphabet in the lower line of the LCD screen. The user needs to press the displayed alphabet on the keyboard. If the pressed alphabet is correct, it will prompt as “THAT IS CORRECT” and then again another alphabet will be displayed. If the pressed alphabet is wrong, it will prompt as “THAT IS WRONG” and then again another alphabet will be displayed. The game goes on.
 
COMPONENTS:
 
1.      AT89S52 Microcontroller [1]
2.      11.0592 MHz Crystal [1]
3.      PS/2 Keyboard Socket [1]
4.      16*2 Alphanumeric LCD screen [1]
5.      PS/2 Keyboard [1]
 
CIRCUIT DIAGRAM:
Typing Assistant based on 8051 microcontroller
 
 
The circuit diagram is to be connected as shown. The extra component which is not shown in the circuit diagram is the Computer PS/2 Keyboard (not a USB Keyboard). A computer Keyboard is to be connected at the PS/2 socket provided in the circuit diagram.
The device has very limited hardware but its software part is somewhat complicated. The description of the software is given below.
 

Software Structure

SOFTWARE STRUCTURE:
 
The software of the project first prompts the user to enter an alphabet. Then it checks whether the pressed key is really an alphabet or a non-alphabet. If it is non-alphabet, the software prompts again to press an alphabet. If it is an alphabet, the software moves forward. The software then generates a random alphabet and displays it and asks the user to press the displayed alphabet. The software then reads the key that is being pressed by the user and checks it whether it is same with the displayed key. If it is equal, it displays as correct otherwise wrong. The software then continues. 
The software has various parts. Let me to describe them one by one.
 
1.      The first part of the software fetches the SCAN CODE from the PS/2 keyboard and converts it to an equivalent ASCII code.
SCAN CODE is a code which is send by a keyboard to a computer whenever a key is pressed. All the keys have different scan code. So it is possible to detect which key is pressed on the keyboard by looking at the scan code the keyboard has sent to the computer. But this device has NO LINK with a computer for its operation and the keyboard is connected to the device. So this part of the software does the job of detecting the scan code send by the keyboard. The scan code, then, needs to be converted to equivalent ASCII code. The reason behind this is that the LCD Screen that we have used here can display alphabets only when the equivalent ASCII code is sent to the LCD screen.
 
2.      The second part of the software checks whether the ASCII CODE is among the Alphabets.
As the device is designed to work with the ALPHABETS only, so the other keys on the keyboard is of no interest. So this part of the software is included to check for alphabets and it does the job by comparing the ASCII code of the pressed key and the ASCII code of the alphabets.
 
3.      The third part of the software generates a RANDOM number between ‘A’ and ‘Z’ to display the alphabet on the Screen.
This part of the software moves the game on by generating and displaying Random Alphabets on the screen. To this job, the software does some arithmetic calculation with the last pressed key by the USER.
 
4.      The last part of the software checks whether the pressed key by the USER is the same key as displayed on the screen.
This part takes help of the first and second part to compare the key pressed by the USER and the alphabet displayed on the screen. If it finds them equal, it informs the USER as correct otherwise wrong.
 

PS/2 KEYBOARD PROTOCOL

MORE DETAILS ON PS/2 KEYBOARD PROTOCOL:
 
The PS/2 keyboard protocol covers a vast area to depict and needs to be studied separately. Still I shall try to give you an overall idea how a PS/2 keyboard works with a computer and how this project serves as a host for the PS/2 keyboard.
If you open a PS/2 keyboard, you ca see a small PCB inside it and an inbuilt silicon chip (or an IC) on the PCB. This inbuilt silicon chip (or the IC) is nothing but a microcontroller known as KEYBOARD ENCODER. This KEYBOARD ENCODER continuously polls the keys and as a key is pressed by an USER, it generates a specific code for the pressed key known as SCAN CODE and sends the code to the computer using some kind of communication protocol. This SCAN CODE is then decoded and interpreted by another microcontroller inside the computer known as KEYBOARD CONTROLLER. The decoded SCAN CODE is then passed to the main processor of the computer. After this step the responsibility of the KEYBOARD CONTROLLER ends and the communication between the keyboard and the computer gets over. So this is the overall idea of working between a keyboard and a computer.
 
Now let us discuss what happens when an USER presses a key on the keyboard. The SCAN CODE said before actually has two parts- MAKE CODE and BREAK CODE. Both these codes combine to form the SCAN CODE. The MAKE CODE is generated by the KEYBOARD ENCODER when an USER just presses the key and the BREAK CODE is generated when the USER release the key. For example, when the key ESC is pressed the MAKE CODE generated by the KEYBOARD ENCODER is 76H and sends to the computer. When the pressed ESC key is released, the BREAK CODE is generated by the KEYBOARD ENCODER is F0H, 76H and then again this code is send to the computer. In this way the KEYBOARD ENCODER generates code for all the keys and sends to the computer. The lists of the SCAN CODES of all the keys of a keyboard are given below.
 
In case of a keyboard and a computer, the computer acts as a host for the keyboard and the KEYBOARD CONTROLLER inbuilt inside the computer handles the operation. But as no computer is involved in this project, the AT89S52 microcontroller serves as the host for the keyboard and the program written for the microcontroller serves as a KEYBOARD CONTROLLER. It is worth notifying that in case of computer, the KEYBOARD CONTROLLER is a specific hardware part for the job but in this project no such specific hardware KEYBOARD CONTROLLER is used instead the AT89S52 microcontroller has been programmed to do the job.
 
Let us now discuss about the communication protocol of the keyboard.
 
The keyboard has four wires. They are 5V supply line, Ground line, Clock line and Data line. The 5V and the Ground are power supply line and have no contribution during communication. The Clock line and Data line participates during communication. The keyboard communication protocol is a serial communication protocol. The keyboard sends data in the following order:-
 
– 1 start bit (always 0);
– 8 data bits (LSB first);
– 1 parity bit (if number of ones is even, then parity bit = 1);
– 1 stop bit (always 1).
 
The data are sent by the keyboard serially using the data line. The clock line synchronizes the data line during communication. The clock is produced by the keyboard itself. A diagram for both the line status has been given below.
 
TYPING-ENHANCER.jpg
 
When the KEYBOARD ENCODER detects a pressed key, it sends the SCAN CODE generated to the host using the above protocol. As the host for the keyboard in this project is the microcontroller itself, so program is written to detect the serial SCAN CODE. It is to mention
 
here that the keyboard sends one byte of data at a time. (From 0 to 7 bits contribute to form one byte in the above picture). The program detects each bit of one byte data at the rising edge of the each clock pulse.
 

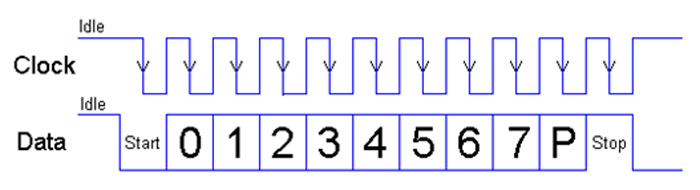
NOTE:-  As I said previously, the PS/2 working and its protocol is a vast topic and needs to be studied separately. I have tried to produce a short description before you; here I would notify you that the communication described above is only by the KEYBOARD to HOST i.e. when the keyboard talks to the host, the above communication protocol is used. But when the HOST wants to communicate to the KEYBOARD, the communication protocol will be again different from it. In this project, we don’t need the HOST to KEYBOARD protocol and so it is omitted. Also, there are in total three SCAN CODE set but here I have shown you only the SCAN CODE set 2 as I have experimented only with that SCAN CODE set.


SCAN CODE 


KEY
 
MAKE
 
BREAK
 
KEY
 
MAKE
 
BREAK
 
KEY
 
MAKE
 
BREAK
A
1C
F0,1C
9
46
F0,46
[
54
FO,54
B
32
F0,32
`
0E
F0,0E
INSERT
E0,70
E0,F0,70
C
21
F0,21
–
4E
F0,4E
HOME
E0,6C
E0,F0,6C
D
23
F0,23
=
55
FO,55
PG UP
E0,7D
E0,F0,7D
E
24
F0,24
5D
F0,5D
DELETE
E0,71
E0,F0,71
F
2B
F0,2B
BKSP
66
F0,66
END
E0,69
E0,F0,69
G
34
F0,34
SPACE
29
F0,29
PG DN
E0,7A
E0,F0,7A
H
33
F0,33
TAB
0D
F0,0D
U ARROW
E0,75
E0,F0,75
I
43
F0,43
CAPS
58
F0,58
L ARROW
E0,6B
E0,F0,6B
J
3B
F0,3B
L SHFT
12
FO,12
D ARROW
E0,72
E0,F0,72
K
42
F0,42
L CTRL
14
FO,14
R ARROW
E0,74
E0,F0,74
L
4B
F0,4B
L GUI
E0,1F
E0,F0,1F
NUM
77
F0,77
M
3A
F0,3A
L ALT
11
F0,11
KP /
E0,4A
E0,F0,4A
N
31
F0,31
R SHFT
59
F0,59
KP *
7C
F0,7C
O
44
F0,44
R CTRL
E0,14
E0,F0,14
KP –
7B
F0,7B
P
4D
F0,4D
R GUI
E0,27
E0,F0,27
KP +
79
F0,79
Q
15
F0,15
R ALT
E0,11
E0,F0,11
KP EN
E0,5A
E0,F0,5A
R
2D
F0,2D
APPS
E0,2F
E0,F0,2F
KP .
71
F0,71
S
1B
F0,1B
ENTER
5A
F0,5A
KP 0
70
F0,70
T
2C
F0,2C
ESC
76
F0,76
KP 1
69
F0,69
U
3C
F0,3C
F1
05
F0,05
KP 2
72
F0,72
V
2A
F0,2A
F2
06
F0,06
KP 3
7A
F0,7A
W
1D
F0,1D
F3
04
F0,04
KP 4
6B
F0,6B
X
22
F0,22
F4
0C
F0,0C
KP 5
73
F0,73
Y
35
F0,35
F5
03
F0,03
KP 6
74
F0,74
Z
1A
F0,1A
F6
0B
F0,0B
KP 7
6C
F0,6C
0
45
F0,45
F7
83
F0,83
KP 8
75
F0,75
1
16
F0,16
F8
0A
F0,0A
KP 9
7D
F0,7D
2
1E
F0,1E
F9
01
F0,01
]
5B
F0,5B
3
26
F0,26
F10
09
F0,09
;
4C
F0,4C
4
25
F0,25
F11
78
F0,78
‘
52
F0,52
5
2E
F0,2E
F12
07
F0,07
,
41
F0,41
6
36
F0,36
PRNT
SCRN
E0,12,
E0,7C
E0,F0,
7C,E0,
F0,12
.
49
F0,49
7
3D
F0,3D
SCROLL
7E
F0,7E
/
4A
F0,4A
8
3E
F0,3E
PAUSE
E1,14,77,
E1,F0,14,
F0,77
-NONE-


Video


Project Source Code

###


                                ORG 00H

HARDWARE_CONNECTION:

                        LCD_DATA  EQU P2

                        LCD_RS    EQU P1.0

                        LCD_EN    EQU P1.1                       

                        KBD_DATA  EQU P1.2

                        KBD_CLK   EQU P1.3


SOFTWARE_VARIABLE:

                        TEMPVAR_1 EQU R0

                        TEMPVAR_2 EQU 30H

                        DISPLAYED_KEY EQU 31H

                        READY_DATA EQU R2

                        ASCII EQU R3

                        PRESET_VALUE EQU R4

                        TEMPVAR_5 EQU R5

                        TEMPVAR_6 EQU R6

                        TEMPVAR_7 EQU R7                     


LCD_INITIALIZATION:                

                        MOV A,#38H                                                                        

                        ACALL LCD_COMND_WRT

                        MOV A,#0CH

                        ACALL LCD_COMND_WRT

                        MOV A,#01H

                        ACALL LCD_COMND_WRT                    

                        MOV A,#80H                                                               

                        ACALL LCD_COMND_WRT

                        MOV DPTR,#TYPING                       

                        ACALL STRING_DISPLAY

                        ACALL DELAY_ONES                  


                        MOV PRESET_VALUE,#0AH


PROMT_TO_START:

                        MOV A,#80H                                                 ;ASK TO PRESS AN ALPHABET

                        ACALL LCD_COMND_WRT

                        MOV DPTR,#PRESS_ALPHABET_1                       

                        ACALL STRING_DISPLAY

                        MOV A,#0C0H                                                                        

                        ACALL LCD_COMND_WRT

                        MOV DPTR,#PRESS_ALPHABET_2                       

                        ACALL STRING_DISPLAY


                        ACALL READ_KEY                                                            ;READ THE ALPHABET


                        MOV A,ASCII                                                           ;CHECK FOR KEY OTHER THAN ALPHABET

                        CJNE A,#00H,CONTINUE

                        SJMP PROMT_TO_START                                      ;IF KEY IS OTHER THAN ALPHABET


CONTINUE:                                                                          ;IF KEY IS AN ALPHABET

                        MOV A,ASCII

                        ADD A,PRESET_VALUE

                        ACALL COMPARE_ASCII


                        MOV A,#01H                                                 ;ASK TO PRESS THE DISPLAYED ALPHABET

                        ACALL LCD_COMND_WRT

                        MOV A,#80H                                                              

                        ACALL LCD_COMND_WRT

                        MOV DPTR,#PRESS_DIS_ALPHABET                  

                        ACALL STRING_DISPLAY                      


                        MOV A,#0C7H                                                                       

                        ACALL LCD_COMND_WRT

                        MOV A,READY_DATA

                        MOV DISPLAYED_KEY,A

                        ACALL LCD_DATA_WRT

                        CLR C

                        SUBB A,#40H

                        MOV PRESET_VALUE,A

                        SJMP CHK_KEY


COMPARE_ASCII:                                                                          ;COMPARING ASCII CODE WITH 'Z'


                        CJNE A,#5AH,DATA_NOT_EQUAL        

DATA_EQUAL:                                                                                ;WHEN ASCII CODE EQUAL TO 'Z'

                        INC PRESET_VALUE

                        INC PRESET_VALUE

                        CLR C

                        SUBB A,PRESET_VALUE

                        MOV READY_DATA,A

                        RET

DATA_NOT_EQUAL:                                                                                  ;CHECKING FOR < OR >, WHEN NOT EQUAL TO 'Z'

                        JNC NOT_NORMAL

DATA_NORMAL:                                                                            ;WHEN ASCII CODE < 'Z'                                                                         

                        MOV READY_DATA,A

                        RET

NOT_NORMAL:                                                                               ;WHEN ASCII CODE > 'Z' 

                        CLR C

                        SUBB A,#5AH

                        ADD A,#40H

                        MOV READY_DATA,A

                        RET


CHK_KEY:    ACALL READ_KEY


                        MOV A,ASCII

                        CJNE A,#00H,MOVE_ON

                        MOV ASCII,#45H

                        SJMP NOT_EQUAL

MOVE_ON:   CJNE A,DISPLAYED_KEY,NOT_EQUAL


                        MOV A,#01H

                        ACALL LCD_COMND_WRT

                        MOV A,#80H

                        ACALL LCD_COMND_WRT

                        MOV DPTR,#TATS_CORRECT                    

                        ACALL STRING_DISPLAY

                        ACALL DELAY_ONES

                        LJMP CONTINUE


NOT_EQUAL:

                        MOV A,#01H

                        ACALL LCD_COMND_WRT

                        MOV A,#80H

                        ACALL LCD_COMND_WRT

                        MOV DPTR,#TATS_WRONG                       

                        ACALL STRING_DISPLAY

                        ACALL DELAY_ONES

                        LJMP CONTINUE


READ_KEY:

                        MOV TEMPVAR_2,#03H

READ_KEY_AGAIN:

                        MOV A,#00H

                        CLR C

                        MOV TEMPVAR_1,#08H                                       

                        JB KBD_CLK,$

                        JNB KBD_CLK,$

                        JB KBD_CLK,$

                        JNB KBD_CLK,$

                        READ_KEY_BACK:

                        MOV C,KBD_DATA

                        RRC A

                        JB KBD_CLK,$

                        JNB KBD_CLK,$

                        DJNZ TEMPVAR_1,READ_KEY_BACK

                        JNB KBD_CLK,$

                        JB KBD_CLK,$

                        JNB KBD_CLK,$

                        DJNZ TEMPVAR_2,READ_KEY_AGAIN


PRESS_A:CJNE A,#1CH,PRESS_B

                        MOV ASCII,#41H

                        RET

PRESS_B:CJNE A,#32H,PRESS_C

                        MOV ASCII,#42H

                        RET

PRESS_C:CJNE A,#21H,PRESS_D

                        MOV ASCII,#43H

                        RET

PRESS_D:CJNE A,#23H,PRESS_E

                        MOV ASCII,#44H

                        RET

PRESS_E:CJNE A,#24H,PRESS_F

                        MOV ASCII,#45H

                        RET

PRESS_F:CJNE A,#2BH,PRESS_G

                        MOV ASCII,#46H

                        RET

PRESS_G:CJNE A,#34H,PRESS_H

                        MOV ASCII,#47H

                        RET

PRESS_H:CJNE A,#33H,PRESS_I

                        MOV ASCII,#48H

                        RET

PRESS_I:CJNE A,#43H,PRESS_J

                        MOV ASCII,#49H

                        RET

PRESS_J:CJNE A,#3BH,PRESS_K

                        MOV ASCII,#4AH

                        RET

PRESS_K:CJNE A,#42H,PRESS_L

                        MOV ASCII,#4BH

                        RET

PRESS_L:CJNE A,#4BH,PRESS_M

                        MOV ASCII,#4CH

                        RET

PRESS_M:CJNE A,#3AH,PRESS_N

                        MOV ASCII,#4DH

                        RET

PRESS_N:CJNE A,#31H,PRESS_O

                        MOV ASCII,#4EH

                        RET

PRESS_O:CJNE A,#44H,PRESS_P

                        MOV ASCII,#4FH

                        RET

PRESS_P:CJNE A,#4DH,PRESS_Q

                        MOV ASCII,#50H

                        RET

PRESS_Q:CJNE A,#15H,PRESS_R

                        MOV ASCII,#51H

                        RET

PRESS_R:CJNE A,#2DH,PRESS_S

                        MOV ASCII,#52H

                        RET

PRESS_S:CJNE A,#1BH,PRESS_T

                        MOV ASCII,#53H

                        RET

PRESS_T:CJNE A,#2CH,PRESS_U

                        MOV ASCII,#54H

                        RET

PRESS_U:CJNE A,#3CH,PRESS_V

                        MOV ASCII,#55H

                        RET

PRESS_V:CJNE A,#2AH,PRESS_W

                        MOV ASCII,#56H

                        RET

PRESS_W:CJNE A,#1DH,PRESS_X

                        MOV ASCII,#57H

                        RET

PRESS_X:CJNE A,#22H,PRESS_Y

                        MOV ASCII,#58H

                        RET

PRESS_Y:CJNE A,#35H,PRESS_Z

                        MOV ASCII,#59H

                        RET

PRESS_Z:CJNE A,#1AH,EXIT

                        MOV ASCII,#5AH

                        RET

EXIT:              MOV ASCII,#00H

                        RET


LCD_COMND_WRT:                                                                                                 

                        MOV LCD_DATA,A

                        CLR LCD_RS

                        SETB LCD_EN

                        ACALL DELAY_NINE

                        CLR LCD_EN

                        RET

LCD_DATA_WRT:                                                                                      

                        MOV LCD_DATA,A

                        SETB LCD_RS

                        SETB LCD_EN

                        ACALL DELAY_NINE

                        CLR LCD_EN

                        RET

DELAY_NINE:        

                        MOV TEMPVAR_5,#16                                                      

                        NINE_BACK:MOV TEMPVAR_6,#250    

                        DJNZ TEMPVAR_6,$                      

                        DJNZ TEMPVAR_5,NINE_BACK

                        RET

DELAY_ONES:       

            MOV TEMPVAR_5,#9

                        NEE_BACK:MOV TEMPVAR_6,#255                                                      

                        NE_BACK:MOV TEMPVAR_7,#255        

                        DJNZ TEMPVAR_7,$                      

                        DJNZ TEMPVAR_6,NE_BACK

                        DJNZ TEMPVAR_5,NEE_BACK  

                        RET

STRING_DISPLAY:                                                                                                

            DIS_BACK:CLR A

                        MOVC A,@A+DPTR

                        JZ DIS_OUT

                        ACALL LCD_DATA_WRT

                        INC DPTR

                        SJMP DIS_BACK

                        DIS_OUT:RET


TYPING:                    DB 'TYPING ENHANCER',0

PRESS_ALPHABET_1:        DB 'PLEASE PRESS ANY',0

PRESS_ALPHABET_2:        DB 'ALPHABET TO PLAY',0

PRESS_DIS_ALPHABET:   DB 'PRESS THE LETTER',0

TATS_CORRECT:                 DB 'THAT IS CORRECT',0

TATS_WRONG:                    DB 'THAT IS WRONG',0

                        END

###


Circuit Diagrams

Typing-Assistant-on-8051


Filed Under: Electronic Projects
Tagged With: 8051, computer, microcontroller, ps2, typing assistant
 

Next Article

← Previous Article
Next Article →

Questions related to this article?
👉Ask and discuss on EDAboard.com and Electro-Tech-Online.com forums.


Tell Us What You Think!! Cancel reply

You must be logged in to post a comment.

EE TECH TOOLBOX

“ee
Tech Toolbox: 5G Technology
This Tech Toolbox covers the basics of 5G technology plus a story about how engineers designed and built a prototype DSL router mostly from old cellphone parts. Download this first 5G/wired/wireless communications Tech Toolbox to learn more!

EE Learning Center

EE Learning Center
“engineers
EXPAND YOUR KNOWLEDGE AND STAY CONNECTED
Get the latest info on technologies, tools and strategies for EE professionals.

HAVE A QUESTION?

Have a technical question about an article or other engineering questions? Check out our engineering forums EDABoard.com and Electro-Tech-Online.com where you can get those questions asked and answered by your peers!


RSS EDABOARD.com Discussions

  • 21V keeps getting shorted to my UART line.
  • Voltage mode pushpull is a nonsense SMPS?
  • Voltage mode push pull with extra DC blocking capacitor
  • NXP library issue in awr
  • Confused About Atomicity

RSS Electro-Tech-Online.com Discussions

  • Is AI making embedded software developers more productive?
  • Why can't I breadboard this oscillator?
  • using a RTC in SF basic
  • Parts required for a personal project
  • Cataract Lens Options?

Featured – RPi Python Programming (27 Part)

  • RPi Python Programming 21: The SIM900A AT commands
  • RPi Python Programming 22: Calls & SMS using a SIM900A GSM-GPRS modem
  • RPi Python Programming 23: Interfacing a NEO-6MV2 GPS module with Raspberry Pi
  • RPi Python Programming 24: I2C explained
  • RPi Python Programming 25 – Synchronous serial communication in Raspberry Pi using I2C protocol
  • RPi Python Programming 26 – Interfacing ADXL345 accelerometer sensor with Raspberry Pi

Recent Articles

  • GigaDevice launches GD32C231 MCU series with 48MHz Cortex-M23 core and 64KB Flash
  • Advanced Energy releases 425 W CF-rated medical power supply in 3.5 x 6 x 1.5-inch format”
  • LEM combines shunt and Hall effect sensing in 2000 A current measurement unit
  • What is AWS IoT Core and when should you use it?
  • AC-DC power supply extends voltage range to 800 V DC

EE ENGINEERING TRAINING DAYS

engineering

Submit a Guest Post

submit a guest post
Engineers Garage
  • Analog IC TIps
  • Connector Tips
  • Battery Power Tips
  • DesignFast
  • EDABoard Forums
  • EE World Online
  • Electro-Tech-Online Forums
  • EV Engineering
  • Microcontroller Tips
  • Power Electronic Tips
  • Sensor Tips
  • Test and Measurement Tips
  • 5G Technology World
  • Subscribe to our newsletter
  • About Us
  • Contact Us
  • Advertise

Copyright © 2025 WTWH Media LLC. All Rights Reserved. The material on this site may not be reproduced, distributed, transmitted, cached or otherwise used, except with the prior written permission of WTWH Media
Privacy Policy

Search Engineers Garage

  • Electronic Projects & Tutorials
    • Electronic Projects
      • Arduino Projects
      • AVR
      • Raspberry pi
      • ESP8266
      • BeagleBone
      • 8051 Microcontroller
      • ARM
      • PIC Microcontroller
      • STM32
    • Tutorials
      • Audio Electronics
      • Battery Management
      • Brainwave
      • Electric Vehicles
      • EMI/EMC/RFI
      • Hardware Filters
      • IoT tutorials
      • Power Tutorials
      • Python
      • Sensors
      • USB
      • VHDL
    • Circuit Design
    • Project Videos
    • Components
  • Articles
    • Tech Articles
    • Insight
    • Invention Stories
    • How to
    • What Is
  • News
    • Electronic Product News
    • Business News
    • Company/Start-up News
    • DIY Reviews
    • Guest Post
  • Forums
    • EDABoard.com
    • Electro-Tech-Online
    • EG Forum Archive
  • DigiKey Store
    • Cables, Wires
    • Connectors, Interconnect
    • Discrete
    • Electromechanical
    • Embedded Computers
    • Enclosures, Hardware, Office
    • Integrated Circuits (ICs)
    • Isolators
    • LED/Optoelectronics
    • Passive
    • Power, Circuit Protection
    • Programmers
    • RF, Wireless
    • Semiconductors
    • Sensors, Transducers
    • Test Products
    • Tools
  • Learn
    • eBooks/Tech Tips
    • Design Guides
    • Learning Center
    • Tech Toolboxes
    • Webinars & Digital Events
  • Resources
    • Digital Issues
    • EE Training Days
    • LEAP Awards
    • Podcasts
    • Webinars / Digital Events
    • White Papers
    • Engineering Diversity & Inclusion
    • DesignFast
  • Guest Post Guidelines
  • Advertise
  • Subscribe