Engineers Garage

  • Projects and Tutorials
    • Electronic Projects
      • 8051
      • Arduino
      • ARM
      • AVR
      • PIC
      • Raspberry pi
      • STM32
    • Tutorials
    • Circuit Design
    • Project Videos
    • Components
  • Articles
    • Tech Articles
    • Insight
    • Invention Stories
    • How to
    • What Is
  • News
    • Electronic Products News
    • DIY Reviews
    • Guest Post
  • Forums
    • EDABoard.com
    • Electro-Tech-Online
    • EG Forum Archive
  • Digi-Key Store
    • Cables, Wires
    • Connectors, Interconnect
    • Discrete
    • Electromechanical
    • Embedded Computers
    • Enclosures, Hardware, Office
    • Integrated Circuits (ICs)
    • Isolators
    • LED/Optoelectronics
    • Passive
    • Power, Circuit Protection
    • Programmers
    • RF, Wireless
    • Semiconductors
    • Sensors, Transducers
    • Test Products
    • Tools
  • EE Resources
    • DesignFast
    • LEAP Awards
    • Oscilloscope Product Finder
    • White Papers
    • Webinars
  • EE Learning Center
  • Women in Engineering

Using SMTP in the IoT

By engineersgarage

Controlling IoT devices requires specific apps and settings. But you can also control them using emails since emailing is possible using SMTP (Simple Mail Transfer Protocol), which is on the TCP/IP stack. Therefore, the devices that support TCP/IP stack can use emails as command and control.

So, for an application purpose, we will be making a device that will be sensing any object’s presence in a particular range and clicking an image when anyone will be in the detection range of the device. Finally, it will send an email with the image as an attachment.

Components Required

  1. Raspberry Pi
  2. Raspberry Pi camera module
  3. Ultrasonic sensor (HC-SR04)
  4. Basic Understanding of Python
  5. 1kΩ, 2kΩ Resistor, jumper Wires

Schematic and connection

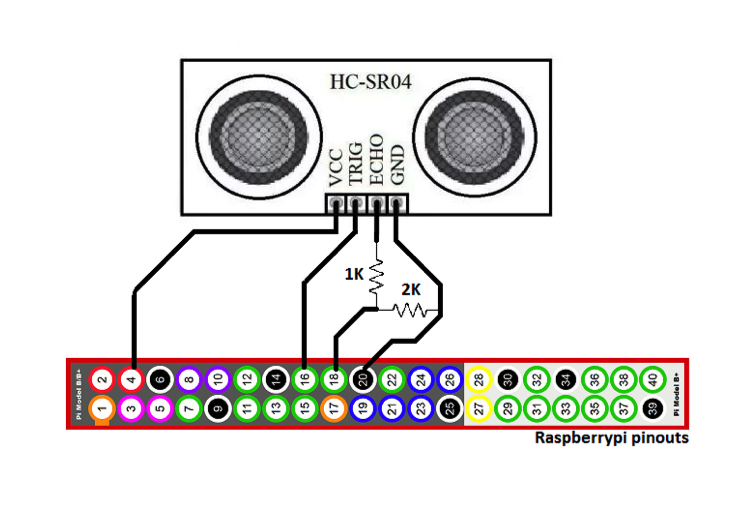
Figure 1. Connection diagram

  1. Connect VCC of HC-SR04 to 5V of Pi and GND to Ground
  2. Connect TRIG Pi to GPIO23
  3. For the ECHO pin, the Raspberry Pi’s GPIO does not support a 5 V signal directly, so we will be using a voltage divider to connect the ECHO pin to GPIO24 and make a 5V signal 3.3V.

Understanding the basic functionality

  1. We will be using a Python script to control our sensor module and camera modules input and output connected to the Pi for detection and sensing.
  2. The sensor will send ultrasonic waves and detect the waves reflating back on the ECHO pin; thus, we can calculate the distance at which the object is placed from the sensor. So, we will make a distance area where we can get an ECHO signal if an object is placed there.
  3. The echo signal will act as a click button for our camera module, and thus we will be getting an image every time someone enters the detection area.
  4. After taking the picture, we will be using SMTP to transfer captured image to our mailbox.

Implementation

We will use Python 2.7 to implement the complete functionality, including many multithreading and parallel tasks; therefore, a basic understanding of Python is required. The implementation part can be divided into three parts.

  1. Importing important libraries
  2. Detection of object
  3. Clicking the image of object
  4. Emailing the image to mailbox

Setup & Importing important libraries: To perform GPIO and camera functions in Raspberry Pi we will need some Python libraries. We will be importing them to control our camera module as well.
For the camera, we need to install the library using the following command in the terminal.
$ sudo apt-get install python-picamera

After installing, we will be importing the theme in our main script. We will import our libraries on top of that.
import RPi.GPIO as GPIO
import picamera
We also have to import other libraries required for multithreading.

We need to import some libraries such as base64, MIME (for attachments like an image) and SMPT, for emails.
import imaplib
from base64 import b64decode
from smtplib import SMTP
from email.MIMEMultipart import MIMEMultipart
from email.MIMEBase import MIMEBase
from email.MIMEText import MIMEText
from email import Encoders

Now you need to change the variables which stores the value for email and password.
gmail_user = ‘[email protected]’
gmail_pwd = ‘gmail_password’
server = ‘smtp.gmail.com’
server_port = 587

Detection of object: We will make a function that will keep triggering the ultrasonic sensor to send ultrasonic waves out and detect if anything comes in range.
while GPIO.input(ECHO)==1:
At detection this function will call a function to click an image of the object. Since this is a continuous task, it will be in our main loop.
if distance < distance_detect:
capture_image()

Clicking the image of object: To click the image of the object, we will create a function that will be clicking upon calling and storing the image on local storage.
camera.capture(filepath)
After clicking, it will call a function which will be composing an email with the image as an attachment.
download(‘Image’,filepath)

Emailing the image to mailbox:
Using the SMTP library and its methods, this function takes parameters like image name and its path, time of the click, and email to the mailbox. It is a parallel task as the uploading can take time according to the connection speed. We don’t want to stop another task in that period.
sendEmail(rightnow, self.jobid, [self.filepath])

So, this is how we can use emails to communicate with our IoT devices.

Code:

Video

https://www.engineersgarage.com/wp-content/uploads/2021/07/video.mp4

You may also like:

  • SMTP
    SMTP – Simple Mail Transfer Protocol

  • The pros and cons of the Raspberry Pi 400

  • Getting started with Raspberry Pi

  • IoT Standards and Protocols: IoT Part 3

  • Transmission Control Protocol/Internet Protocol (TCP/IP) : IOT Part 28

Filed Under: Tech Articles
Tagged With: IoT, python, Raspberry Pi, smtp
 

Questions related to this article?
👉Ask and discuss on Electro-Tech-Online.com and EDAboard.com forums.


Tell Us What You Think!! Cancel reply

You must be logged in to post a comment.

HAVE A QUESTION?

Have a technical question about an article or other engineering questions? Check out our engineering forums EDABoard.com and Electro-Tech-Online.com where you can get those questions asked and answered by your peers!


Featured Tutorials

  • Adjustable 0 to 30V 2A DC Power Supply Circuit (Part 1/13)
  • Adjustable +/- 1.25V to +/-22V 1A Power Supply Circuit (Part 2/13)
  • Adjustable 0 to 15V 1A Mini Power Supply (Part 3/13)
  • Constant 12V Power Supply for LED Circuits (Part 4/13)
  • Constant +/-9V DC Symmetrical Power Supply Circuit (Part 5/13)
  • Making a Circuit Breaker (Part 6/13)

Stay Up To Date

Newsletter Signup

Sign up and receive our weekly newsletter for latest Tech articles, Electronics Projects, Tutorial series and other insightful tech content.

EE Training Center Classrooms

“ee

“ee

“ee

“ee

“ee

“ee

Recent Articles

  • STMicroelectronics and MACOM announce successful RF GaN-on-Si prototypes
  • Infineon expands its CoolSiC portfolio
  • STMicroelectronics and AWS collaborate for secure IoT connections
  • Pet feeding system using WhatsApp (protocol bridging with MQTT)
  • STMicroelectronics launches new MDmesh MOSFETs

Most Popular

5G 555 timer circuit 8051 ai Arduino atmega16 automotive avr dc motor display Electronic Part Electronic Parts Fujitsu ic infineontechnologies integratedcircuit Intel IoT ir lcd ldr led maximintegratedproducts microchip microchiptechnology Microchip Technology microcontroller microcontrollers mosfet motor powermanagement Raspberry Pi remote renesaselectronics Research robot samsung semiconductor sensor software STMicroelectronics switch Technology vishayintertechnology wireless

RSS EDABOARD.com Discussions

  • Space Vector PWM Help Needed
  • RFIC LNA cascode base and ground layout problem
  • Unable to launch virtuoso: libvisadev.so error
  • DIY test leads - source for lead ends?
  • P-Channel MOSFET always on

RSS Electro-Tech-Online.com Discussions

  • How to get lots of PCBs made cheap?
  • Adding Current Limit Feature to a Buck Converter
  • 24v dc relays not de-energising
  • How do I test amplifier speaker output polarity?
  • XOR Gate Circuit From Diodes
Engineers Garage
  • Analog IC TIps
  • Connector Tips
  • DesignFast
  • EDABoard Forums
  • EE World Online
  • Electro-Tech-Online Forums
  • Microcontroller Tips
  • Power Electronic Tips
  • Sensor Tips
  • Test and Measurement Tips
  • 5G Technology World
  • About Us
  • Contact Us
  • Advertise

Copyright © 2022 WTWH Media LLC. All Rights Reserved. The material on this site may not be reproduced, distributed, transmitted, cached or otherwise used, except with the prior written permission of WTWH Media
Privacy Policy | Advertising | About Us

Search Engineers Garage

  • Projects and Tutorials
    • Electronic Projects
      • 8051
      • Arduino
      • ARM
      • AVR
      • PIC
      • Raspberry pi
      • STM32
    • Tutorials
    • Circuit Design
    • Project Videos
    • Components
  • Articles
    • Tech Articles
    • Insight
    • Invention Stories
    • How to
    • What Is
  • News
    • Electronic Products News
    • DIY Reviews
    • Guest Post
  • Forums
    • EDABoard.com
    • Electro-Tech-Online
    • EG Forum Archive
  • Digi-Key Store
    • Cables, Wires
    • Connectors, Interconnect
    • Discrete
    • Electromechanical
    • Embedded Computers
    • Enclosures, Hardware, Office
    • Integrated Circuits (ICs)
    • Isolators
    • LED/Optoelectronics
    • Passive
    • Power, Circuit Protection
    • Programmers
    • RF, Wireless
    • Semiconductors
    • Sensors, Transducers
    • Test Products
    • Tools
  • EE Resources
    • DesignFast
    • LEAP Awards
    • Oscilloscope Product Finder
    • White Papers
    • Webinars
  • EE Learning Center
  • Women in Engineering