Engineers Garage

  • Electronic Projects & Tutorials
    • Electronic Projects
      • Arduino Projects
      • AVR
      • Raspberry pi
      • ESP8266
      • BeagleBone
      • 8051 Microcontroller
      • ARM
      • PIC Microcontroller
      • STM32
    • Tutorials
      • Audio Electronics
      • Battery Management
      • Brainwave
      • Electric Vehicles
      • EMI/EMC/RFI
      • Hardware Filters
      • IoT tutorials
      • Power Tutorials
      • Python
      • Sensors
      • USB
      • VHDL
    • Circuit Design
    • Project Videos
    • Components
  • Articles
    • Tech Articles
    • Insight
    • Invention Stories
    • How to
    • What Is
  • News
    • Electronic Product News
    • Business News
    • Company/Start-up News
    • DIY Reviews
    • Guest Post
  • Forums
    • EDABoard.com
    • Electro-Tech-Online
    • EG Forum Archive
  • DigiKey Store
    • Cables, Wires
    • Connectors, Interconnect
    • Discrete
    • Electromechanical
    • Embedded Computers
    • Enclosures, Hardware, Office
    • Integrated Circuits (ICs)
    • Isolators
    • LED/Optoelectronics
    • Passive
    • Power, Circuit Protection
    • Programmers
    • RF, Wireless
    • Semiconductors
    • Sensors, Transducers
    • Test Products
    • Tools
  • Learn
    • eBooks/Tech Tips
    • Design Guides
    • Learning Center
    • Tech Toolboxes
    • Webinars & Digital Events
  • Resources
    • Digital Issues
    • EE Training Days
    • LEAP Awards
    • Podcasts
    • Webinars / Digital Events
    • White Papers
    • Engineering Diversity & Inclusion
    • DesignFast
  • Guest Post Guidelines
  • Advertise
  • Subscribe

Voice Record and Playback from SD Card Using GR Sakura

By Ajish Alfred October 19, 2013

There are so many devices available which can record and playback voice. Most of the digital devices like mobile phones can use the SD card to record the voice signals and playback. This project demonstrates how to record voice signals on a micro SD card and play it back using the GR SAKURA board.


Voice signals are continuous analog signals and the digital devices like microcontrollers cannot handle the continuous analog signals. Most of the microcontrollers have an ADC module which can do analog to digital conversion. The microcontroller uses sampling technique to convert the continuous analog signals to discrete digital equivalent samples. 
While recording the voice, the GR SAKURA board samples the voice signals and writes the sampled values to a file at the sampling time itself. The same file is opened again and reads the values at the same frequency at which they are sampled. The digital microcontrollers based devices cannot produce analog output also, since their output will be always either logic high or logic low. To generate the effect of the continuous analog voice signal, the GR SAKURA uses PWM (Pulse Width Modulation) technique.
DESCRIPTION


The GR SAKURA board has a micro SD card slot and the board is connected to a microphone amplifier circuit at its input and loudspeaker driver circuit at its output. The project uses a simple condenser microphone which captures the voice input and the fetch them to one of the ADC channels of the GR SAKURA. The GR SAKURA reads the digital equivalent value of the sampled analog signal and writes the same value to the micro SD card at the same sampling time itself. While playing back, the GR SAKURA reads the same sampled values from the micro SD card to generate the PWM equivalent of the analog voice signals at an output pin where the loudspeaker is connected.
The entire system can be divided into the following blocks:
Block Diagram of GR Sakura based Voice Recoder and Playback
 
Fig. 1: Block Diagram of GR Sakura based Voice Recoder and Playback

1)      MICROPHONE AMPLIFIER CIRCUIT

The microphone used here is a small commonly found condenser microphone. The microphone captures the voice signals from the surrounding and produces the voltage equivalent of the sound signals. The amplitude of the sound signal output from the microphone is very feeble and they need to be amplified several times before they are applied to the microcontroller or any other devices. This circuit blocks uses two stage transistor based amplifier which are designed amplify the analog voice signals to the required amplitude level for the GR SAKURA.
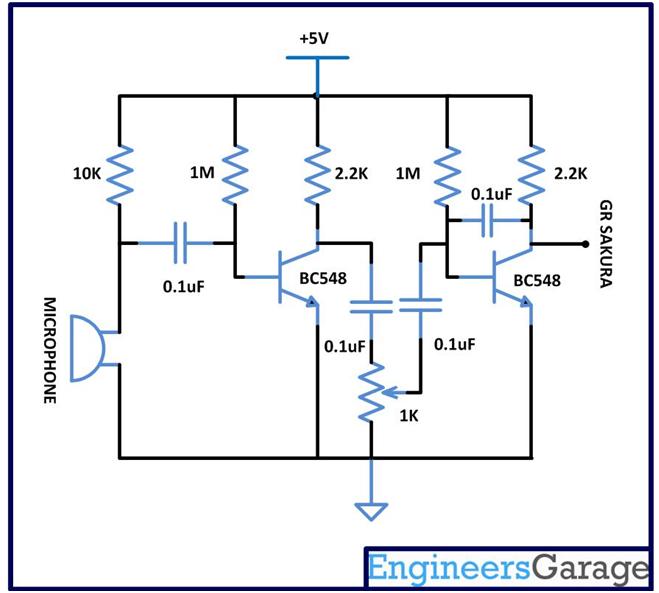
Circuit Diagram of Microphone Amplifier

Fig. 2: Circuit Diagram of Microphone Amplifier

The supply voltage is taken from the GR SAKURA board itself operating with USB power. To get the +5V from the 5 volt VCC pin of the SAKURA board, the jumper J2 is shorted.
      2)      GR SAKURA


The voltage at the ADC channel or the analog input of the GR SAKURA will be the sum of quiescent voltage of the transistor amplifier + amplified voice signals. The quiescent voltage is subtracted from the total voltage to get the voice signal. The GR SAKURA samples the voice signals at a sampling frequency of 20 KHz. Sampling the voice signals at 20 KHz means it converts the analog signal at the analog input pin to digital value and reads the value at every 50 micro seconds.
The TIMER 0 of the GR SAKURA is used to generate exact time intervals of 50 us at which the voice signals needs to be sampled. At the same time interval the same voice sampled value is written to the micro SD card using memory card interfacing library. A file of predefined name is created and opened in writing mode into which the sampled values are written at each and every sampling period. Once the recording is completed the file is closed.
For playing back the voice, the same file is opened in the reading mode and the sample values are read back with the same sampling frequency. Thissample values are used to modify the ON period and the OFF period of the timer in such a way that the entire sampling period is always constant. At every ON time the digital output pin where the loudspeaker is connected is turned on and at every OFF period it is turned off.
Thus the digital output pin of the GR SAKURA has a digital waveform of which the ON period and OFF period varies according to the amplitude of the input voice signals but keeping the entire (ON + OFF) period constant as the sampling period. This is nothing but a PWM equivalent of the input voice signal at that digital output pin. When this PWM wave is applied to the loudspeaker it will produce the same sound which has been captured through the microphone.
The code written for this uses the functions like digitalWrite()and analogRead()to write digital values to a digital output pin and read the analog input values from an analog input pin respectively. The files “intvect.c” of the Cloud Compiler IDE is modified to enable the TIMER0 interrupt. For writing into and reading back from the micro SD card the GR SAKURA uses the functions like begin(), open(), write(), read(), close() and remove() from the SD card interfacing library.

Loudspeaker Driver and Playback

      3)      LOUDSPEAKER DRIVER
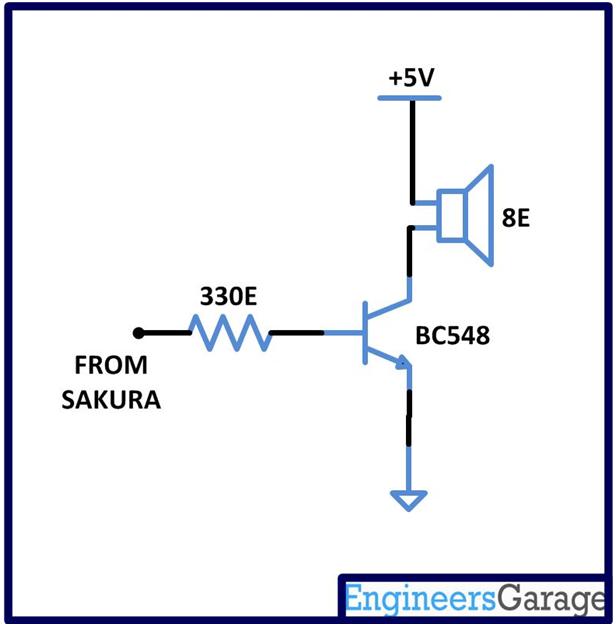
The Loudspeaker used to reproduce the sound signals in this project is an 8 ohm loudspeaker. The 8 ohm loudspeaker consumes lot of current while it operates but the current sourcing capabilities of the digital output pin of the microcontrollers are limited. Here the output pin is connected to the base of a transistor and the Loudspeaker is connected to the collector of a transistor. Very low base current is required to drive the loudspeaker at the collector of the transistor with the required amount of current.

Circuit Diagram of Loud Speaker Driver

Fig. 3: Circuit Diagram of Loud Speaker Driver

      4)      RECORD/PLAYBACK SWITCH

The record and playback switch is a simple push button which is pulled down using a 1K ohm resistor and when pressed it makes contact with the VCC. The button is connected to the pin number 8 of the GR SAKURA which is configured as an input pin. Before recording, the code will wait till the value at the pin number 8 becomes logic high which will happens when someone presses the button.The digital value is read from this pin using the functiondigitalRead().

Circuit Diagram
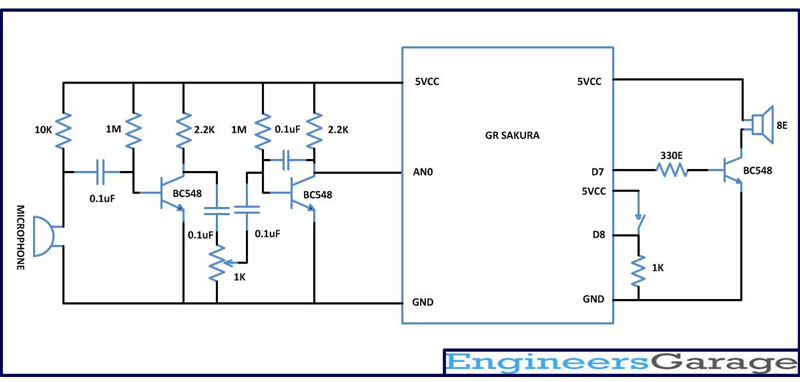
 

Circuit Diagram of GR Sakura based Voice Recorder and Playback

Fig. 4: Circuit Diagram of GR Sakura based Voice Recorder and Playback


Circuit Diagram of GR Sakura based Voice Recorder and Playback

Fig. 5: Circuit Diagram of GR Sakura based Voice Recorder and Playback


Project Datasheet

https://www.engineersgarage.com/wp-content/uploads/2019/10/code_0.zip


Project Video


Filed Under: Electronic Projects
Tagged With: GR Sakura, sd card
 

Next Article

← Previous Article
Next Article →

Questions related to this article?
👉Ask and discuss on EDAboard.com and Electro-Tech-Online.com forums.


Tell Us What You Think!! Cancel reply

You must be logged in to post a comment.

EE TECH TOOLBOX

“ee
Tech Toolbox: 5G Technology
This Tech Toolbox covers the basics of 5G technology plus a story about how engineers designed and built a prototype DSL router mostly from old cellphone parts. Download this first 5G/wired/wireless communications Tech Toolbox to learn more!

EE Learning Center

EE Learning Center
“engineers
EXPAND YOUR KNOWLEDGE AND STAY CONNECTED
Get the latest info on technologies, tools and strategies for EE professionals.

HAVE A QUESTION?

Have a technical question about an article or other engineering questions? Check out our engineering forums EDABoard.com and Electro-Tech-Online.com where you can get those questions asked and answered by your peers!


RSS EDABOARD.com Discussions

  • SMPS feedback circuit
  • How to generate and use large‑signal S‑parameter (LSSP) files for PA harmonic‑balance (HB) simulations?
  • Snooping Around is All
  • ADEM III ECM — No CAN Signal & Power Supply Issue
  • IGBTs without negative gate drive

RSS Electro-Tech-Online.com Discussions

  • More fun with ws2812 this time XC8 and CLC
  • Pic18f25q10 osccon1 settings swordfish basic
  • Pickit 5
  • turbo jet fan - feedback appreciated.
  • I Wanna build a robot

Featured – LoRa/LoRaWan Series

  • What is the LoRaWAN network and how does it work?
  • Understanding LoRa architecture: nodes, gateways, and servers
  • Revolutionizing RF: LoRa applications and advantages
  • How to build a LoRa gateway using Raspberry Pi
  • How LoRa enables long-range communication
  • How communication works between two LoRa end-node devices

Recent Articles

  • How IoT network topologies work
  • The top five AI startups to watch in 2025
  • STMicroelectronics unveils SoC based on secure MCU
  • Nexperia’s 48 V ESD diodes support higher data rates with ultra-low capacitance design
  • Taoglas releases Patriot antenna with 18 integrated elements covering 600 to 6000 MHz

EE ENGINEERING TRAINING DAYS

engineering

Submit a Guest Post

submit a guest post
Engineers Garage
  • Analog IC TIps
  • Connector Tips
  • Battery Power Tips
  • DesignFast
  • EDABoard Forums
  • EE World Online
  • Electro-Tech-Online Forums
  • EV Engineering
  • Microcontroller Tips
  • Power Electronic Tips
  • Sensor Tips
  • Test and Measurement Tips
  • 5G Technology World
  • Subscribe to our newsletter
  • About Us
  • Contact Us
  • Advertise

Copyright © 2025 WTWH Media LLC. All Rights Reserved. The material on this site may not be reproduced, distributed, transmitted, cached or otherwise used, except with the prior written permission of WTWH Media
Privacy Policy

Search Engineers Garage

  • Electronic Projects & Tutorials
    • Electronic Projects
      • Arduino Projects
      • AVR
      • Raspberry pi
      • ESP8266
      • BeagleBone
      • 8051 Microcontroller
      • ARM
      • PIC Microcontroller
      • STM32
    • Tutorials
      • Audio Electronics
      • Battery Management
      • Brainwave
      • Electric Vehicles
      • EMI/EMC/RFI
      • Hardware Filters
      • IoT tutorials
      • Power Tutorials
      • Python
      • Sensors
      • USB
      • VHDL
    • Circuit Design
    • Project Videos
    • Components
  • Articles
    • Tech Articles
    • Insight
    • Invention Stories
    • How to
    • What Is
  • News
    • Electronic Product News
    • Business News
    • Company/Start-up News
    • DIY Reviews
    • Guest Post
  • Forums
    • EDABoard.com
    • Electro-Tech-Online
    • EG Forum Archive
  • DigiKey Store
    • Cables, Wires
    • Connectors, Interconnect
    • Discrete
    • Electromechanical
    • Embedded Computers
    • Enclosures, Hardware, Office
    • Integrated Circuits (ICs)
    • Isolators
    • LED/Optoelectronics
    • Passive
    • Power, Circuit Protection
    • Programmers
    • RF, Wireless
    • Semiconductors
    • Sensors, Transducers
    • Test Products
    • Tools
  • Learn
    • eBooks/Tech Tips
    • Design Guides
    • Learning Center
    • Tech Toolboxes
    • Webinars & Digital Events
  • Resources
    • Digital Issues
    • EE Training Days
    • LEAP Awards
    • Podcasts
    • Webinars / Digital Events
    • White Papers
    • Engineering Diversity & Inclusion
    • DesignFast
  • Guest Post Guidelines
  • Advertise
  • Subscribe