A Wireless Sensor Network (WSN) consists of the following:
- One central receiver (for monitoring, storage, and controlling)
- Several wireless sensor nodes
The wireless sensor node is a battery-powered or solar-powered circuit that senses any physical quantity (like temperature, pressure, flow, soil moisture, gas, smoke, etc.) and transmits its value to a remote receiver. It consists of
- One sensing element
- Microcontroller unit (MCU) (may be optional in some cases)
- Modulator and Transmitter (mostly RF)
- Battery (some time solar powered)
Many such sensor nodes are placed at a regular distance in a big geographical area to cover the complete area. They all send their data to one receiver that is placed in central data monitoring and storage system. All the sensor nodes transmit data (sensor value) periodically. The receiver receives the data from all such nodes, and it is stored and displayed for monitoring and controlling purposes.
Just have a look at one example.
- It is required to maintain the set temperature in every corner of the complete area in cold storage. So, many small wireless temperature sensing nodes are installed in different corners. Together, they sense the surrounding temperature and transmit sensed value to the central monitoring and controlling room. So the central controller can get the temperature readings from all the corners of the storage area, and based on that, it will try to maintain the same temperature in every corner.
Here in this project for the sensor node, I have used gas sensor MQ2 to sense different gas (like CO2, methane, LPG, propane, etc.) in the atmosphere. The idea is to detect gas leakage at any point. For example:
- In a very long LPG gas line, such sensor nodes are placed at a regular distance. so whenever and wherever there is a leakage inline, the sensor node detects it and transmit it to the remote center to take controlling action immediately
- In a chemical processing industry/plant, such sensor nodes are placed at different locations (like on gas chambers, tanks, boilers, etc.) to detect leakage of hazardous gases. They detect gas leakage immediately sends an alarm signal to a central control room. The central control room takes necessary action, and thus the catastrophic effects can be prevented.
The sensor node also consists of Arduino NANO as MCU, and 433 MHz ASK RF transmitter module. There can be many such sensor nodes, but I have used only 2 such nodes. The receiver includes a 433 MHz ASK RF receiver module and Arduino NANO MCU. Both sensor nodes transmit data of sensed values of GAS. The receiver receives values from both sensors and gives them to the computer. Computer displays these values and stores them for future use.
So let us build the system, starting with the block diagram first, followed by a circuit diagram, its working, and operation. The software program is given at the last
System block diagram
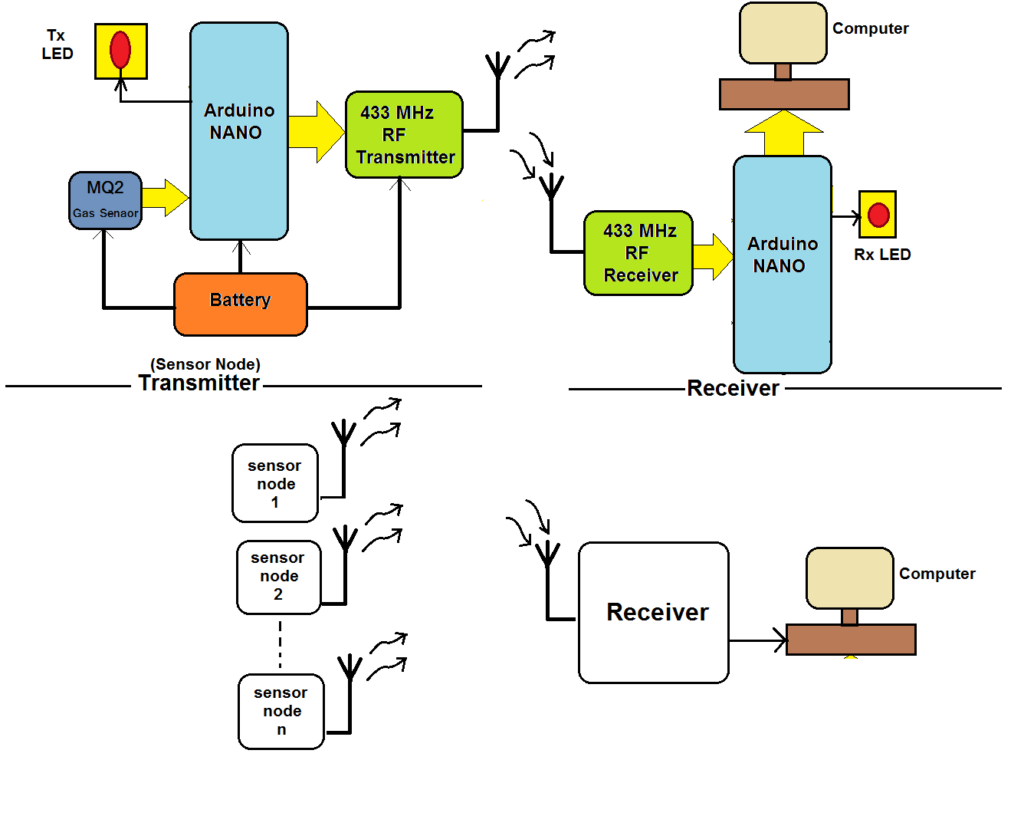
The complete system is divided into two distinct blocks
- Transmitter (also termed as a sensor node)
- Receiver
There may be any number of sensor nodes situated at different places, but there will be only one receiver that is connected with a central data storage system (computer)
The sensor node consists of four things, (1) different sensors, (2) micro-controller, (3) RF transmitter, and (4) battery. Here in our case
- The sensor is an MQ2 gas sensor that is used to detect gas/smoke in the surrounding atmosphere
- Arduino nano board is used as a microcontroller that will read the data from the gas sensor and transmit it using an RF transmitter
- An ASK based RF transmitter module with 433 MHz carrier frequency is used to modulate and transmit the data to the receiver
- 6V – 9V battery is used to provide power supply to complete the sensor node
- One LED is also given that will blink to indicate the sensor node is active and it is transmitting data
The receiver consists of only two things, (1) RF receiver module and (2) microcontroller.
Here in our case
- An ASK based RF receiver module with 433 MHz carrier frequency is used to demodulate and receive data transmitted by sensor node RF Tx module
- Arduino NANO board is used as a microcontroller that gets the data from the RF receiver module and gives it to a computer that will store it for future use
- One LED is given here also that will blink to indicate the receiver is active and it is receiving data
Circuit diagram of sensor node
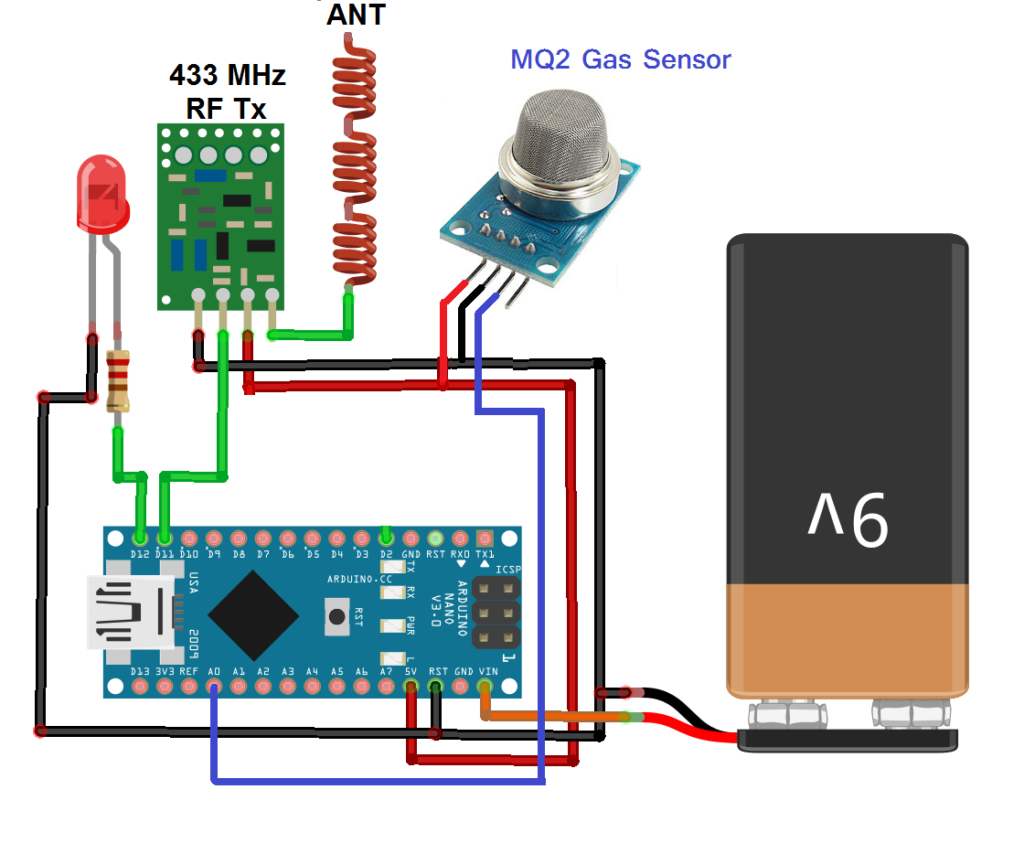 As shown in the figure, there are only 3 major components in the circuit
- MQ2 sensor has only 4 pins for interfacing. (1) Vcc (2) Gnd (3) A0 and (4) D0. D0 pin is digital output (that is either 0 or 1), and it is not used. A0 is analog output, and it is connected with analog input A0 of Arduino. Vcc pin is connected with 5 V output of Arduino board, and Gnd is connected with common ground
- 433 MHz RF Tx module has 4 interfacing pins. (1) Vcc (2) Gnd (3) data_in and (4) antenna. The Vcc pin is connected with the 5 V output of the Arduino board, and Gnd is connected with common ground. Data_in pin is connected with digital pin D11 of Arduino board. an antenna is formed by wounding 1 mm @ 35 cm long copper wire (single-core) that is connected with an antenna pin
- An LED is connected to digital pin D12 through a current limiting resistor
- A 9V battery is used to give supply to the Arduino board. Arduino board Vin pin is connected with the battery. So the board will get working voltage, and it will generate 5 V supply from onboard 7805 voltage regulator chip, and that is given to DHT11 and RF Tx module
Circuit diagram of remote data receiver
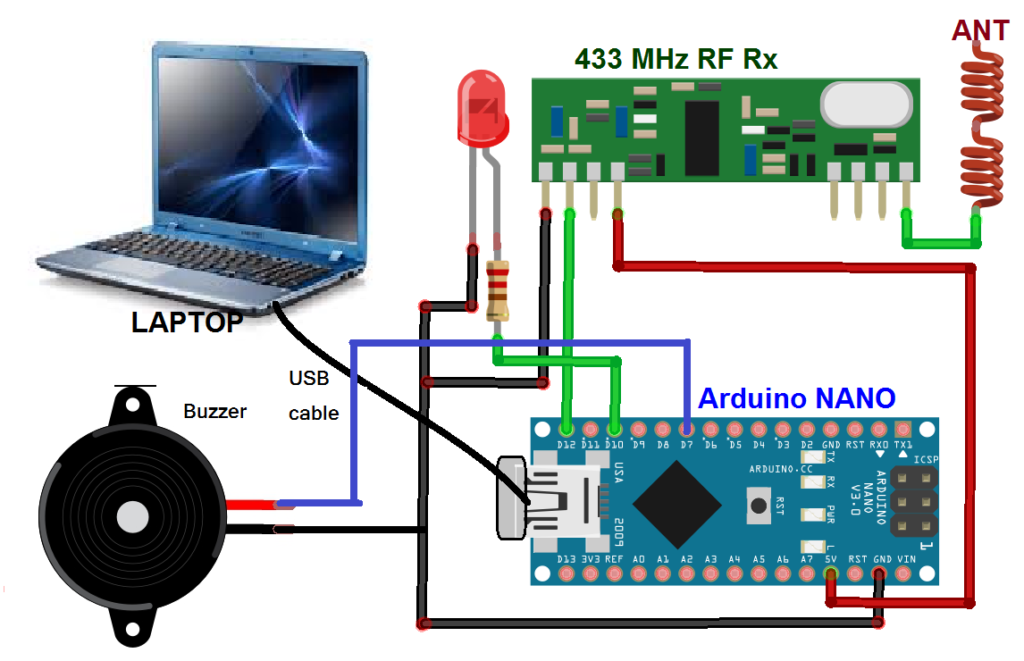 As shown in the figure, there are only three major components in this receiver circuit
- 433 MHz RF Rx module has 4 interfacing pins. (1) Vcc (2) Gnd (3) data_out and (4) antenna. The Vcc pin is connected with the 5 V output of the Arduino board, and Gnd is connected with common ground. Data_out pin is connected with digital pin D12 of the Arduino board. an antenna (same as transmitter side) is connected with antenna pin
- An LED is connected to digital pin D10 through a current limiting resistor
- A 5V DC buzzer is connected at digital pin D7 as shown
- The Arduino board and RF Rx module get power supply from laptop/desktop PC/central storage system computer through USB cable. The Arduino board also logs data and communicates with the computer using the same USB cable
Working and operation
Sensor node
If I want to say sensor node operation in a single line, I will say, “it will periodically sense gas and transmit them.” But it is not that simple. There may be 2, 3, 5, 10, or N number of sensor nodes as we had seen in the block diagram. They all are doing the same thing. More than one node may transmit data at a time. Another question is, “how would the receiver know the data received is from a particular node (say node 1, node 2, etc.)?”
To overcome these problems, special arrangements have to be made. All the sensor nodes will be synchronized in time so that two nodes will not transmit simultaneously. In any case, if that happens, the receiver will accept any one sensor data. Also, all the nodes are assigned numbers (say from 1 to N), and before they transmit the data, they transmit their node number. So the receiver would know this data is from sensor node X.
- MQ2 gas sensor gives analog voltage output directly proportional to gas level in surrounding atmosphere. That means its output voltage increases as gas concentration increases. Arduino converts this analog voltage into digital value (between 0 to 1023) and maps it between 0 – 99%. Finally, it converts this % value into ASCII characters
- It forms a string (array of characters) of 4 characters as
node number + gas concentration
(2 characters) (2 characters)
- And then give it to RF Tx module through pin D11
- RF Tx module gets this string of 10 characters (we may call it as a packet), modulates it using 433 MHz carrier, and transmit it using antenna
- Whenever a packet is transmitted, the microcontroller blinks the LED to indicate data is transmitted
- This cycle continuously repeats after set time period (say 3 or 5 or 10 seconds)
Remote Data Receiver
- The RF Rx module receives packets from every node. It demodulates and gives this packet to Arduino micro-controller
- The micro-controller gets the packet and extracts gas level value (in %) along with node number
- It serially sends this data to computer through USB as
Node x
Gas level: XXX %
- The micro-controller blinks LED to indicate data is received
- If gas level in any node is more than the threshold level, then the buzzer will sound continuously to indicate gas leakage problem
- This process repeats for each packet received from any node at any time. because all node are synchronized in time, they all transmit data one after another
- So receiver will get data from all nodes one by one, and it updates readings of any one node after set time period
Sensor node program:
#include <VirtualWire.h>
#define MQ2_pin A0

const int led_pin = 12;
const int transmit_pin = 11;
char str1[2];
char node[3] = "01"; // node number. change this node number for
char trnsmit_str[4];// different node
void setup()
{
    vw_set_tx_pin(transmit_pin);
    vw_set_ptt_inverted(true);
    vw_setup(2000);       			// Bits per sec
    Serial.begin(9600);
    pinMode(led_pin, OUTPUT);
}
void loop()
{
  int gas,gas_level;
  gas=analogRead(MQ2_pin);
  gas_level=map(gas,0,1023,0,99);		// map them in the range between 0 to 99%
  Serial.println("Node 1");		// serially print all values
  Serial.print("gas level: ");		// for debugging
  Serial.print(gas_level);
  Serial.println(" %");
  digitalWrite(led_pin, HIGH); 		// Flash a light to show transmitting
  itoa(gas_level,str1,10);			// convert all 2 digit values into
  strcpy(trnsmit_str,node);		// one string
  strcat(trnsmit_str,str1);
  Serial.print("transmitted string: ");
  Serial.println(trnsmit_str);
  vw_send((uint8_t *)trnsmit_str, 4);
  vw_wait_tx(); 				// Wait until the whole message is gone
  digitalWrite(led_pin, LOW);
  delay(5000);
}

Sensor node program:Receiver program for 2 nodes:
#include <VirtualWire.h>
#define gas_threshold 80
#define siren 7
const int receive_pin = 12;
int led = 10,gas_level;
void setup()
{
  Serial.begin(9600);                 	// setup serial communication
  vw_set_rx_pin(receive_pin);
  vw_set_ptt_inverted(true);
  vw_setup(2000);                     	// wireless data rate
  vw_rx_start();                   	// Start the receiver PLL running
  pinMode(led,OUTPUT);
  pinMode(siren,OUTPUT);
  digitalWrite(led,LOW);
  digitalWrite(siren,LOW);
  delay(1000);
  Serial.println("Receiving sensor DATA from all nodes.....");
}
void loop()
{
   uint8_t buf[VW_MAX_MESSAGE_LEN];
   uint8_t buflen = VW_MAX_MESSAGE_LEN;
   int i;
   if (vw_get_message(buf, &buflen)) 	// when msg is received
     {
        digitalWrite(led,HIGH);
        if(buf[1]=='1')			// check node number
        {
          Serial.println("Node 1");	// print node number and
          Serial.print("gas level: "); 	// all sensor values
          for (i = 2; i < 4; i++) Serial.print(buf[i]-48);
          Serial.println(" %");
		gas_level = (buf[2]-48)*10 + (buf[3]-48)*1;
           if(gas_level>gas_threshold) digitalWrite(siren,HIGH);
           else digitalWrite(siren,LOW);
         }
      else if(buf[1]=='2')
        {
          Serial.println("Node 2");
          Serial.print("Gas Level: ");
          for (i = 2; i < 4; i++) Serial.print(buf[i]-48);
          Serial.println(" %");
          gas_level = (buf[2]-48)*10 + (buf[3]-48)*1;
           if(gas_level>gas_threshold) digitalWrite(siren,HIGH);
          else digitalWrite(siren,LOW);
       }
     }
  }
{
You may also like:
Filed Under: Electronic Projects, Featured





Questions related to this article?
👉Ask and discuss on EDAboard.com and Electro-Tech-Online.com forums.
Tell Us What You Think!!
You must be logged in to post a comment.