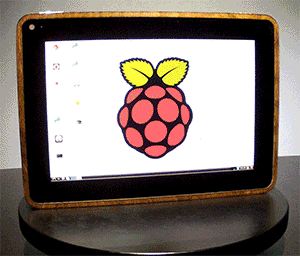
M K Castor built an enclosure for the PiPad in simplistic, functional design accompanied by fun, hidden features and awesome design in a stand-alone tablet form-factor. He used the PiPad as a company on flights so he made the enclosure look as factory as possible, while being accessible and usable.
Equipment required
To start with frame Material and backing Material, you will also require latch /closing, battery, Wi-Fi, USB HUB, Bluetooth, Keyboard, Main brain – Raspberry Pi Model B, Heat Sinks for Raspberry Pi, Misc. USB ends – Male A (3), Micro (1), Female A Screen and 10″ Capacitive Touch Screen with LDVS Adapter. Further, you will also need brightness adjustment of 10K Potentiometer, GPIO and connectors for GPIO. A Power switch, Screen / backing, Hinges Extension for battery charging, Amplification and Audio. All the associated files are available on Github

Working
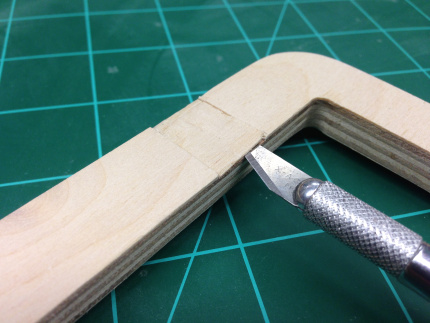
1/2″ Baltic birch plywood and 1/16″ carbon fiber for the back are the principle components for the enclosure. The design is in the form of Vectric’s incredible Aspire CAD/CAM package and for enough clearance, used the image tracing feature to digitally recreate the components. All those components were placed on a scanner and then loaded into the software so I could manipulate them for the best layout
Hand cut the necessary slots and down cut new spiral bit for a smooth finish and turn CNC machine loose on the wood. To line up everything, machine the carbon fiber with a 1/8″ carbide Dremel bit, sanded, and do a test fit.
For electronics, cut access holes in the plywood frame. After marking. Cut one layer of plywood with an Exacto knife until the slot was deep enough. Then measure and mark the SD card slot, tape a level onto drill and then drill a series of holes using a 1/8″ bit. After drilling the holes, cut out the area for the hinges and mount them into place.
Glue the carbon fiber back in place, then install all the components and solder the wiring. Put whole thing together and turn it on. Once the power indicator blinks and starts booting, start anchoring the components in place using either hot glue, permanent double sided tape, and foam tape. Finally clamp the battery and screen down to allow the tape to cure over night to ensure a good bond.
Conclusion:
The flawless performance of PiPad on every flight is proof of its success. The point is that it can be made by anyone and since it requires an up gradation so you can give a try
Up gradation
There is a possibility of adding a camera and IR sensor and the touch screen working in Raspbmc – evidently it isn’t compiled with the nTrig driver. This is how it ends. For minute details, visit MKcastor blogs. All the Best.
Filed Under: Reviews

Questions related to this article?
👉Ask and discuss on Electro-Tech-Online.com and EDAboard.com forums.
Tell Us What You Think!!
You must be logged in to post a comment.