Engineers Garage

  • Projects and Tutorials
    • Electronic Projects
      • 8051
      • Arduino
      • ARM
      • AVR
      • PIC
      • Raspberry pi
      • STM32
    • Tutorials
    • Circuit Design
    • Project Videos
    • Components
  • Articles
    • Tech Articles
    • Insight
    • Invention Stories
    • How to
    • What Is
  • News
    • Electronic Products News
    • DIY Reviews
    • Guest Post
  • Forums
    • EDABoard.com
    • Electro-Tech-Online
    • EG Forum Archive
  • Digi-Key Store
    • Cables, Wires
    • Connectors, Interconnect
    • Discrete
    • Electromechanical
    • Embedded Computers
    • Enclosures, Hardware, Office
    • Integrated Circuits (ICs)
    • Isolators
    • LED/Optoelectronics
    • Passive
    • Power, Circuit Protection
    • Programmers
    • RF, Wireless
    • Semiconductors
    • Sensors, Transducers
    • Test Products
    • Tools
  • EE Resources
    • DesignFast
    • LEAP Awards
    • Oscilloscope Product Finder
    • White Papers
    • Webinars
  • EE Learning Center
    • Design Guides
      • WiFi & the IOT Design Guide
      • Microcontrollers Design Guide
      • State of the Art Inductors Design Guide
  • Women in Engineering

Multiple DS18B20 temperature sensors interfacing with nodemcu esp8266: DS18B20 WiFi temperature monitoring over Web Server with arduino IDE

By EG Projects

In this tutorial i am going to teach you how to interface multiple ds18b20 temperature sensors with nodemcu esp8266 12e WiFi module and monitor temperature over WiFi. Temperature readings can be seen in browser of any mobile, desktop, laptop or notebook device on a web page. Web page enlists the temperature readings of multiple ds18b20 temperature sensors. Web page also contains an update button. Pressing the update button will get the instance temperature readings from all ds18b20 sensors and display them on web page. Code of the project is written and compiled in arduino ide. Make sure you have installed the nodemcu esp8266 12e WiFi board support for arduino ide before starting the project.  
Nodemcu and ds18b20 temperature sensor

Nodemcu and ds18b20 temperature sensor

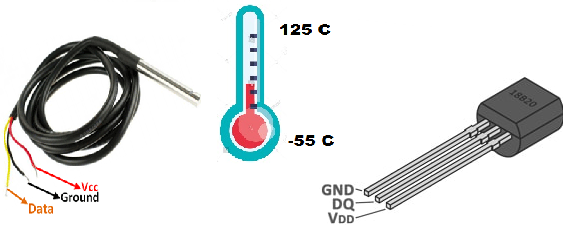
DS18B20 Temperature Sensor

DS18B20 is a tiny digital temperature sensor. It comes in TO-92 package. It looks same like a transistor. Though its small in size but it provides greater accuracy and temperature measurement range when compared to other digital temperature sensors available in market. Its price range is between $1.50 to $4 depending on the manufacturer. It can measure temperature from -55 degree centigrade to 125 degree centigrade with +-0.5 degree centigrade margin of error. You can monitor extreme high and low temperatures with ds18b20. You can even use it in your refrigerators and kitchens.  Ds18B20 works on 3 to 5 volts. 
Ds18b20 is a 1-wire temperature sensor. From 1-wire it means the sensor require only one digital pin for its operation. Since each ds18b20 has a unique address and only one wire is required to communicate with them hence we can connect multiple ds18b20 sensors to a single 1-wire and call them one by one with their addresses. Each DS18B20 contains a unique 64-bit address etched in to it. Ds18b20 provides 9-bit or 12-bit precision. 
DS18B20 Pin out

DS18B20 Pin out

Ds18b20 has 3 pins. Two are power pins. Vcc is +ve power pin and GND is -ve power pin. The third pin is DQ pin. Its our data line. We have to connect this line to our microcontroller or control system. If we are using multiple ds18b20 sensors in our project then we need to commonly connect all the sensors DQ pins to a single point/wire.   
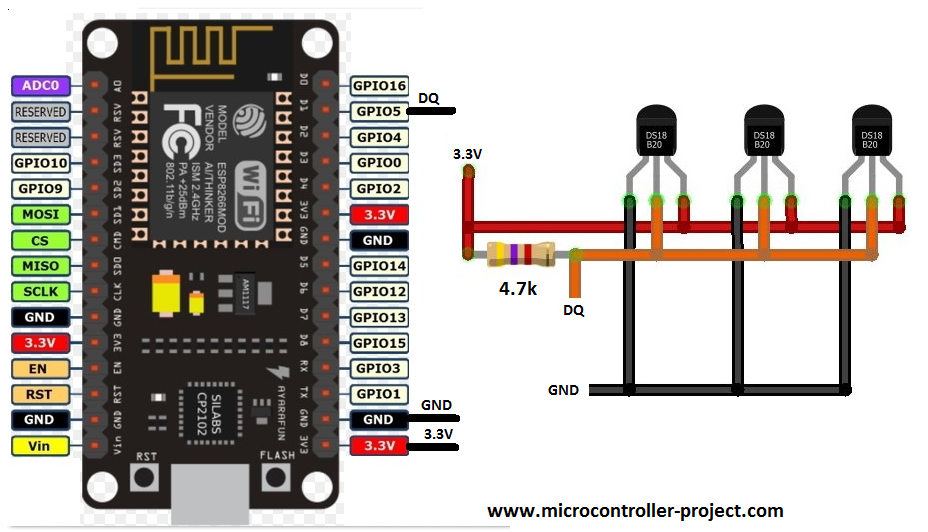
DS18B20 is available in market in two forms. One is naked all the pins are exposed same like transistors/mosfets. The other is with a half meter long wire. In this form sensor legs are connected to long wire almost half meter in length and the sensor is enclosed in a metallic cylinder. DS18B20 is enclosed in metallic cylinder to prevent it from heating.     

Project circuit

I am going to monitor the temperature from three ds18b20 temperature sensors connected commonly to a single 1-wire. Nodemcu esp8266 GPIO-5 or D1 is used as data pin to accept the digital output from the sensors. All the sensors DQ pins are connected to GPIO-5 of nodemcu. DQ pin is pull up with 4.7 k current limiting resistor. DQ pin must be pulled up for proper ds18b20 configurations. Sensor may work with out pull up resistor but it will cause problem after some time. 
Nodemcu works on 3.3 v TTL logic and ds18b20 working range is between 3 to 5 volts. So we can power ds18b20 with nodemcu power output rails and i powered the sensors with nodemcu power output.  
Nodemcu esp8266 with multiple ds18b20 sensors

Nodemcu esp8266 with multiple ds18b20 sensors

Coming to the code of the project. First i included three libraries(<OneWire.h>,<DallasTemperature.h> and <ESP8266WiFi.h>). OneWire.h is standard arduino one wire library it is used for working with 1 wire devices. Since our ds18b20 is a one wire temperature sensor so we included this library in our code to use its pre defined functions. DallasTemperature.h library is provides by Dallas. It is used for dallas temperature sensors. DS18B20 is a dallas temperature sensor we included this library in our code to use its pre defined functions provided by dallas to work with its temperature sensors. ESP8266WiFi.h library is used to setup nodemcu esp8266 WiFi or server. It is used for all the nodemcu WiFi functions from configurations to client request processing. Next the nodemcu digital pin is defined which is going to communicate with the ds18b20 sensors connected to a 1-wire bus.
Please enter your WiFi SSID and password before moving any further. Enter the SSID and password in the double quotations. 

const char* ssid = “Your SSID”;                            //Enter your WiFi SSID Here
const char* password = “Your Wifi Password”;  //Enter your WiFi Password Here

After ssid and password some variables are defined. These variables are used to grab the temperature from each ds18b20 sensor. Celsius1 is used store the temperature in Celsius from sensor 1 and Fahrenheit1 is used to store the temperature in Fahrenheit from sensor 1. The other variables are for the rest of the 2 ds18b20 sensors. Moving forward web server default port 80 is defined. 
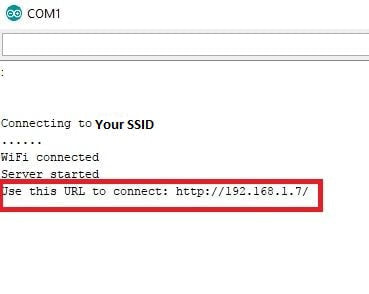
​In the setup function first the arduino serial monitor communication channel is initialed at 115200 baud rate. Then ds18b20 sensors on 1-wire bus are commanded to start the operations. After wards nodemcu is requesting the WiFi router for an IP allotment. When IP is allotted by your router nodemcu starts its server.   
 /************************************************* * Written by : Usman Ali Butt * * Property off : www.microcontroller-project.com* * Dated : 30 July 2018 * ************************************************/ #include <onewire.h> #include <dallastemperature.h> #include <esp8266wifi.h> // Data output of DS18B20 is connected to nodemcu GPIO 5 or D1 #define ONE_WIRE_BUS 5 // Setting a one wire instance OneWire oneWire(ONE_WIRE_BUS); // Passing onewire instance to Dallas Temperature sensor library DallasTemperature sensors(&oneWire); const char* ssid = "Your SSID"; //Enter your WiFi SSID Here const char* password = "Your Wifi Password"; //Enter your WiFi Password Here //Variables to store temperature readings from DS18B20 temperature sensors int Celsius1=0, Fahrenheit1=0; int Celsius2=0, Fahrenheit2=0; int Celsius3=0, Fahrenheit3=0; WiFiServer server(80); //Web server default port void setup(){ Serial.begin(115200); //initialize serial communication delay(10); sensors.begin(); // Begin the DS18B20 initialization delay(10); Serial.println(); Serial.println(); Serial.print("Connecting to "); // Connect to WiFi network Serial.println(ssid); WiFi.begin(ssid, password); while (WiFi.status() != WL_CONNECTED) { delay(500); Serial.print("."); } Serial.println(""); Serial.println("WiFi connected"); // Start the server server.begin(); Serial.println("Server started"); // Print the IP address on serial monitor Serial.print("Use this URL to connect: "); Serial.print("http://"); //URL IP to be typed in mobile/desktop browser Serial.print(WiFi.localIP()); Serial.println("/"); } void loop(){ //Call all sensors on one wire to start calculating the temperature readings sensors.requestTemperatures(); // Check if a client has connected WiFiClient client = server.available(); if (!client) { return; } // Wait until the client sends some data Serial.println("new client"); while(!client.available()){ delay(1); } // Read the first line of the request String request = client.readStringUntil('\r'); Serial.println(request); client.flush(); // Match the request if (request.indexOf("/Tem=ON") != -1) { Celsius1=sensors.getTempCByIndex(0); //Get temperature reading from sensor 0 in celsius scale Fahrenheit1=sensors.getTempFByIndex(0);//Get temperature reading from sensor 0 in fahrenheit scale Celsius2=sensors.getTempCByIndex(1); //Get temperature reading from sensor 0 in celsius scale Fahrenheit2=sensors.getTempFByIndex(1);//Get temperature reading from sensor 0 in fahrenheit scale Celsius3=sensors.getTempCByIndex(2); //Get temperature reading from sensor 0 in celsius scale Fahrenheit3=sensors.getTempFByIndex(2);//Get temperature reading from sensor 0 in fahrenheit scale } // Return the response client.println("HTTP/1.1 200 OK"); client.println("Content-Type: text/html"); client.println(""); // do not forget this one client.println("<!doctype html>"); client.println("<html>"); client.println("<h1>Multiple Ds18b20 with Nodemcu</h1>"); client.println("<br /><br />"); client.print("Sensor-1 Celcius Temperature ="); client.print(Celsius1); client.println("<br />Sensor-1 Farenheight Temperature ="); client.print(Fahrenheit1); client.print("<br />Sensor-2 Celcius Temperature ="); client.print(Celsius2); client.println("<br />Sensor-2 Farenheight Temperature ="); client.print(Fahrenheit2); client.print("<br />Sensor-3 Celcius Temperature ="); client.print(Celsius3); client.println("<br />Sensor-3 Farenheight Temperature ="); client.print(Fahrenheit3); client.println("<br /><br />"); client.println("<a href="/\"/Tem=ON\"\""><button>Update Temperature</button></a><br />"); client.println("</html>"); delay(1); Serial.println("Client disonnected"); Serial.println(""); } </!doctype></esp8266wifi.h></dallastemperature.h></onewire.h>
I will come on the loop function later. First just download the code make the circuit and burn the code in your nodemcu and start the project. When you are done with circuit and code downloading in nodemcu esp8266. Open your serial monitor from arduino ide at 115200 baud rate.
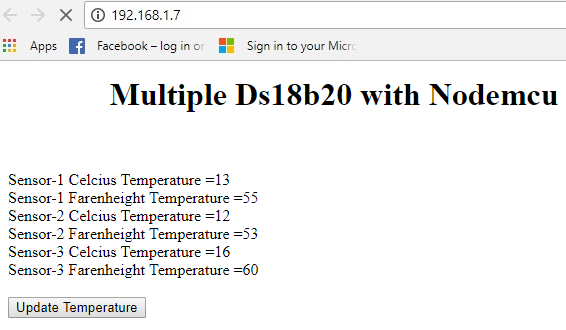
You will see in serial nodemcu requesting your router for an IP allotment. After successful IP allotment it will show you its server status. Once the sever starts nodemcu will print the server address on serial monitor. You have to enter this server address in your client browser to access the ds18b20 control and temperature display page. 
Note: Both the server(nodemcu) and client(mobile, desktop, laptop or notebook) must be connected to same network in order to communicate with each other. You have to connect your client to same WiFi whose ssid and password you entered in the code above or to which you connected your nodemcu.   
Picture

When you connect the client with the same WiFi to which your nodemcu is connected to. Copy the web address or IP printed by nodemcu in arduino serial monitor and enter it in the browser of your client. As soon as you enter IP in your browser and hit enter a web page will be displayed in your browser same as below. 
Nodemcu DS18B20 web server temperature display

Nodemcu DS18B20 web server temperature display

On top of the web page project heading is displaced. After heading individual sensors temperature in Celsius and Fahrenheit is displayed. After temperatures their is an “Update Temperature” button. Press this button to update the temperature. So what happens when you press this button? Upon pressing this button the client requests the server from update temperature readings. What happens at code level lets talk about it.
In loop function nodemcu is always waiting for the client request. When the request arrives it matches it with the request format it has “/Tem=ON“. If the request matches nodemcu updates the temperature readings. Updating statements are 

  Celsius1=sensors.getTempCByIndex(0);       //Get temperature reading from sensor 0 in celsius scale
  Fahrenheit1=sensors.getTempFByIndex(0); //Get temperature reading from sensor 0 in fahrenheit scale

Celsius1=sensors.getTempCByIndex(0) gets temperature in Celsius scale from ds18b20 sensor 1 and stores it in variable “Celsius1“.  Fahrenheit1=sensors.getTempFByIndex(0) gets temperature in Celsius scale from ds18b20 sensor 1, finds its Fahrenheit value and stores it in “Fahrenheit1” variable. Index(0) means to get data from sensor 1 increasing the index value will fetch the readings from other sensors on 1-wire bus. I did the same in the code increased the indexed to 1 for second sensor and 3 for third sensor.
Rest of the code in loop function contains HTML code to be displayed as a web page in browser of client. After calculating the updated temperature values nodemcu before closing the request replies back with the HTML format. Its actually the updated web page. I web page only the temperature readings are changed rest of the page remains same.

Future Work:
I connected only three ds18b20 temperatures sensors on bus. For future you can connect more to the 1-wire bus and test them. Web page is not static it refreshes every time one presses the “Update Temperature” button. For future you can make a static web page using J Query or AJAX. Multiple sensors can increases the temperature readings by averaging all the senors temperature readings.   

Download the Project Code written in arduino ide. Folder contains the arduino ide .ino project file. Please give us your feed back on the project. In case you have any queries please write them below in the comments section.
Code/Files


Filed Under: ESP8266, Microcontroller Projects


Questions related to this article?
👉Ask and discuss on Electro-Tech-Online.com and EDAboard.com forums.


Tell Us What You Think!! Cancel reply

You must be logged in to post a comment.

HAVE A QUESTION?

Have a technical question about an article or other engineering questions? Check out our engineering forums EDABoard.com and Electro-Tech-Online.com where you can get those questions asked and answered by your peers!


Featured Tutorials

  • PS2 Keyboard To Store Text In SD Card Using Arduino Circuit Setup On Breadboard
    How To Use PS2 Keyboard To Store Text In SD Card Using Arduino- (Part 42/49)
  • Wireless Path Tracking System Using Mouse, XBee And Arduino Circuit Setup On Breadboard
    How To Make A Wireless Path Tracking System Using Mouse, XBee And Arduino- (Part 43/49)
  • How to Make a Wireless Keyboard Using Xbee with Arduino- (Part 44/49)
  • Making Phone Call From GSM Module Using Arduino Circuit Setup On Breadboard
    How to Make Phonecall From GSM Module Using Arduino- (Part 45/49)
  • How to Make a Call using Keyboard, GSM Module and Arduino
    How To Make A Call Using Keyboard, GSM Module And Arduino- (Part 46/49)
  • Receiving SMS Using GSM Module With Arduino Prototype
    How to Receive SMS Using GSM Module with Arduino- (Part 47/49)

Stay Up To Date

Newsletter Signup

Sign up and receive our weekly newsletter for latest Tech articles, Electronics Projects, Tutorial series and other insightful tech content.

EE Training Center Classrooms

EE Classrooms

Recent Articles

  • Renesas delivers intelligent sensor solutions for IoT applications
  • Microchip Technology releases AVR-IoT Cellular Mini Development Board
  • Qualcomm acquires Cellwize to accelerate 5G adoption and spur infrastructure innovation
  • MediaTek’s chipset offers high-performance option for 5G smartphones
  • Nexperia’s new level translators support legacy and future mobile SIM cards

Most Popular

5G 555 timer circuit 8051 ai Arduino atmega16 automotive avr bluetooth dc motor display Electronic Part Electronic Parts Fujitsu ic infineontechnologies integratedcircuit Intel IoT ir lcd led maximintegratedproducts microchip microchiptechnology Microchip Technology microcontroller microcontrollers mosfet motor powermanagement Raspberry Pi remote renesaselectronics renesaselectronicscorporation Research samsung semiconductor sensor software STMicroelectronics switch Technology vishayintertechnology wireless

RSS EDABOARD.com Discussions

  • SRF04 module measure distance
  • Adaptive filters fundamental
  • Using LTspice to check Current sense transformer reset?
  • Thermal pad construction on pcb
  • lna+mixer noise figure problem

RSS Electro-Tech-Online.com Discussions

  • Are Cross-wind compensation and Road crown compensation functions inputs to LKA function?
  • Interfacing ZMOD4410 with Arduino UNO
  • Help diagnosing a coffee maker PCB
  • Capacitor to eliminate speaker hum
  • Identify a circuit.
Engineers Garage
  • Analog IC TIps
  • Connector Tips
  • DesignFast
  • EDABoard Forums
  • EE World Online
  • Electro-Tech-Online Forums
  • Microcontroller Tips
  • Power Electronic Tips
  • Sensor Tips
  • Test and Measurement Tips
  • 5G Technology World
  • About Us
  • Contact Us
  • Advertise

Copyright © 2022 WTWH Media LLC. All Rights Reserved. The material on this site may not be reproduced, distributed, transmitted, cached or otherwise used, except with the prior written permission of WTWH Media
Privacy Policy | Advertising | About Us

Search Engineers Garage

  • Projects and Tutorials
    • Electronic Projects
      • 8051
      • Arduino
      • ARM
      • AVR
      • PIC
      • Raspberry pi
      • STM32
    • Tutorials
    • Circuit Design
    • Project Videos
    • Components
  • Articles
    • Tech Articles
    • Insight
    • Invention Stories
    • How to
    • What Is
  • News
    • Electronic Products News
    • DIY Reviews
    • Guest Post
  • Forums
    • EDABoard.com
    • Electro-Tech-Online
    • EG Forum Archive
  • Digi-Key Store
    • Cables, Wires
    • Connectors, Interconnect
    • Discrete
    • Electromechanical
    • Embedded Computers
    • Enclosures, Hardware, Office
    • Integrated Circuits (ICs)
    • Isolators
    • LED/Optoelectronics
    • Passive
    • Power, Circuit Protection
    • Programmers
    • RF, Wireless
    • Semiconductors
    • Sensors, Transducers
    • Test Products
    • Tools
  • EE Resources
    • DesignFast
    • LEAP Awards
    • Oscilloscope Product Finder
    • White Papers
    • Webinars
  • EE Learning Center
    • Design Guides
      • WiFi & the IOT Design Guide
      • Microcontrollers Design Guide
      • State of the Art Inductors Design Guide
  • Women in Engineering