In the previous tutorial, the basics of Wireless Sensor Networks were discussed. It was mentioned that WSN can utilize many wireless standards and protocols to enable sensor communication with a cloud or server. It was also mentioned that wireless sensors communicate to a cloud or server with the help of a Gateway which performs protocol conversion for the wireless network. Zigbee is one of the standard and protocol which is generally used for WSN deployed in industrial applications.
Zigbee was developed as an open source global standard to solve the unique needs of low cost, low power wireless sensor networks. The Zigbee Alliance Group developed Zigbee standard by adding a stack of network layer, security layer and an application framework on the top of IEEE 802.15.4 standard. Zigbee operates in unlicensed bands including 2.4 GHz, 900 MHz and 868 MHz.

Fig. 1: Symbol of Zigbee Standard
Zigbee supports multiple network topologies such as point to point, point to multipoint and mesh networking topologies. Zigbee supports master to master or master to slave communications for different sensor nodes.
The Zigbee protocol is characterized by the following features –
1) Zigbee operates on devices which require low power so, this limits the transmission distances to 10–100 meters line-of-sight, depending on power output and environmental characteristics.
2) Zigbee devices can transmit the data over long distances by passing data through a mesh network topology in which each sensor node relays data for the network.
3) Zigbee is typically used in low data rate applications that require long battery life and small power consumption.
4) It supports secure communication networking (128-bit AES security).
5) The data rate in Zigbee networks varies from 20 Kbit/s to 250 Kbit/s.
This standard is purposely designed to create Personal Area Networks with the help of small, low power digital radios like Xbee modules for home automation and small scale projects which require wireless connection. The standard is intended to be simpler and less expensive than other Wireless PAN networks such as Wi-Fi and Bluetooth.
Zigbee Architecture –
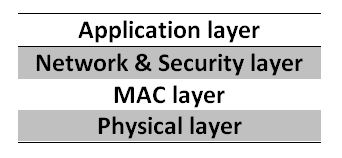
IEEE 802.15.4 is defined by physical and MAC layers while Zigbee standard is completed by accumulating Zigbee’s own network and application layers. The Zigbee Architecture can be represented as shown below –
Fig. 2: Image showing Zigbee Network Architecture
1) Physical Layer – This layer does modulation for outgoing signals and demodulation for incoming signals. This layer’s frequency, country, date rate and number of channels are summarized in the following table –

Fig. 3: Table listing frequencies used for Zigbee in different regions across the world
For making a Zigbee based WSN, two Xbee series 2C devices will be required of which one will be configured as coordinator and other as router.
2) Medium Access (MAC) Layer – This layer is responsible to access the different networks by using carrier sense multiple access (CSMA or CA) techniques for collision avoidance. In this way, it provides reliable data transmission.
3) Network and Security Layer – This layer is responsible for several functions like starting the network, managing end devices like checking whether they join or leave the network, routing, device configuration and providing 128-bit AES security
4) Application Support Sub-Layer (APS) – This layer enables the services necessary for Zigbee device object (ZDO) and application objects (endpoints) to interface with the network layers for data communication and management services. This layer is responsible for matching two devices according to their services and needs.
Device Types in Zigbee Network –
Zigbee system consists of three types of devices – Zigbee coordinator, Router and End device (optional).
1) Coordinator – Every Zigbee network must consist of at least one coordinator node which is the main decision making sensor node of the network. It transmits and receives the data between different sensor nodes with the responsibility of handling and storing the information including security keys.
2) Router – Zigbee routers act as intermediate device which relays the data from other devices.
3) End devices – These devices can talk to coordinator or router but can’t relay data from other devices.
Zigbee Modules –
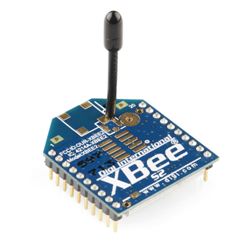
There are standard Zigbee modules available in the market that can be directly deployed and installed to create WSN network based on Zigbee protocol. The Xbee series from Digi International is one of the popular Zigbee product.
The Xbee Series 2C will be used in the upcoming tutorials to design WSN networks. This module supports Zigbee protocol for wireless communication. Xbee modules are small RF (Radio frequency) device that transmit and receive data over the air using radio signals. Xbee modules operate on 3.3 V power supply with Transmit and Receive current of 40 mA. As they are working on 3.3V CMOS logic level, so to communicate with a microcontroller board like Arduino which works on TTL level, there is need of some kind of bidirectional (CMOS-to-TTL and TTL-to-CMOS) logic converter. This module supports data rate up to 250 Kbps.
The Xbee Series 2C has the following specifications –
• Product family: XB24C
• Protocol- Zigbee
• RF Standard- 802.15.4
• Operating frequency- ISM 2.4 GHz
• Antenna type- Wire
• Encryption- 128-bit AES
• AT & API command set
• Current requirement-
o Transmit current- 40mA (@3.3V boost mode enabled)
o Receive current- 40mA (@3.3V boost mode enabled)
o Sleep- <1 uA

Fig. 4: Image of Xbee Series 2C Module
The Coordinator is always necessary in any wireless communication network of Zigbee standard. The Coordinator device performs the following functions –
• It first starts the network, selecting the channel and PAN ID.
• It distributes addresses, allowing routers and end devices to join the network and assists in routing data.
• It manages the other functions that define the network, secure it and keep it healthy. This device cannot sleep and must remain powered on all the time.
A router is a fully-featured Zigbee node. It performs the following functions –
• It joins the existing networks and send, receive and route information.
• It allows other routers and end devices to join the network.
• It cannot sleep and must be powered on at all times
• It may have multiple router devices in a network.
Configuring XBEE Devices
There are software available which can be used to configure the Xbee devices as coordinator and router. Two such software are XCTU legacy and XCTU 6.3.8. XCTU is a free and multi-platform application for Xbee and RF solutions. It can be used to configure Xbee devices with the help of an Arduino board.
So, for configuration of Xbee devices to make a WSN network, two Xbee Series 2 modules, two Xbee shields, 2 Arduino UNO or Arduino Mega boards and some connecting wires will be required. The software used will be XCTU 6.3.8 or the latest version of XCTU.
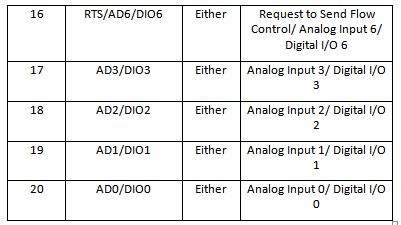
The X-Bee module is a 20-pin module with the following pin configuration –

Fig. 5: Table Listing Pin Configuration of Xbee Series 2C Module

Fig. 6: Table Listing Pin Configuration of Xbee Series 2C Module
For connecting the module with PC, Arduino can be used. The Arduino UNO or Arduino Mega acts as a USB converter for Xbee modules. Before using Arduino UNO with Xbee modules, a bare minimum sketch must be uploaded on it or the Atmega microcontroller must be removed from the board. The Xbee module and the Arduino board must communicate serially. The Xbee module should be connected to the Arduino according to the following table –

Fig. 7: Table Listing Circuit Connections between Xbee Module and Arduino Uno
After circuit connections, the Xbee modules can be configured by performing the following steps –
1) Open the XCTU software.
2) Click on “Discover Radio Modules”.
3) Click on the desired COM port on which module is connected.
4) Set the baud rate according to the device. The baud rate is set to 9600 in this case.
5) After successful scanning, the device with unique ID can be found.
6) Click on the device, and the software will read the AT parameters of the device.
7) Write the PAN ID say 1234. This PAN ID determines the network to join. The valid range is 0 to 0xFFFFFFFFFFFFFFFF. This ID must be same for all radios in the same network.
8) Enable the coordinator if the Xbee device has to be set in coordinator mode, by CE coordinator Enable. If the Xbee device has to be set in router mode then disable the CE Coordinator Enable.
9) Set the Destination Address HIGH & LOW. It can be 32-bit address or 64-bit address. It is set to “0x000000000000FFFF” in this case. This is the broadcast address for the PAN. It means the coordinator or router is listening for any incoming radio packets.
10) If the Xbee is used in router mode then enable the JV channel Verification. If this is enabled, the router will verify if a coordinator exists on the same channel after joining and ensure it is operating on a valid channel or not.
11) Give a name to the Xbee modules by “NI node identifier”. The maximum length which is accepted is 0 to 20 ASCII characters.
12) The Xbee modules operate in two modes – AT command mode and API mode. Select the mode accordingly in the “AP API Enable”.
13) After all these changes, click on the write parameters and the setting will be saved in to the Xbee modules.
In this way, the Xbee modules can be configured for the required modes.
It should be noted that the latest firmware (405F in this case) should be used for the Xbee modules. Also keep checking for firmware update for Xbee modules even after the wireless network has been already installed. The XCTU legacy can also be used in similar manner for module configuration.
In the next tutorial – Client to Client Communication over Zigbee Protocol, learn to setup a simple Zigbee Network between two clients using Xbee modules.
Filed Under: Featured Contributions, IoT tutorials, Tutorials


Questions related to this article?
👉Ask and discuss on EDAboard.com and Electro-Tech-Online.com forums.
Tell Us What You Think!!
You must be logged in to post a comment.