
In this project, we’ll build a “smart” restroom door system using PNP and NPN transistors, where simple switching logic replaces software. The design avoids apps and Wi-Fi and instead relies on solid engineering fundamentals. The aim is to design a low-cost, fail-safe solution that detects occupancy, controls indicators, and automates utilities with minimal components. Let’s…
Wearable emergency system for mine workers using Arduino Uno
Mine workers have a harsh job. They have to work deep down the earth. At such depths, they are almost disconnected from the everything and everyone. Even the mobile network does not work at those depths. The loss of connectivity leads to delay in any help in case of a danger or underground mishap. This project is built to detect any danger in advance and relay alert among the mine workers. Though most wireless networks don’t work underground, small-distance radio communication can be used in such situation. The project uses a gas sensor, temperature and humidity sensor and light sensor to detect any sign of danger. The data from the sensors is sent to a computer through radio communication for continuous monitoring.
IoT-based heart rate monitoring system
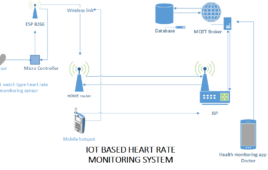
In this project we are going to make heart beat monitor system which will be able to send the readings in bpm to the doctor directly through internet using MQTT protocol from anywhere in the world. The ESP 8266 and Arduino are used to read the reading from sensor and then send them to the…
How to monitor temperature and humidity using Arduino Nano on a TFT display with graphics
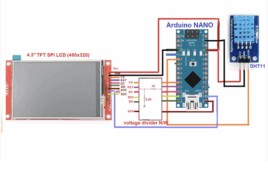
Monitoring temperature and humidity levels in real-time is essential for various manufacturing processes, as well as for applications in home automation and weather stations. A significant portion of FMCG products requires precise temperature and humidity control to maintain their quality. To achieve accurate control, it’s necessary first to monitor these parameters, meaning they must be…
How to use IoT-based D2D automation
In this tutorial, we’ll learn how to use device-to-device (D2D) communication to make daily life a little simpler. For example, you’ll be able to control household appliances, such as the coffee machine, a light switch, or the AC — and do so from inside your vehicle. So, if you’re arriving home one evening, the presence…
Forest fire detection system using IoT sensor network
In this article, we will be detecting a forest fire using an IoT sensor network and making a portable device with battery operation. Getting information about a fire hazard in a forest in time can prevent the forest fire from spreading. The sensor network can give the particular location of the fire as we already…
WhatsApp-based home automation: Protocol bridging with MQTT
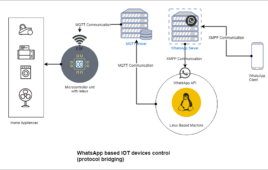
In this article, we will be controlling devices that do not support WhatsApp but support other communication protocols like MQTT, TCP, IMAP, etc. If a house is installed with home automation devices that do not support Whatsapp, we will communicate with these devices (controllers) using protocols supported by these devices. Thus, we will be able…
WhatsApp-based home automation
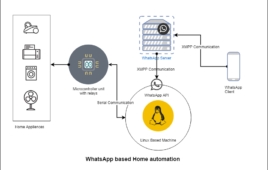
In this article, we will learn how to control our IoT home appliances using the messaging app WhatsApp to easily and effectively communicatie with those devices. So we will be sending WhatsApp messages to a number of “lights on,” and lights at our house will turn ON. Components required Tools Required/ libraries required: WhatsApp API…
How to implement a voltmeter with a 3-digit, 7-segment indicator

This article explores the implementation of a voltmeter using the AnalogPAK SLG47011, featuring a 3-digit, 7-segment dynamic display. The design leverages the device’s ADC with a programmable gain amplifier (PGA) for voltage measurement, while the Memory Table and Width Converter enable dynamic visualization on the display. Depending on the switch position, the voltmeter operates in…
How to wake ESP32 from deep sleep using EXT1

In the previous project, we discussed how to wake ESP32 using EXT0. ESP32 supports five power modes: active, modem sleep, light sleep, deep sleep, and hibernation. For battery-powered or Internet-of-Things (IoT) applications, deep sleep mode is particularly useful. In this mode, the ESP32 powers down most components, including the CPU, flash memory, Wi-Fi, Bluetooth, and…
How to design an ESP32-based text-to-speech engine

Text-to-speech (TTS) engines are widely used in assistive technology, communication systems, and automation in various industries. They’re essential for individuals with visual impairments or reading disabilities, enabling them to access written content audibly. TTS also assists students with dyslexia, language learners, and individuals with learning difficulties. Virtual assistants like Siri, Alexa, and Google Assistant also…
How to design a distance meter using ESP32

The Internet of Things (IoT) has transformed how we interact with one another and our environment. As devices become smarter and more connected, do-it-yourself (DIY) projects have become increasingly popular. One such project involves developing a distance meter using the ESP32, a versatile microcontroller with built-in Wi-FI, Bluetooth connectivity, and diverse capabilities. This project highlights…
How to create an RFID-based locker system using Arduino

Need somewhere to secure a few items? No problem! In this project, we’ll design an RFID-based locker system that offers a reliable and convenient solution for securing objects using radio frequency identification (RFID) technology. Working operation: The RFID locker system The RFID reader scans a unique tag, and if it matches a pre-registered one, the…
How to design an Arduino-based traffic light system

Traffic light systems are important signaling devices that regulate the flow of vehicles and pedestrians at intersections, crosswalks, and other critical areas. These systems use three primary lights — red, yellow (amber), and green — to manage traffic effectively and ensure safety. In this project, we’ll create a traffic light system for a four-way intersection…
How to capture images using ESP32-CAM and an SD card

The ESP32-CAM is a widely used development board for embedded vision applications. It combines the ESP32 microcontroller with an OV2620 camera module, and the ESP32 itself comes with built-in Wi-Fi and Bluetooth capabilities. Previously, we created a video streaming server using the ESP32-CAM to troubleshoot potential operational issues with the module. In this project, we’ll…
How to design an Arduino-based meditation device

Meditation is a practice that involves focusing the mind and cultivating awareness, often to achieve a state of mindfulness, mental clarity, inner peace, or spiritual connection. It’s used across cultures and traditions to reduce stress, improve emotional well-being, and enhance self-awareness — making it a valuable tool for mental and physical health. There are several…
How to create a geofence using Arduino

Geofencing is a technology that creates virtual boundaries around a specific physical location using tools like GPS, Wi-Fi, RFID, or cellular networks. It enables control over the movement or use of an object or device within a defined geographic area. To establish geofencing, virtual parameters are set around a designated area using special software that…
Atmega 32u4 Based USB Number Pad (Part 7/25)

How keyboards are made? This has been already discussed in Atmega 32u4 based Generic USB Keyboard project. A number pad is also a kind of keyboard having the keys for decimal digits and the basic arithmetic operations. Building from the keyboard project, a basic numeric keypad that will work with all the operating systems is designed in the following project. The keypad will have ten keys for the decimal digits and one key for multiplication, division, subtraction, addition and equals each. Each of these digits or operations has unique keycode assigned. The project utilizes 8-bit USB AVR – Atmega 32u4 as the USB controller chip to pass the keycodes to the computer in a format dictated by the USB protocol and uses AVR based Lightweight USB Framework (LUFA) as the firmware to implement the protocol itself.
Atmega 32u4 Based Password Generator (Part 6/25)

Like computers have become part and parcel of daily lives, the passwords have too. From operating systems to website logins, the most common and secured way to get access is the password protection. The passwords just serve like the keys. Like the keys open physical locks, the passwords open the digital locks for access to operating systems and other software or website. Generally users need to type the password in a textbox and press some button to get access to OS, software or website. While typing the password, it can be seen by an onlooker or tracked by key logging. This project is a USB device that will store the user passwords and print it out to a login window just by pressing a single button.
Atmega 32u4 Based Digital Business Card (Part 5/25)
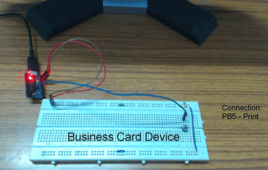
Business cards are commonly used to give away the business related information to the clients or customers. Business cards are just another means to promote the business and establish an identity or brand. The companies and firms usually issue business cards for all the officials holding important designations. A business card has the information like name of the card holder, designation of the card holder, name of the business organisation, address and contact details of the person or the business organisation. This project is a digital version of business card and allows to relay the business related information digitally on a computer screen or browser. The project is an USB Plug and Play device that prints the business card information on any text editor weather a desktop application or a textbox on browser on the press of a single button. The project has been built on Atmega 32u4 based Generic USB Keyboard project which was based on making a generic USB Keyboard.