1.0 Introduction
Keil is very popular cross compiler for 8051 microcontroller. It is different than Turbo C compiler. Turbo C compiler never ask target device (microcontroller) for which you want to write program. Keil starts to code with the target device in mind because the same compiler can be used for 300 different microcontrollers. Here I am giving various steps to use this compiler. You can download evaluation copy of this compiler from Keil’s Company website (www.keil.com) . Keil is now part of ARM limited.
Step 1: Start Keil compiler software. See below screen.

Fig. 1:
Fig 1.1 First screen of Keil Compiler
Step2: Open project -> New -> give name of project (any suitable, donot give extension to it), click on Save button., now it is asking “Select target Device” screen. See below screen shot.

Fig. 2: Screenshot of Keil Compiler IDE
3)Select, Philips or NXP company, in that P89V51RD2 (if you are using Keil version 2) then your target device could be P89C51RD2xx also will do. Fig 1.3 shows, how to select Philips P89VRD2 family as a microcontroller, due to this your assembly of C code will be compatible to P89v51RD2xx microcontroller.

Fig. 3: Screenshot showing navigation to New Project in Keil Compiler
4) Click on “OK” button of above screen. You are getting following screen. In this screen click on “NO” button because we do not want startup file from compiler. Startup file is initialization file for the microcontroller will provide memory, initialization. If you want to execute code from 000 flash memory location then no need to take startup code from Keil compiler. If device is very complex and there is lot of re-arrangement of memory allocation then you can go for startup code which we use in the ARM microcontroller programming. We will study this is separate chapter.
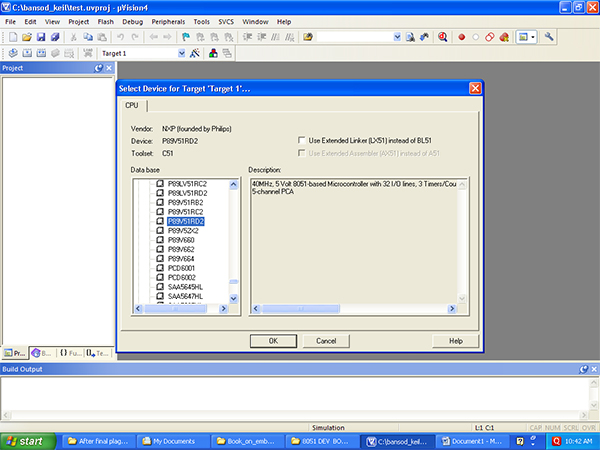
Fig. 4: Screenshot of Microcontroller Family Selection in Keil Compiler
5)Now your Keil compiler project is ready to accept any C code or assembly code. Project is like folder sort off, like in VB. In the project folder you have to add code file. See below IDE screen after project creation.
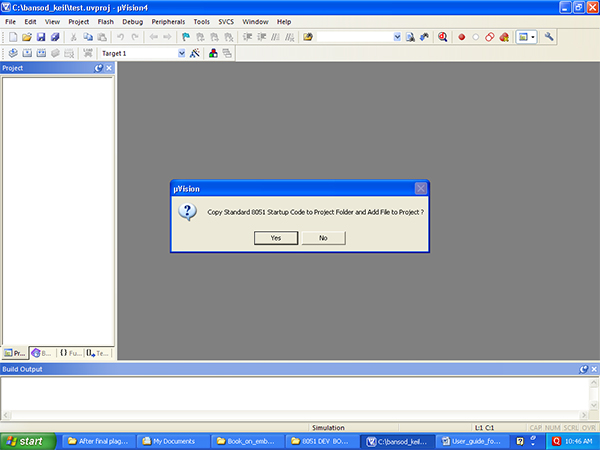
Fig. 5: Screenshot showing Target Microcontroller selection on Keil Compiler
Using Keil compiler-1
6)Now you have to start writing program, click on FILE -> NEW (to create new file), In Fig 1.6, keil project is divided in to two part, one is left side (project screen) and right side Text1 (default ) file name. In the left side, see +target1 Yellow color folder, this is keeping track of your all file (Assembly or C program).
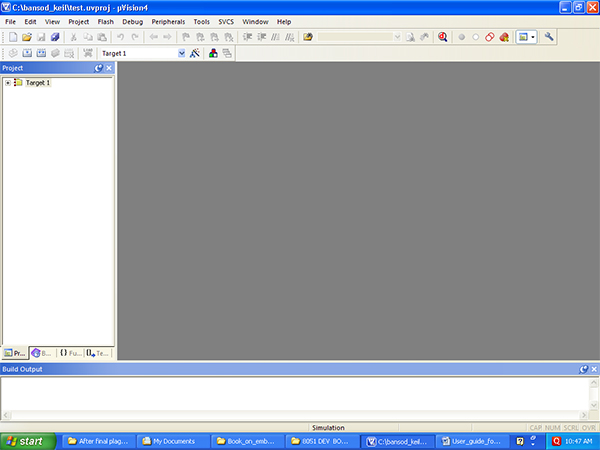
Fig. 6: Screenshot of Project Creation on Keil Compiler
7)Now you can type program in Text1 window, I have shown one sample program. Check below screen shot. Fig 1.7 shows sample code in text1 default file area.
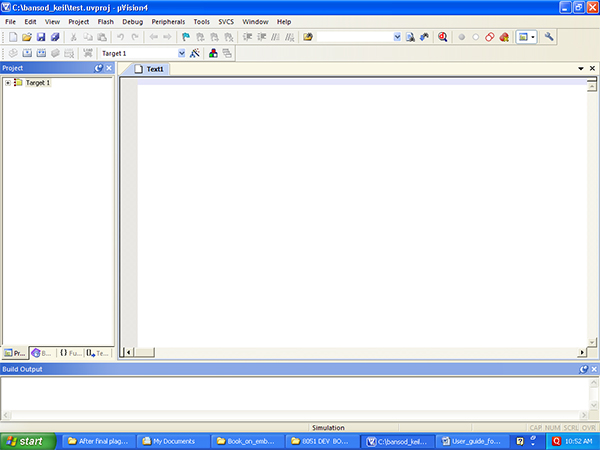
Fig. 7: Screenshot of creating New File on Keil Compiler

Fig. 8: Screenshot of Code Editor Window in Keil Compiler
9) You wrote program and you saved also but you have not added in to “source Group1”. To add your file in to project, bring your cursor on + target sign. Target is expanded in to “Source Group 1”, right click on “Source Group 1 and check below screen shot. Fig 1.9 shows various options of the target Group.
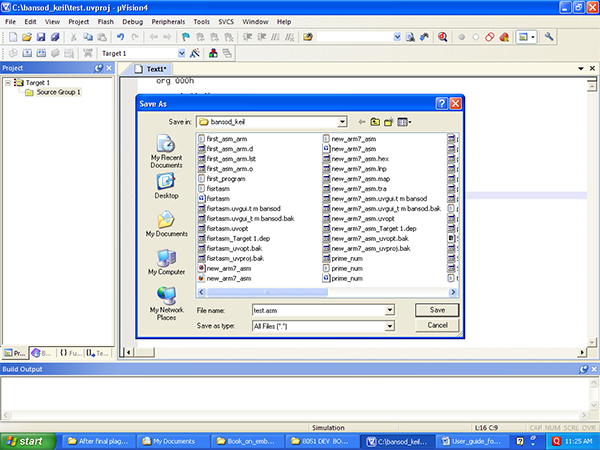
Fig. 9: Screenshot of saving Code on Keil Compiler
8)Now select “Add Files to group” options, Fig 1.10 shows yellow band on selection of “Add files to Group”

Fig. 10: Screenshot of Adding Files to a Group on Keil Compiler
9)Keil by default search for *.C file, so change “Files of Type” from C to “all files”. Fig 1.11 shows place to save your code file.

Fig. 11: Screenshot of selecting File Types on Keil Compiler
Using Keil compiler-2
10)See Fig 1.12 as File type “all files” and here we can type test.asm name of file also.

Fig. 12: Screenshot of adding new file to a group on Keil Compiler
11) Select your program name, I am selecting “test.asm” in my directory and click “add” button. After adding you can click on “close” button also because adding activity is over.
Now source group has one file, that you can recognize by “+” in the “Source group1”, Fig 1.13 shows screen after adding Test.asm file with the project Group.

Fig. 13: Screenshot of selecting a file for adding to a group
12) Click on that “+” to expand Source group1. Fig 1.14 shows Expanded Target 1 files, you can see, test.ASM file is part of Screen Group1

Fig. 14: Screenshot of searching file to be added in a group
13)In Fig.14, you can see “test.asm” which I added in the ‘source Group’. Once this addition is over, now you can “Build” target by again right clicking ‘source group’. Or You can press “F7” keyboard button also. This build command is for compiling your program. Fig 1.15 shows build options in the Target options.

Fig. 15: Screenshot of compiling a program on Keil V4
14)If you remove all errors then compiler will show 0 Error and 0 warnings then you can create “HEX” file for this target. Click on “Project” menu“ and select “options for target” (ALT F7) See below screen:
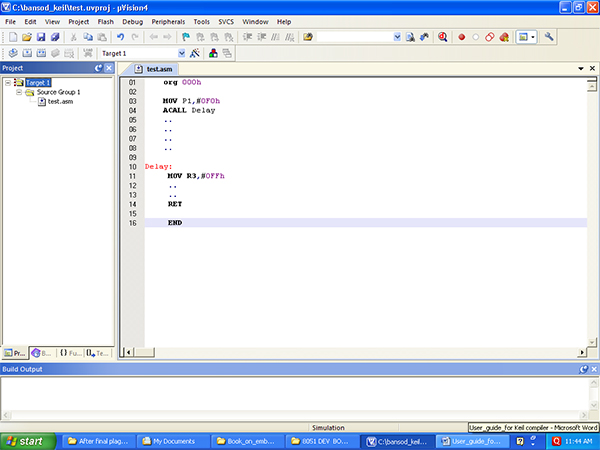
Fig. 16: Screenshot of error messages on Keil Compiler
15)Now you will get below screen:

Fig. 17: Screenshot of building Target on Keil Compiler
16)Select “Output” tab and now your screen is look like below screen, which shows how to generate HEX file.

Fig. 18: Screenshot of generating Hex File on Keil
17)Click on “Create HEX file” options and click on “OK” button. Now you again “Rebuild” your program from right clicking “source group 1”. Now in Build output window, you can see “HEX file is created” message. This HEX file, you can download with the help of Flash Magic software to our 8051 board.
2.0 How to Debug Program in Keil compiler?
1)Click on “Debug” menu, there are Start/Stop session (Ctrl + F5), Run, Stop, Step, Step over menu options. See below screen shot:

Fig. 19: Screenshot of Debug Menu in Keil IDE
2)Click on OK on Evaluation Mode window of Keil compiler. Screen of Keil compiler will change and it will shows Register, disassembly, call stack windows. When Keil in Debug mode, then only Peripheral Menu is working. If you are not in Debug mode, Keil would not show active “peripheral” menu. We are now in debug mode that why keil shows following screen of Peripheral (click on Peripheral menu). See below screen of Keil.

Fig. 20: Screenshot of selecting Evaluation Mode on Keil
3)You can see detail of port by left click on Port0,port1. You can check registers,Accumulator, stack, Program counter also. Check below screen:

Fig. 21: Screenshot of selecting I/O Ports
4)You can run your program by clicking on “Run” options in the Debug menu or use “F5” Key and check live output in the simulator. To stop your execution of code by clicking “Stop” button. If you are clicking once then Keil would not come out from Debug session, again your have to select “Start/Stop Debug Session”. Now Keil in normal mode.Now you can modify the program and again “Rebuild” the program and again test in Debug mode.
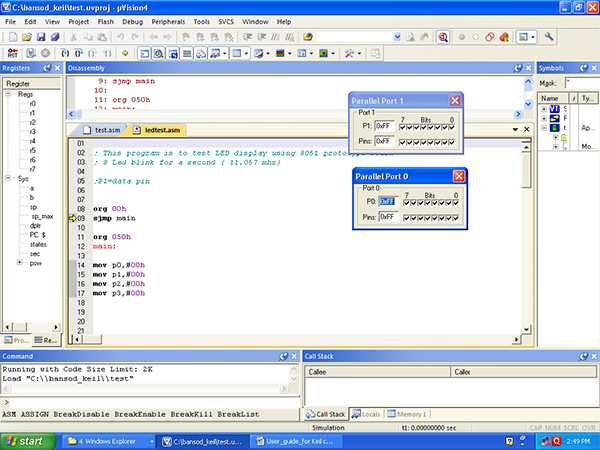
Fig. 22: Screenshot of a Debug Session on Keil
5)If you are doing single stepping and you stuck in to delay function, you can come out by selecting “Step over” in the debug mode. (F10).

Fig. 23: Screenshot of exiting Debug Mode in Keil Compiler
Project Source Code
###
; This program is to test LED display using 8051 prototype board
; 8 Led blink for a second ( 11.057 mhz)
;P1=data pin
org 00h
sjmp main
org 050h
main:
mov p0,#00h
mov p1,#00h
mov p2,#00h
mov p3,#00h
setb p1.0
acall delay
clr p1.0
acall delay
setb p1.1
acall delay
clr p1.1
acall delay
setb p1.2
acall delay
clr p1.2
acall delay
setb p1.3
acall delay
clr p1.3
acall delay
setb p1.4
acall delay
clr p1.4
acall delay
setb p1.5
acall delay
clr p1.5
acall delay
setb p1.6
acall delay
clr p1.6
acall delay
setb p1.7
acall delay
clr p1.7
acall delay
mov p1,0ffh
acall delay
acall delay
mov p1,00h
acall delay
acall delay
mov p1,0ffh
acall delay
acall delay
sjmp main
;-------------------delay program------------------------
DELAY:
MOV TMOD,#010H
MOV R3,#04H ;95
Loop2: MOV TL1,#00H ;00
MOV TH1,#00H ;00
SETB TR1
loop : JNB TF1,loop
CLR TR1
CLR TF1
DJNZ R3,loop2
RET
;---------------------end-------------------------------------###
Filed Under: Electronic Projects


Questions related to this article?
👉Ask and discuss on Electro-Tech-Online.com and EDAboard.com forums.
Tell Us What You Think!!
You must be logged in to post a comment.