In the previous tutorial, we learned about the object-oriented features of Python, which are important for organizing code and structuring our applications. Now, let’s discuss how to design graphic interfaces in Python.
Embedded applications developed on microcontrollers typically have LEDs, character LCDs, or small graphic LCDs as display devices. However, these displays do not have many fancy interfaces. But a single-board computer (such as Raspberry Pi) can be configured like a desktop system. In fact, we’ve set up our Raspberry Pi (RPi) using a Linux desktop. As such, it’s possible to enjoy rich interfaces and large applications that run for similar embedded circuits.
Although microcontrollers offer speed, single-board computers do have advantages that include an operating system with easy access to high-level language features. Rich graphics interfaces, access to databases, data visualization, 3D graphics, networking, and data mining are just some of the HLL features that can be used in an embedded project with SBCs
For example, by interfacing a sensor with a microcontroller, we can only collect sensor data and implement an immediate actions based on the collected data. But, if that same sensor is interfaced with a single-board computer (SBC), it’s possible to perform various tasks.
These include:
- Recording and maintaining a large amount of sensor data in databases
- Performing analytics
- Visualizing data
- Performing data mining
- Sharing data and any results to other devices on a network
- Implementing immediate as well as long-term actions
A microcontroller-based device that’s run on a firmware-level code fails to perform such complex tasks on its own. At most, it can be configured as an Internet-of-Things (IoT) device by connecting it to a network. The collected physical data can then be manipulated on a cloud platform. This is one big reason why single-board computers have a distinct role in the embedded domain.
Another reason: users get to work with the hardware-software co-design in embedded systems when working on SBCs. While the microcontroller-based applications focus on the hardware, a user can shift focus to the software aspects. SBCs allow for the creation of high-level embedded software that uses the power of a hardware component.
Ultimately, it is the software running on the hardware that makes the most sense. Interfacing and controlling LEDs is the “Hello World” of embedded systems.
The following is a screenshot of a graphical user interface (GUI) that’s designed for our first LED driver recipe. Take a minute to review this GUI and try to guess the level of control that we can exert on a hardware component with a SBC.
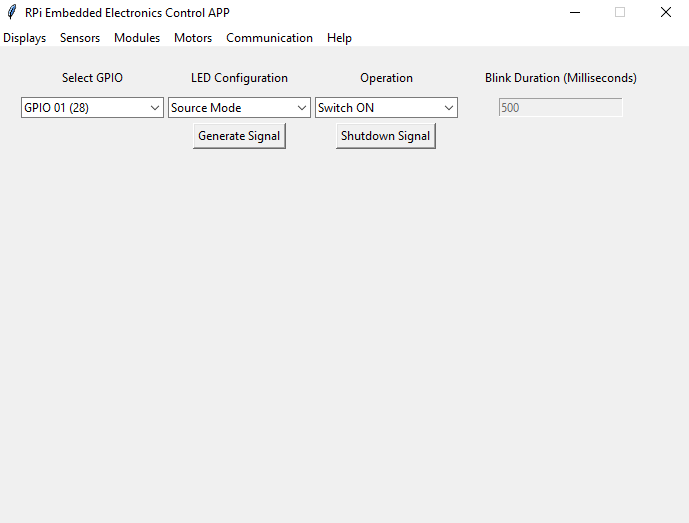
The Python Tkinter GUI for an RPi LED driver.
In all of our RPi recipes, we frequently use GUI programming and multithreading. When using sensors, we’ll include data visualization, database programming, and data mining to the embedded software.
Similarly, when we control actuators, building robots, or use sophisticated hardware modules (such as a camera or microphone, etc.), it’s possible to include the relevant software features like image processing, audio, multimedia programming, 3D graphics, and game programming, etc.
GUI programming and multithreading are essential software components of all of our recipes.
Python GUI programming
Python is a powerful, very-high-level language (VHLL). It allows for the designing of rich graphic interfaces and provides a host of data visualization techniques with data mining capability. This is a distinct advantage in sophisticated embedded applications.
When using RPi in embedded applications, we’ll treat the embedded circuits as Physical Data Sources (when interfaced with sensors) and Sophisticated Controllers (when interfaced with actuators).
The graphic interfaces designed on Python interact with the embedded circuits, visualize sensor data, manipulate data for analytics and decision making, and provide additional interactivity that typically is not possible with microcontrollers.
Python Tkinter GUI’s main window for the RPi embedded electronics app.
There are several options in Python for developing graphical user interfaces. The most popular ones include:
Tkinter – the standard Python interface for the Tk GUI toolkit and the standard de facto GUI in Python. Tkinter is free and automatically included with a Python installation on Linux, Microsoft Windows, and Mac OS X. To use it in an application, however, the Tkinter package must be imported.
WxPython – an open-source, cross-platform GUI toolkit for Python. Its main advantage is its native widgets (OS-specific native widgets).
PyQT – binding for the cross-platform GUI toolkit Qt. It’s likely the most powerful and substantial GUI for Python. PyQT is ideally suited to large applications and is available under GPL and commercial licenses. It can be complicated to use for commercial applications.
PySide – similar to PyQT in functionality, but PySide is covered under the LGPL license. So, it’s readily available for use in commercial applications.
There are many other GUI packages for Python. Before using on in an application, it’s first important to learn about its features, portability, development tools, licensing, and limitations. For large applications, PyQT and PySide are typically the best options (and PySide has a more liberal license).
There are also WYSIWYG editors available for PyQT and PySide that make designing interfaces quick and easy. Tkinter is the top choice for basic applications.
We’ll use Tkinter for designing the GUI for RPi recipes. It offers a small footprint with a relatively quick execution compared to other packages. Layout management is also quite efficient. These features make Tkinter an ideal option for embedded UI.
However, we will have to write code for each widget and handling events is sometimes tricky. These efforts will be it to speed up our small embedded apps.
Multi-threading embedded tasks
In embedded applications, it’s typical to repeat certain tasks. For example, we repeatedly might need to fetch data from a sensor or display messages on a display device. But desktop applications rarely involve such tasks — you’d never want code for a desktop application to run an endless infinite loop.
In our RPi recipes, we’ll implement infinite loops typical of embedded applications. However, if we were to run these loops from the GUI app, our interface would freeze and we wouldn’t be able to input any other commands.
So, for every embedded task, we’ll create a separate thread and the GUI will run as a different process on Linux. We can pass commands to kill these threads with a small coding trick to stop the tasks whenever necessary. With threads, we can treat RPi recipes like microcontroller-based embedded applications but with more efficiency.
With multi-threading, there are also the advantages of simultaneously and independently handling multiple hardware components. Multi-threading is not possible on microcontrollers, which just goes to show that SBC running an embedded OS is key.
Tkinter
Tkinter is the standard GUI library for Python. It provides an object-oriented interface to the Tk GUI toolkit. Any GUI consists of a main window in which different graphical elements –such as labels, text boxes, buttons, radio buttons, select buttons, canvas, etc. — are laid out.
These graphical elements, including the main window and other windows, are called widgets. User actions, such as clicking a button, focusing on a textbox, selecting a radio button, etc., are called events. In response to an event, it’s possible to open another window, which is then called the child window to its parent window.
To create a user interface with Tkinter, first import the Tkinter module, which can be done in Python code like any other module. The name of the module is “Tkinter” in Python 2 and “tkinter” in Python 3.
These are valid statements for importing Tkinter module in Python 3:
import tkinter
or
from tkinter import *
or
import tkinter as tk
In the third example above, “tk” is the reference defined for the Tk class. This reference can be any identifier. After importing the Tkinter module, create a GUI application main window. This can be done by creating an instance object of the Tk class. For the main window (which is not a child of any other window), the Tk object is created without any arguments.
These are valid statements for creating the main window
root = Tk()
or
root = tkinter.Tk()
or
root = tk.Tk() # tk is reference to Tk() class in the import statement
To create a child window, the instance object with Toplevel() method must first be created — which must be passed to the parent window (object) as an argument.
Here’s a valid statement for creating a child window:
LED_window = Toplevel(root)
All window widgets, including the main window, supports several methods. Of all of the methods, the main loop() method is the most important.
Until the mainloop() method is called on a window widget, it does not appear on the screen. The mainloop() method starts an infinite loop to run the GUI window, wait for an event to occur, and process the event as long as the window is not closed.
Therefore, the mainloop() method must be the last statement to be called on a window widget. Any other methods called on the widget after the mainloop() will not be executed and will return an error.
These are valid statements to start the main window in Tkinter:
root = Tk()
root.mainloop()
These are valid statements to start a child window:
LED_window = Toplevel(root)
LED_window.mainloop()
A window can be destroyed by calling the destroy() method.
Here’s a valid statement to destroy a window (named window):
window.destroy()
The style and behavior of a window can be changed by calling on different methods. For example, for setting the title of the window, the title() method is available.
This is a valid statement to set the title of a window (named window):
window.title(“Raspberry Pi Embedded Electronics Control App”)
To set the size and position of the window on the screen, the geometry() method can be used. The geometry method can take four optional arguments as follows:
window.geometry(“widthxhieght+/-horizontal_position+/-vertical_position”)
This is a valid statement for setting the size and position of a window (named window):
window.geometry(“300×300+100+50”)
All four of the arguments (width of the window, the height of the window, horizontal position, and vertical position) accept the integer values in pixels.
Note:
- If the horizontal position has a leading plus sign, the left edge of the window is that many pixels from the left edge of the screen.
- If the horizontal position has a leading minus sign, the right edge of the window is that many pixels from the right edge of the screen.
- Similarly, if the vertical position has a leading plus sign, top edge of the window is that many pixels from the top edge of the screen, and if the vertical position has a leading minus sign, the bottom edge of the window is that many pixels from the bottom edge of the screen.
The minimum and maximum size of a window can also be set using the minsize() and maxsize() methods. Both methods take the width and height of the window in pixels and as arguments.
Here’s a valid statement for setting minimum size of a window (named window):
window.minsize(480, 480)
By default, a window is resizable and a user can change the size of the window by dragging its edges. The resizing behavior of a window can be changed using the resizable() method.
This method takes two Boolean arguments to set the width and height of the window resizable to either True or False.
The Tkinter module also allows for creating static interfaces. When the user resizes a window, its layout can become clumsy because of the static nature of the interface. So, it’s advisable to set the resize ability of a window to False as follows:
window.resizable(False, False)
A window is automatically resized according to the child widgets contained in it. If the maximum size is set for a window, some of the child widgets may not be visible. As a result, it’s never recommended to set the maximum size of a window.
A window can have several states, such as:
- Normal – displayed on the screen in its default size and position
- Zoomed – displayed covering entire screen
- Icon – minimized to the taskbar
- Withdrawn – window closed
By default, the window appears in its “normal” state. If it’s set to resize both horizontally and vertically, it can be zoomed to the full-screen size by clicking on the maximize button. It can also be “zoomed” from within the code by setting that to its state, such as:
window.state(‘zoomed’)
A window can be minimized to the icon by clicking on the minimize button. It can be minimized to an icon from within the code by using the iconify() method or setting its state to ‘icon’ as follows:
window.state(‘icon’)
or
window.iconify()
A window can be restored to its normal state by clicking on its icon from the taskbar. It can be restored to a normal state from within the code by using the deiconify() method or setting its state to “normal:”
window.state(‘normal’)
or
window.deiconify()
We’ll be using the ttk themed widgets in our GUI windows. The ttk is a separate module that provides access to the Tk themed widgets. It separates the code implementing the appearance of the widgets, as well as the code implementing the behavior of the widgets.
This means we’ll need to import the ttk separately with Tkinter. Here are valid statements for importing ttk:
import ttk
or
from ttk import *
or
from tkinter import ttk
The following are valid statements to start a blank main window:
from tkinter import *
from tkinter import ttk
root = Tk()
root.title(“RPi Embedded Electronics Control APP”)
root.minsize(480, 480)
root.resizable(0, 0)
root.mainloop()
This is a blank GUI main window containing no other widgets. Note that the mainloop() method is called in the last statement on the main window.
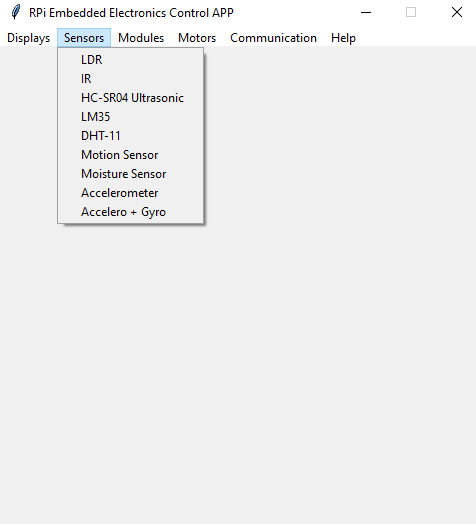
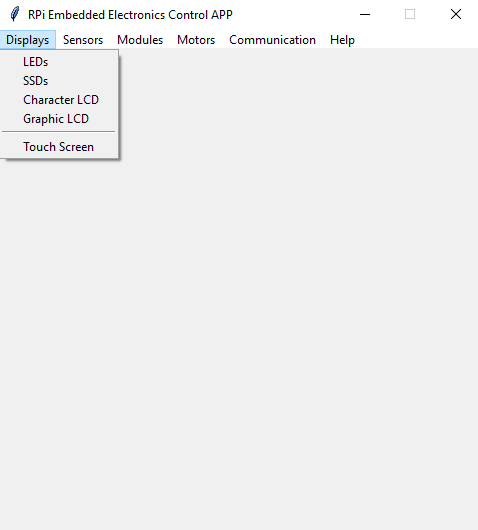
Python Tkinter GUI’s main window menus for an RPi embedded electronics app.
Stay connected. You are about to witness a multi-threading approach to embedded applications using Raspberry Pi. We will be controlling the embedded circuits through a desktop GUI app while implementing the embedded operations of the microcontroller-way on a single-board computer.
In the next tutorial, we’ll learn more about Tkinter and the ttk widgets, adding a menu to our RPi embedded electronics control app. We’ll also keep adding GUI frames to our app for every embedded electronics component (display devices, sensors, modules, motors, and communication interfaces) that’s controlled from the app.
Filed Under: Featured Contributions, Python
