Engineers Garage

  • Projects and Tutorials
    • Electronic Projects
      • 8051
      • Arduino
      • ARM
      • AVR
      • PIC
      • Raspberry pi
      • STM32
    • Tutorials
    • Circuit Design
    • Project Videos
    • Components
  • Articles
    • Tech Articles
    • Insight
    • Invention Stories
    • How to
    • What Is
  • News
    • Electronic Products News
    • DIY Reviews
    • Guest Post
  • Forums
    • EDABoard.com
    • Electro-Tech-Online
    • EG Forum Archive
  • Digi-Key Store
    • Cables, Wires
    • Connectors, Interconnect
    • Discrete
    • Electromechanical
    • Embedded Computers
    • Enclosures, Hardware, Office
    • Integrated Circuits (ICs)
    • Isolators
    • LED/Optoelectronics
    • Passive
    • Power, Circuit Protection
    • Programmers
    • RF, Wireless
    • Semiconductors
    • Sensors, Transducers
    • Test Products
    • Tools
  • EE Resources
    • DesignFast
    • LEAP Awards
    • Oscilloscope Product Finder
    • White Papers
    • Webinars
  • EE Learning Center
    • Design Guides
      • WiFi & the IOT Design Guide
      • Microcontrollers Design Guide
      • State of the Art Inductors Design Guide
  • Women in Engineering

Web Controlled System

By Sadi Mehmud

Block Diagram of Web Controlled Robot

Fig. 1: Block Diagram of Web Controlled Robot

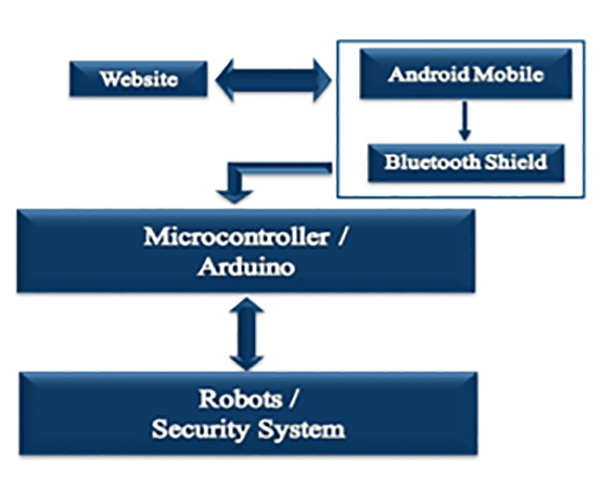
Firstly for this project an Android phone is needed along with an internet connection and a “Getblue” application. This app gets command from website and sends it to Arduino/Microcontroller through Bluetooth. After getting the command from phone, Arduino/Microcontroller can control any kind of robot, home security and automation. [Note: Always keep the Android phone with robot or module.


v  Website Design:

Html, JavaScript, php and Css languages were used for website. “http://www.w3schools.com” is suitable for the beginner.


                                        Ø  Php Code (spy.php):
 

///////////////////////////////////////////////////////////////////////////////////////////////////////////////////////////////////////////////////

                                       <?php
 
                                       $myfile = fopen(“spy.txt”, “w”) or die(“Unable to open file!”);
 
                                       $txt = $_GET[‘data’];
 
                                       fwrite($myfile, $txt);
 
                                       fclose($myfile);
 
                                       header(“Location:spy_robot.php”);
 
                                       ?>
 

///////////////////////////////////////////////////////////////////////////////////////////////////////////////////////////////////////////////////

This program saves the command in a text file [spy.txt] for the robot and is also read by “Getblue” android application. This command text file is called from main webpage through  the code mentioned below and the location can also be changed as per the user’s needs.
 
[header(“Location:spy_robot.php”);]
 
Ø  JavaScript Code (go.php):
 

///////////////////////////////////////////////////////////////////////////////////////////////////////////////////////////////////////////////////


    <style type=”text/css”>
 
        #go{
 
            margin-top: 5px;
 
            margin-left: auto;
 
            margin-right: auto;
 
            display: block;
 
            height: 60px;
 
            width: 60px;
 
            background-image: url(‘/images/Up Arrow.png’);
 
            background-size: 100% 100%;
 
            background-repeat: no-repeat;
 
        }
 
 
        #go:active{
 
            background-image: url(‘/images/Actions-arrow-up-icon.png’);
 
        }
 
    </style>
 
[NOT IN CODE: Above code is for style of arrow or command button]
 
<script src=”//ajax.googleapis.com/ajax/libs/jquery/2.1.3/jquery.min.js”></script>
 
[NOT IN CODE: Above code is for “ajax” Library]
 
    <a id=”go” href=”#go” data-url=”spy.php” data-active=”*go” data-inactive=”*stop”></a>
 
[NOT IN CODE: In above code, when command button is pressed then it calls the above php code (spy.php) file and sends
“*go” command and when the button is released it sends “*stop” command]
   
    <script type=”text/javascript”>
 
        jQuery(document).ready(function (){
 
            jQuery(“#go”).mousedown(function(){
 
                var url=jQuery(this).data(‘url’);
 
                var data=new Object();
 
                data.data=jQuery(this).data(‘active’);
 
                $.ajax({
 
                    url: url,
 
                    type: “GET”,
 
                    data: data,
 
                    dataType: “JSON”
 
                }).done();
 
            });
           
            jQuery(“#go”).mouseup(function(){
 
                var url=jQuery(this).data(‘url’);
 
                var data=new Object();
 
                data.data=jQuery(this).data(‘inactive’);
 
                $.ajax({
 
                    url: url,
 
                    type: “GET”,
 
                    data: data,
 
                    dataType: “JSON”
 
                }).done();
 
            });                                                          
 
        });
 
    </script>
 
[NOT IN CODE: Above code is for mouse press and release function.  When  the left button of the mouse is pressed, it calls active command “*go” and when released then it calls inactive command “*stop”]


///////////////////////////////////////////////////////////////////////////////////////////////////////////////////////////////////////////////////

 
Ø  Css code is for page style. Beginner can learn it from “http://www.w3schools.com” website. (spy_robot.css)
Ø  Html code for the main page can also be learned from “http://www.w3schools.com” website. Here code is in html, but file is saved as php for  the convenience of coding. (spy_robot.php)
Ø  In “spy_robot.php”, below code is for live video from “YouTube” live event. It must be changed from “https://www.youtube.com/my_videos” before starting robot. [Note: For live event facilities user must login to the “Youtube” site]

<iframe width=”420″ height=”315″ src=”https://www.youtube.com/embed/oJzkwEZSQ70″ frameborder=”0″ allowfullscreen></iframe>


Live event page in youtube

Screenshot of Live Event Page on YouTube

Fig. 2: Screenshot of Live Event Page on YouTube

Screenshot of Video Embed Code for the Website

Fig. 3: Screenshot of Video Embed Code for the Website

 For tracing the robot, “Mobiucare” application is used. Sign in “http://www.mobiucare.com” and switch on the GPS option of the android phone. In “spy_robot.php”, below code is for “mobiucare” tracking application.

<iframe src=”https://www.mobiucare.com/console” width=”800″ height=”800″ scrolling=”no” marin-top”-100″ position-top=”-100″ >


·       “Getblue” Setup:

Screenshot of GetBlue Setup

Fig. 4: Screenshot of GetBlue Setup

Before opening “Getblue” application internet connection (wifi or data connection) and  Bluetooth connection must  be switched on. [Note: Demo version work perfectly as well.]

Screenshot of switching Bluetooth Connection for GetBlue App

Fig. 5: Screenshot of switching Bluetooth Connection for GetBlue App

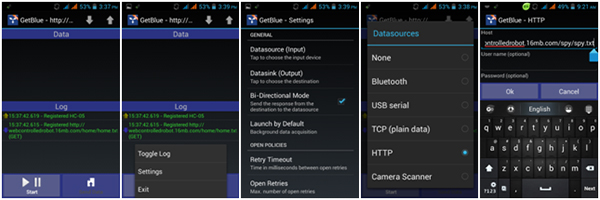
Fig: 1- This is the front page of the getblue apps.
 
Fig: 2- This is the setting page.
 
Fig: 3- This shows the setting page  where “Bi-Directional Mode” is selected
 
Fig: 4- After opening “Datasource (Input)” from setting page select “HTTP”.
 
Fig: 5- Write the web address of the data source in “HTTP” page and then select “OK”

Screenshot showing Data Source setting on GetBlue App

Fig. 6: Screenshot showing Data Source setting on GetBlue App

Fig: 6- After finishing “HTTP” setup go back to setting page (Fig: 3) then open
“Datasink (Output)”and select “Bluetooth” option.
 
Fig: 7- Here select “Start discovery” then connect robot through Bluetooth (HC-05 or HC-06)and select “OK”.
 
Fig: 8- From the setting page open “Launch by Default” and select “Background dataacquisition”.
 
Fig: 9- Open “Retry Timeout [ms]” from setting and select “1000”.
 
Fig: 10- Again open “Open Retries” from setting and select “10”.

Screenshot of GetBlue App's Data Settings

Fig. 7: Screenshot of GetBlue App’s Data Settings

Fig: 11-14- From setting, open these options and select as  shown in the pictures.

Fig: 15- After doing all these things select “Start” from front page (Fig: 1) and also select Send Data” then write any command of the robot. After this, select “Send to
  Datasink”.


Screenshot of Additional Settings done in the GetBlue App

Fig. 8: Screenshot of Additional Settings done in the GetBlue App

Fig: 16- Also select  both the above options from setting.

• Backup:


Block Representation of Web Controlled Robot

Fig. 9: Block Representation of Web Controlled Robot 

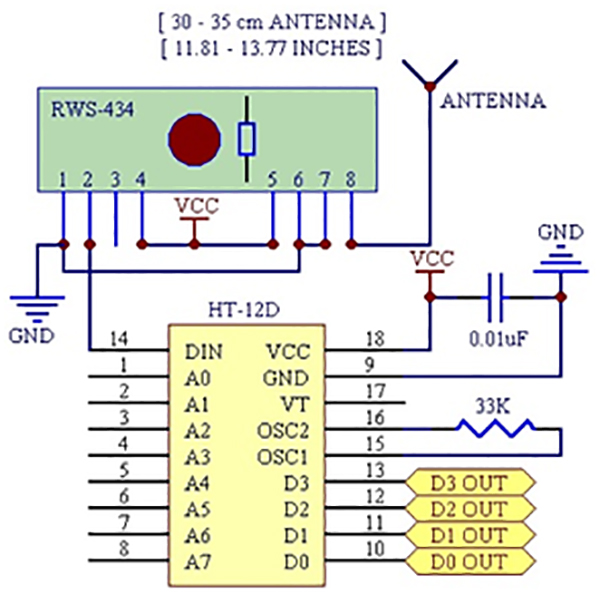
If there is no internet connection then RF controller can be used as backup. For this control system, there is a Tx remote for sending command and an Rx module in robot part for receiving command.

Circuit Diagram and Parts List:
 
Power:
 
1. Battery (11.1V, 1800mah)
 
2. Voltage Regulator 7808 (1 for servo, 1 for Arduino)
 
3. Capacitor 100µF (2x)
 

(Check the circuit diagram tab for complete circuit for Web Controlled System)
•  RF Module:
 
1. 5v Supply (From Arduino Vout)
2. RF Rx
3. RF Tx
4. HT-12D
5. HT-12E
6. Capacitor 0.01µF
7. Resistor 750kΩ
8. Resistor 33kΩ
9. Antenna

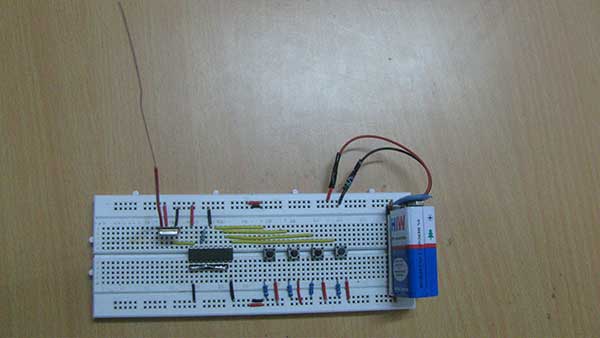
Prototype of RF Transmitter

Fig. 10: Prototype of RF Transmitter

Prototype of RF Receiver mounted on Robot

Fig. 11: Prototype of RF Receiver mounted on Robot

Robot:

1. Arduino Nano (Or any model can be used)
2. Bluetooth Module (HC-05 or HC-06)
3. L298 Motor Driver (L293D Can be Used)
4. DC Motor
5. Servo Motor
6. Push Button (4X)
7. Resistor 2.2kΩ (4X)

Prototype of Web Controlled Robotic Tank

Fig. 12: Prototype of Web Controlled Robotic Tank 

Robot Circuit and Transmitting remote
 
1. Code: All codes are in “Code” file. Please check Code file.
 
2. Implemented Circuit:           


Prototype of Arduino based Control Circuit mounted on Web Controlled Robot
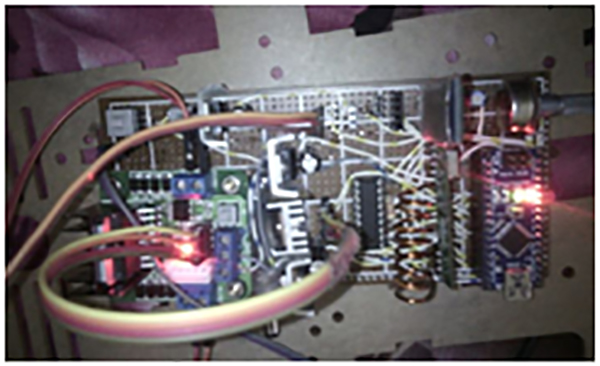
Fig. 13: Prototype of Arduino based Control Circuit mounted on Web Controlled Robot

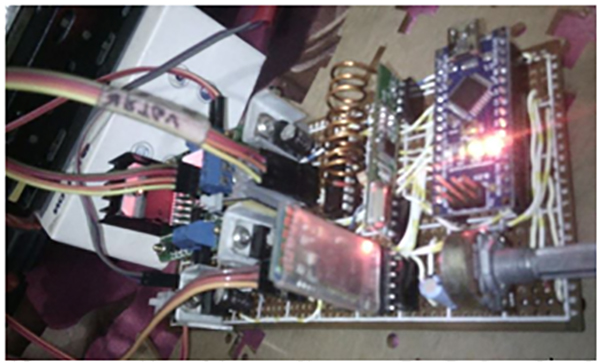
Image showing Arduino based Control Circuit in action on Web Controlled Robot

Fig. 14: Image showing Arduino based Control Circuit in action on Web Controlled Robot
WEB CONTROLLED ROBOT

Fig. 15: Circuit Diagram of Arduino based Web Controlled Robot 

Project Source Code

###


#include <Servo.h>
#include <SoftwareSerial.h>
 
Servo srvoleg;
int angle;
 
String Blue_Car;
String cmd;  // For Changing The Command From BT To RF & Vice Versa
String BT;  // BT & RF Are Used To Print Some Data Through Serial Ports..
String RF; // BT & RF Are Used To Print Some Data Through Serial Ports..
 
//For RF Pin Definition
#define RF_1 2  // Near The IC RF_1 & Count CCW For RF_2, RF_3, RF_4
#define RF_2 3
#define RF_3 4
#define RF_4 5
 
//For Motor Pin Definition
#define Motor_1_1  6 // C On Motor Driver
#define Motor_1_2  7 // D On Motor Driver
#define Motor_2_1  8 // B On Motor Driver
#define Motor_2_2  9 // A On Motor Driver
 
#define servocam A1
 
SoftwareSerial BlueTooth(10, 11); // RX, TX : (10 = RX Of Arduino With TX Of Bluetooth, 11 =  TX Of Arduino With RX Of Bluetooth)
 
// @@@@ Used Pins Are : 2 3 4 5 6 7 8 9 10 11 12  A1 
 
void setup() 
{  
  Serial.begin(9600); 
  BlueTooth.begin(9600);
  
  pinMode(Motor_1_1, OUTPUT); 
  pinMode(Motor_1_2, OUTPUT);
  pinMode(Motor_2_1, OUTPUT); 
  pinMode(Motor_2_2, OUTPUT);
  
  pinMode(RF_1, INPUT);
  pinMode(RF_2, INPUT);
  pinMode(RF_3, INPUT);
  pinMode(RF_4, INPUT);
 
  cmd = "all"; 
  BT = "BlueTooth Command Enabled";
  RF = "RF Controller Command Enabled";
  
  // Initialization Of The Device  
   Serial.println("Initialization Complete & Waiting For Command");
   BlueTooth.println("Initialization Complete & Waiting For Command");
   Stop();
   Srvo_close();
}
 
void loop() 
{  
  Blue_Car=""; //Reset the variable after initiating
  
  while (BlueTooth.available())//Check if there is an available byte to read
  {  
    delay(5); //Delay added to make thing stable in ms
    char c = BlueTooth.read(); //Conduct a serial read
      
    if (c == '#')  //Exit the loop when the # is detected after the word
    {   break; }
    Blue_Car += c; //Shorthand for Blue_Car = Blue_Car + c
  }  
    
  while (Serial.available())//Check if there is an available byte to read
  {  
    delay(5); //Delay added to make thing stable 
    char c = Serial.read(); //Conduct a serial read
      
    if (c == '#')  //Exit the loop when the # is detected after the word
    {  break;  }
    Blue_Car += c; //Shorthand for Blue_Car = Blue_Car + c
  } 
 
  //  Changing Command Control From Bluetooth Module
  if (Blue_Car.length() > 0) 
  {
    if( Blue_Car == "rf" )
       {  cmd = Blue_Car ;
        Serial.println(RF);
        BlueTooth.println(RF);
       }
       
    if( Blue_Car == "bt" )
       {  cmd = Blue_Car ;
        Serial.println(BT);
        BlueTooth.println(BT);
       }   
  }
  //  Changing Command Control From RF Module
  if ( digitalRead(RF_1) == LOW && digitalRead(RF_2) == HIGH && digitalRead(RF_3) == LOW && digitalRead(RF_4) == HIGH)      
    {  cmd = "bt";
       Stop();
        Serial.println(BT);
        BlueTooth.println(BT);
    }
  if ( digitalRead(RF_1) == LOW && digitalRead(RF_2) == HIGH && digitalRead(RF_3) == HIGH && digitalRead(RF_4) == LOW)      
    {  cmd = "rf";
       Stop();
        Serial.println(RF);
        BlueTooth.println(RF);
    }
    
  //@@@@@ Start Of Bluetooth command @@@@@
  if ((cmd == "bt") || (cmd == "all"))
  {
        
  if (Blue_Car.length() > 0) 
  {
    if (cmd == "all" )
      {
        cmd = "bt"; 
        Serial.println(BT);
        BlueTooth.println(BT);
      }
      
   BlueTooth.println(Blue_Car);
   Serial.println(Blue_Car); 
   
       if(Blue_Car == "*stop")   //Turn of All Pins (Call Function)
       {  Stop();  }  
        if(Blue_Car == "*go") 
        {  Forward(); } 
       if(Blue_Car == "*back")
        {   Backward();   }
        if(Blue_Car == "*right") 
        {   Right();  }
        
        if(Blue_Car == "*left") 
        {   Left();  }
    
      if(Blue_Car == "*servoon") 
        {
          Srvo_open();
          delay(20);
        }
     if(Blue_Car == "*servooff") 
        {
          Srvo_close();
          delay(20);
        }   
      if(Blue_Car == "*res") 
        {
          Stop();
          delay(5);
          Srvo_close();
          delay(5);
        }
        if(Blue_Car == "*a") 
        {
          Forward();
          Srvo_open();
        }
        if(Blue_Car == "*@") 
        {
          Srvo_open();
          delay(20);
          Forward();
        }
                
      } 
  }
  
  //#### Start Of RF Command ####
  if ((cmd == "rf") || (cmd == "all"))
  {
    if(cmd == "all" )
    {
      if( digitalRead(RF_1) == LOW || digitalRead(RF_2) == LOW || digitalRead(RF_3) == LOW || digitalRead(RF_4) == LOW )
      { cmd= "rf"; 
        Serial.println(RF);
        BlueTooth.println(RF); 
      }
    }
  
   if( cmd == "rf" )
   { 
    if ( digitalRead(RF_1) == LOW && digitalRead(RF_2) == HIGH && digitalRead(RF_3) == HIGH && digitalRead(RF_4) == HIGH)  
      {  Forward(); }
      
      if (digitalRead(RF_1) == HIGH && digitalRead(RF_2) == LOW && digitalRead(RF_3) == HIGH && digitalRead(RF_4) == HIGH)  
      {  Left();  }
      
      if ( digitalRead(RF_1) == HIGH && digitalRead(RF_2) == HIGH && digitalRead(RF_3) == LOW && digitalRead(RF_4) == HIGH)  
      {  Backward(); }
      
      if ( digitalRead(RF_1) == HIGH && digitalRead(RF_2) == HIGH && digitalRead(RF_3) == HIGH && digitalRead(RF_4) == LOW)  
      {  Right();  }
      
      if ( digitalRead(RF_1) == HIGH && digitalRead(RF_2) == LOW && digitalRead(RF_3) == LOW && digitalRead(RF_4) == HIGH)
      { Stop(); Srvo_open();  }
      
      if ( digitalRead(RF_1) == HIGH && digitalRead(RF_2) == HIGH && digitalRead(RF_3) == LOW && digitalRead(RF_4) == LOW)
      {  Stop(); Srvo_close();  }
      
      if ( digitalRead(RF_1) == HIGH && digitalRead(RF_2) == HIGH && digitalRead(RF_3) == HIGH && digitalRead(RF_4) == HIGH)
      { Stop(); }
   }
  
  }
  
  
} 
 
// End Of void loop 
 
void Stop()
  {
    digitalWrite(Motor_1_1, LOW); 
    digitalWrite(Motor_1_2, LOW); 
    digitalWrite(Motor_2_1, LOW); 
    digitalWrite(Motor_2_2, LOW);
    Serial.println("Don't Move");
    BlueTooth.println("Don't Move");
    delay(11);
  }
void Forward()
  {
    digitalWrite(Motor_1_1, LOW); 
    digitalWrite(Motor_1_2, HIGH); 
    digitalWrite(Motor_2_1, LOW); 
    digitalWrite(Motor_2_2, HIGH);
    Serial.println("Move Forward");
    BlueTooth.println("Move Forward");
    delay(11);
  }
void Backward()
  {      
    digitalWrite(Motor_1_1, HIGH); 
    digitalWrite(Motor_1_2, LOW); 
    digitalWrite(Motor_2_1, HIGH); 
    digitalWrite(Motor_2_2, LOW);
    Serial.println("Move Back");
    BlueTooth.println("Move Back");
    delay(11);
  }   
void Right()
  { 
    digitalWrite(Motor_1_1, LOW); 
    digitalWrite(Motor_1_2, HIGH); 
    digitalWrite(Motor_2_1, HIGH); 
    digitalWrite(Motor_2_2, LOW);
   Serial.println("Move Left"); 
    BlueTooth.println("Move Left");
   delay(11);
  }
void Left()
  {  
    digitalWrite(Motor_1_1, HIGH); 
    digitalWrite(Motor_1_2, LOW); 
    digitalWrite(Motor_2_1, LOW); 
    digitalWrite(Motor_2_2, HIGH);
   Serial.println("Move Right"); 
    BlueTooth.println("Move Right");
   delay(11);
  }
void Srvo_open()
  {
    
    if(angle < 95)
    {
      srvoleg.attach(A1);
      for(angle = angle; angle < 100; angle=angle+2) 
      {
        srvoleg.write(angle);      
        delay(11); 
      }
      srvoleg.detach();
    }
    
      Serial.println("Srvo Open");
      BlueTooth.println("Srvo Open");
  }
  
void Srvo_close()
 {
   if (angle > 5)
   {
    srvoleg.attach(servocam);
    for(angle = angle; angle > 0; angle=angle-3)  
    {
      srvoleg.write(angle);       
      delay(11);
    }
    srvoleg.detach();
   }
    Serial.println("Srvo Close");
    BlueTooth.println("Srvo Close");
 }
 
 
/////////////////////////////////////////////
Command button code: ////
1. back.php       ////
2. blue.php      ////
3. go.php     ////
4. left.php    //// 
5. rf.php   ////
6. right.php  ////
7. servooff.php ////
8. servoon.php ////
9. stop.php       ////
//////////////////////////////////
Command Calling Code:     ////
1. Spy.php    ////
///////////////////////////////
Command Save File:  ////
1. Spy.txt ////
////////////////////////////
 
Page Style Code:
1. spy_robot.css
//////////////////////////
Mani page Code:
1. spy_robot.php

###


Circuit Diagrams

Circuit-Diagram-Arduino-Based-Web-Controlled-Robot


Filed Under: Electronic Projects


Questions related to this article?
👉Ask and discuss on Electro-Tech-Online.com and EDAboard.com forums.


Tell Us What You Think!! Cancel reply

You must be logged in to post a comment.

HAVE A QUESTION?

Have a technical question about an article or other engineering questions? Check out our engineering forums EDABoard.com and Electro-Tech-Online.com where you can get those questions asked and answered by your peers!


Featured Tutorials

  • Introduction to Brain Waves & its Types (Part 1/13)
  • Understanding NeuroSky EEG Chip in Detail (Part 2/13)
  • Performing Experiments with Brainwaves (Part 3/13)
  • Amplification of EEG Signal and Interfacing with Arduino (Part 4/13)
  • Controlling Led brightness using Meditation and attention level (Part 5/13)
  • Control Motor’s Speed using Meditation and Attention Level of Brain (Part 6/13)

Stay Up To Date

Newsletter Signup

Sign up and receive our weekly newsletter for latest Tech articles, Electronics Projects, Tutorial series and other insightful tech content.

EE Training Center Classrooms

EE Classrooms

Recent Articles

  • What are the battery-selection criteria for low-power design?
  • Key factors to optimize power consumption in an embedded device
  • EdgeLock A5000 Secure Authenticator
  • How to interface a DS18B20 temperature sensor with MicroPython’s Onewire driver
  • Introduction to Brain Waves & its Types (Part 1/13)

Most Popular

5G 555 timer circuit 8051 ai Arduino atmega16 automotive avr bluetooth dc motor display Electronic Part Electronic Parts Fujitsu ic infineontechnologies integratedcircuit Intel IoT ir lcd led maximintegratedproducts microchip microchiptechnology Microchip Technology microcontroller microcontrollers mosfet motor powermanagement Raspberry Pi remote renesaselectronics renesaselectronicscorporation Research samsung semiconductor sensor software STMicroelectronics switch Technology vishayintertechnology wireless

RSS EDABOARD.com Discussions

  • Pull up via GPIO
  • Code Optimization
  • Poly Spacing Effect
  • Thyristor Gate Drive
  • Passive Harmonics Filter

RSS Electro-Tech-Online.com Discussions

  • Someone please explain how this BMS board is supposed to work?
  • HV Diodes
  • Question about ultrasonic mist maker
  • DIY bluetooth speaker
  • Disabled son needs advice please
Engineers Garage
  • Analog IC TIps
  • Connector Tips
  • DesignFast
  • EDABoard Forums
  • EE World Online
  • Electro-Tech-Online Forums
  • Microcontroller Tips
  • Power Electronic Tips
  • Sensor Tips
  • Test and Measurement Tips
  • 5G Technology World
  • About Us
  • Contact Us
  • Advertise

Copyright © 2022 WTWH Media LLC. All Rights Reserved. The material on this site may not be reproduced, distributed, transmitted, cached or otherwise used, except with the prior written permission of WTWH Media
Privacy Policy | Advertising | About Us

Search Engineers Garage

  • Projects and Tutorials
    • Electronic Projects
      • 8051
      • Arduino
      • ARM
      • AVR
      • PIC
      • Raspberry pi
      • STM32
    • Tutorials
    • Circuit Design
    • Project Videos
    • Components
  • Articles
    • Tech Articles
    • Insight
    • Invention Stories
    • How to
    • What Is
  • News
    • Electronic Products News
    • DIY Reviews
    • Guest Post
  • Forums
    • EDABoard.com
    • Electro-Tech-Online
    • EG Forum Archive
  • Digi-Key Store
    • Cables, Wires
    • Connectors, Interconnect
    • Discrete
    • Electromechanical
    • Embedded Computers
    • Enclosures, Hardware, Office
    • Integrated Circuits (ICs)
    • Isolators
    • LED/Optoelectronics
    • Passive
    • Power, Circuit Protection
    • Programmers
    • RF, Wireless
    • Semiconductors
    • Sensors, Transducers
    • Test Products
    • Tools
  • EE Resources
    • DesignFast
    • LEAP Awards
    • Oscilloscope Product Finder
    • White Papers
    • Webinars
  • EE Learning Center
    • Design Guides
      • WiFi & the IOT Design Guide
      • Microcontrollers Design Guide
      • State of the Art Inductors Design Guide
  • Women in Engineering