By Aaron Bauch, Senior Field Application Engineer, IAR Systems
Design specifications require the ability to update a device’s firmware in the field dynamically. This is done commonly via a bootloader. Designing a bootloader, however, is challenging as it must meet various requirements. For example, the mechanism for getting the new application into the MPU is through the USB peripheral of the MPU; for some, it might be Over the Air (OTA). When creating a bootloader, there are several questions to consider regarding project setup and the execution handover from the bootloader to the application. Some of these include:
- Should you have one single project, or one for the bootloader, and one for the application?
- When and what is the best way to perform the hardware initialization?
- What about configuring or resetting the stack pointer?
- How do you avoid unexpected interrupts during startup?
- How can you map the memory for the bootloader and allocate enough memory for the application?
In addition, debugging a bootloader can be tricky since there is only source-level access to either the bootloader or the application at debug time. The challenge is how to make the debugger aware of the two “applications.” But first, let’s start with the basics.
What is a bootloader?
A bootloader is a standalone program that’s generally the first code to run on a processor at startup. It loads essential software to get the minimum running on the processor chip before higher-level software can run. The tasks performed by embedded bootloaders vary based on the architecture and the application. Based on several criteria, they decide whether to jump to the installed application and start running or load a new application that may include updated firmware for the system.
Bootloaders provide the ability to do field upgrades of system firmware and, in some cases, protect against invalid code rollback and other attack mechanisms. Depending on the required functionality, bootloaders can range from simple to quite complex. It’s wise to consider the many commercially available bootloaders before writing custom code for a specific application. While a bootloader can update application firmware, it is challenging to update a bootloader in the field, making it essential to select the right solution.
Modern embedded systems generally have extremely complex firmware, which requires frequent updates for various reasons. These include adding functionality to existing systems, fixing bugs in existing code, or keeping systems up to date. It is common for a system to include a firmware update as part of the device installation. The proliferation of re-programmable on-chip program storage, such as flash memory, helps enable this feature.
Benefits of using a bootloader
A bootloader performs various hardware checks, initializes the processor and peripherals, and completes other tasks like partitioning or configuring registers. In addition to starting up a system, bootloaders can update MCU firmware every time the MCU/MPU resets or when the MCU/MPU resets and a button on the physical device is pressed. In addition, it can be a mechanism for initial device programming on the production floor. Since bootloader is a separate program that runs at the system’s startup, it can perform a diverse range of setup and check functions or jump to an installed application. The latter is the most common function.
Bootloader startup and memory map
Once the application starts, there’s no reason why the application has to be aware that the bootloader launched it. The bootloader often runs in the context of other startup code, such as memory initialization routines, before an application reaches the primary function start point in a C or C++ project. Diagram 1 shows a system’s memory map that uses a bootloader for startup and management.
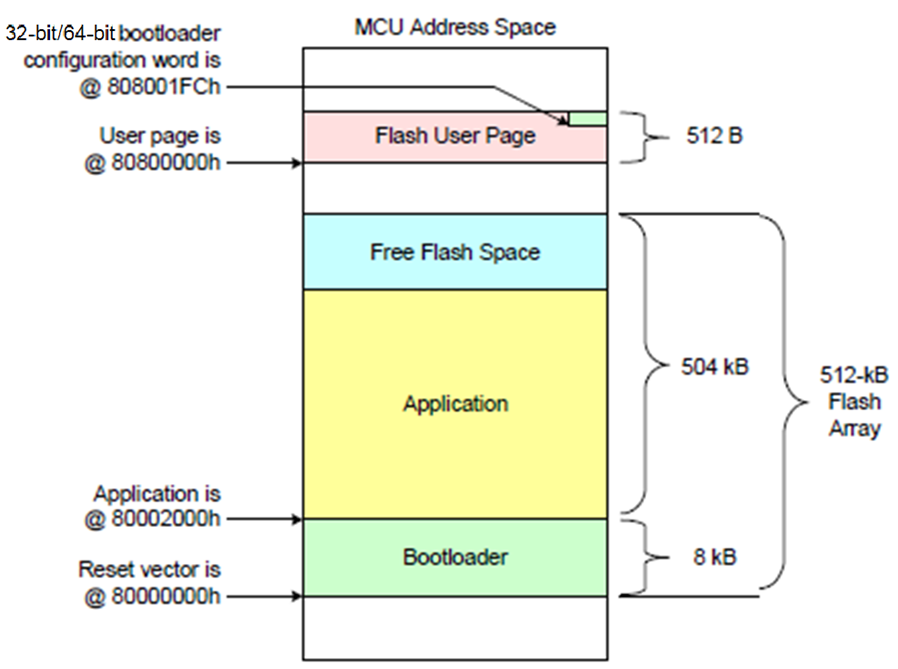
This example shows an STM32 Arm microcontroller, which has its program, starting at Memory location 800000 hex. In this case, the bootloader and its Interrupt Vector table are populated at the primary program base address. The main application is located at some higher address, starting with the application program’s vector table, which contains a jump vector to the start address of the application. This leaves space at the bottom of the flash memory for the bootloader code.
Setting up a bootloader in an Integrated Development Environment
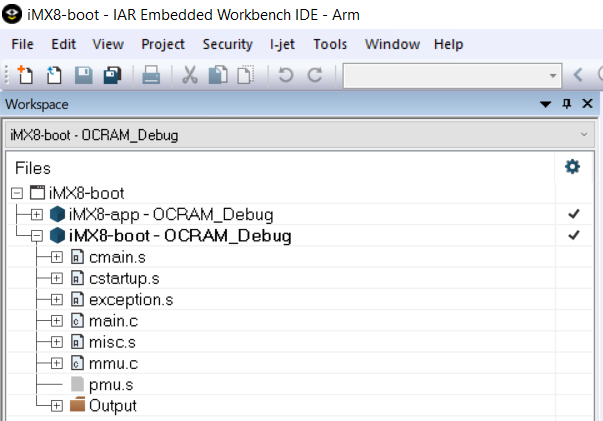
Setting up a bootloader project is no different from any other project in Integrated Development Environments (IDE) like Embedded Workbench from IAR Systems. Initially, developers should create a basic framework for a new project that will ultimately become the bootloader for the system. Alternatively, users can create a bootloader using chip initialization tools, creating the bootloader project in a separate workspace. This project can be added as an existing project to the application workspace, making it easy to work on them together. Diagram 2 shows the application and bootloader projects set up in the same workspace.
So far, we’ve assumed that using two separate projects, one for the application and the other for a bootloader is the preferred way to implement this combination of functions. However, this is not arbitrary. There are good reasons to set up the environment in this manner.
Combing the bootloader and application into a single project can be done, but it has several drawbacks. Foremost is the challenge of making changes. By tying the two functions together in one project, changes made to one will affect the other. In addition, this can cause significant inefficiencies in how memory gets allocated and viewed. It’s best to think of the bootloader as a fixed part of the target chip. Once it’s debugged and in place, you can download the application and debug it without worrying about the load or startup mechanisms implemented in the bootloader.
Debugging bootloaders
In general, debugging the bootloader can be tricky since developers can access either the bootloader or the application at one time. Some IDEs provide the ability to load multiple images (ELF/DWARF) or only load the debug symbols to have a smooth bootloader to application jump debug transition.
When debugging the bootloader, especially when checking the transition to the start of the application, there are tradeoffs, especially when a developer wants more than just the application’s binary image loaded. For example, it may be helpful to download the symbol information from the application and the symbol information for the bootloader. This action would enable the developer to view the source-level information, such as line numbers and symbol references, as it transitions from the bootloader to the application.
As long as there is an understanding of the issues introduced by loading multiple projects’ symbol information, including that some warnings may be ignored, the benefits of having symbols from both projects together can be quite helpful.
Diagram 3 shows how to set up a debugger to load the symbols from the application found in the Elf Output file from the application project.
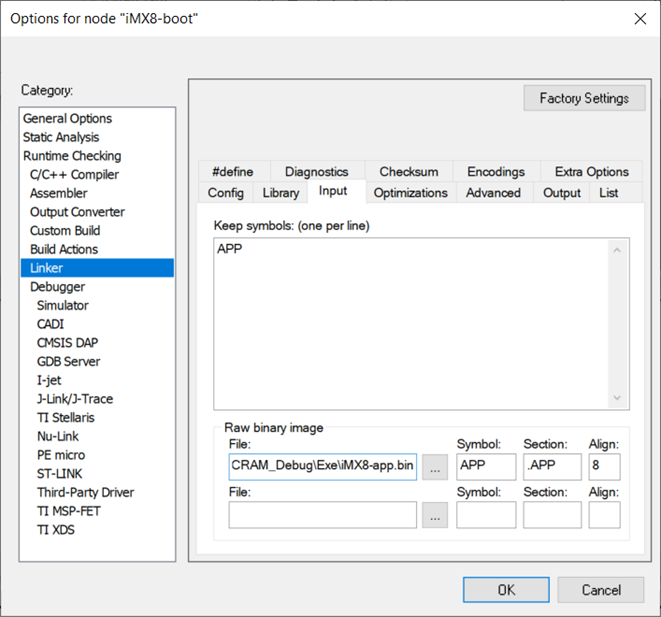
Note that the address offset is set to zero since the symbols in this file have the correctly located absolute addresses of code and data for the application.
In addition, checking the debug information-only box ensures that the debug symbol information and the program image are downloaded separately and linked as a binary file to the bootloader program image.
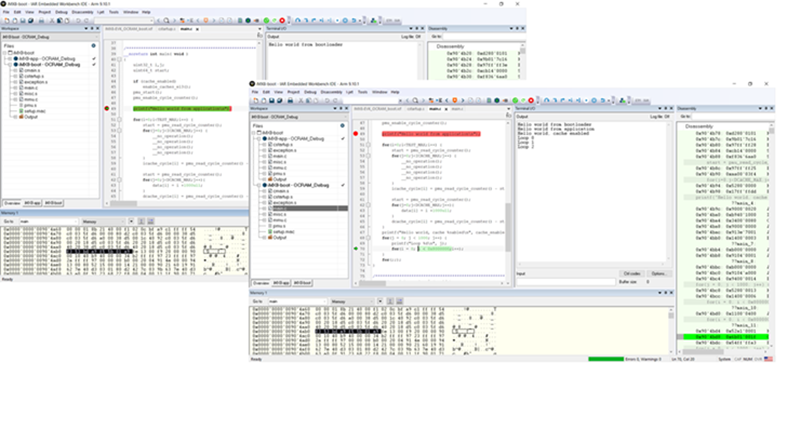
Diagram 4 shows how downloading the bootloader and application images and the symbol information for both can be used to enable source-level debugging of the bootloader and then of the application.
This process helps developers ensure that the jump from one to the other is correct. It may be used to verify only the start of the application code while debugging the bootloader.
Once this is reliably verified, developers can complete debugging the application without loading the program or symbol information for the bootloader. In this way, extensive application debugging is achievable without any issues of redundant lead-defined symbols. The bootloader can be installed and run as part of the startup code of the system before the main application starts.
Safe and secure bootloaders
An important subtopic of boot loaders is the concept of safe and secure boot loaders. As mentioned earlier, the array of possible functions performed by a bootloader can be quite extensive, due primarily to the fact that it is the first code to run on the processor in the system.
As such, it’s also the ideal place to implement a security protocol for installing new firmware updates on the system. It is essential to ensure that only new code from a trusted source is installed on an existing device. Doing this requires that the code update be signed for authenticity, which the target bootloader can check before installation. The entire update may be encrypted to prevent it from being viewed or stolen by third parties in transit. The target system must contain secret key information to validate and decrypt an image before installation.
Finally, it’s desirable to rollback protection so that an attacker cannot install an old version of the device firmware, such as a valid image known to have vulnerabilities, which was subsequently fixed and updated. This rollback protection prevents hackers from exploiting known and fixed vulnerabilities by installing older firmware versions.
Conclusion
All these capabilities add complexity to the bootloader, suggesting that using proven debugged and robust bootloader code for these applications is a good choice.
The use of bootloaders in today’s embedded systems which increase in complexity daily is increasingly common. They provide the ability to deliver firmware updates after product delivery and create opportunities for adding features and fixing bugs throughout the product life cycle. Creating a bootloader can be challenging; however, using a modern commercial toolchain makes this process manageable and straightforward.
Debugging the functionality of a bootloader, particularly when it comes to monitoring the transition from the end of the bootloader to the start of the system application code, requires an advanced debug environment where validating bootloader functionality is a standard exercise.
You may also like:


Filed Under: ARM., Tutorials

Questions related to this article?
👉Ask and discuss on EDAboard.com and Electro-Tech-Online.com forums.
Tell Us What You Think!!
You must be logged in to post a comment.