Engineers Garage

  • Electronic Projects & Tutorials
    • Electronic Projects
      • Arduino Projects
      • AVR
      • Raspberry pi
      • ESP8266
      • BeagleBone
      • 8051 Microcontroller
      • ARM
      • PIC Microcontroller
      • STM32
    • Tutorials
      • Sensor Series
      • Engineering Deep Dives
      • AI
      • ARDUINO Compatible Coding
      • Audio Electronics
      • Battery Management
      • Beginners Electronics Series
      • Brainwave
      • Digital electronics (DE)
      • Electric Vehicles
      • EMI/EMC/RFI
      • EVs
      • Hardware Filters
      • IoT tutorials
      • LoRa/LoRaWAN
      • Power Tutorials
      • Protocol
      • Python
      • RPI Python Programming
      • Sensors
      • USB
      • Thermal management
      • Verilog
      • VHDL
    • Circuit Design
    • Project Videos
    • Components
  • Articles
    • Tech Articles
    • Insight
    • Invention Stories
    • How to
    • What Is
  • News
    • Electronic Product News
    • Business News
    • Company/Start-up News
    • DIY Reviews
    • Guest Post
  • Forums
    • EDABoard.com
    • Electro-Tech-Online
    • EG Forum Archive
  • DigiKey Store
    • Cables, Wires
    • Connectors, Interconnect
    • Discrete
    • Electromechanical
    • Embedded Computers
    • Enclosures, Hardware, Office
    • Integrated Circuits (ICs)
    • Isolators
    • LED/Optoelectronics
    • Passive
    • Power, Circuit Protection
    • Programmers
    • RF, Wireless
    • Semiconductors
    • Sensors, Transducers
    • Test Products
    • Tools
  • Learn
    • eBooks/Tech Tips
    • Design Guides
    • Learning Center
    • Tech Toolboxes
    • Webinars & Digital Events
  • Resources
    • Digital Issues
    • EE Training Days
    • LEAP Awards
    • Podcasts
    • Webinars / Digital Events
    • White Papers
    • Engineering Diversity & Inclusion
  • Guest Post Guidelines
  • Advertise
  • Subscribe

How To Test The Built-In EEPROM Of The Arduino- (Part 17/49)

By Ajish Alfred July 9, 2013

The EEPROM stands for Electrically Erasable Programmable Read Only Memory. In an EEPROM the data can be written with the help of electrically programming the chip. Once programmed the data it will remain in the memory for a very long time even if there is no power applied to it. Hence the EEPROM memory is widely used in microcontroller systems where some particular data need to be retained each time the system is turned on.The EEPROM memory chips can be interfaced in a microcontroller chip usually with the help of serial communication protocols. Their applications can be found in sensor based system where the sensor data can be stored, display systems where the image data can be stored and in electronic voting machines where the count of the votes can be stored etc.In case of small applications where only a few bytes needs to be stored the extra EEPROM chips are not preferred since it add extra complexity in the hardware, coding and increase the cost of the system. Hence most of the microcontrollers are provided with small sized built-in EEPROM chip which can be used to store data in small applications.

The Arduino board has an AVR microcontroller in it which also has a built-in EEPROM memory. The memory size varies with the Arduino boards and the microcontroller used in them. Before writing the data to the EEPROM memory it is always recommended to check each and every memory locations of so that there won’t be any data error when the microcontroller tries to retain the data. This particular project explains how to perform a test on the built-in EEPROM of an Arduino microcontroller. 


The AVR microcontroller boards which are provided with all the basic circuitry for the operation of the microcontroller which has been flashed with the arduino boot-loader are called arduino boards. The arduino can communicate with the other devices using its digital I/O, serial port, I2C port, SPI port etc.The arduino IDE is so simple to use that anyone who has basic knowledge of c programming can quickly get started with it. The project on how to get started with the arduino explains about the steps required to get start with an arduino board.The arduino board used in this project is the arduino pro-mini board and the IDE version of the arduino is 1.0.3 for windows. The Arduino pro-mini board has ATMEGA328 microcontroller inside it which has an internal EEPROM memory of 1Kb. The image of the arduino pro-mini board and the arduino IDE are shown below;
 
Typical Arduino Pro-Mini Board
Fig. 2: Typical Arduino Pro-Mini Board
 
 
Arduino IDE Software Window
Fig. 3: Arduino IDE Software Window
 
Since the arduino pro-mini board has no circuitary for interfacing it with the serial port or the USB port of the PC, an external USB to TTL converter board is required to connect it with the PC. This hardware helps in programming the arduino board and also helps in the serial communication with the USB port of the PC.
External USB To TTL Converter Board For Programming Arduino And Serial Communication
Fig. 4: External USB to TTL converter board for programming Arduino and serial communication
It is assumed that the reader has gone through the project how to get started with the arduino and tried out all the things discussed there.The Arduino IDE provides some functions to access the built-in EEPROM using with the EEPROM read and write can be performed very easily. The functions are available from the library called <EEPROM.h>. The library provides functions for write a data into the EEPROM and read data from the EEPROM. The functions used in the code written for this projects are EEPROM.write() and EEPROM.read() from the library <EEPROM.h> which can be used for writing a data into the EEPROM memory and reading a data from the EEPROM memory. The details of the functions are discussed in the following section
 
EEPROM.write()
The function EEPROM.write() is used to write a data byte into a particular address of the EEPROM memory mentioned by the parameters passed to the function. The function has two parameters where the first one should be provided with the address of the EEPROM location into which the data need to be written into and the second parameter should be provided with actual data byte. For example if the data ‘A’ need to be written into the address mentioned by the variable ‘addr’ the following statement can be used.
EEPROM.write(addr, ‘A’);
 
EEPROM.read()
The function EEPROM.read() is used to read a particular data byte from the internal EEPROM of the Arduino’s microcontroller. The function has a single parameter which is the address from which the data should be read from. The function has a return value which is the actual data byte which it read from the address mentioned by the parameter passed into it. For example if the data byte is to be read from the location mentioned by the variable ‘addr’ the following statement can be used.
EEPROM.read(addr);
 
THE CODE
The ATMEGA328 microcontroller in the Arduino pro-mini board has a built-in EEPROM memory of 1Kb. This project checks all the memory locations of the EEPROM memory starting from 0th location till the 1023th location. Even though there are lot of standard algorithms to perform memory check, in this particular project the checking is performed by simply writing a data into each and every memory location and reading back the same data and verifies whether they are same.
The code writes a particular data into a memory location with the help of EEPROM.write() function and reads back the data from the same memory location using the function EEPROM.read() both provided by the library <EEPROM.h> and then advances to the next memory location.
Both the value written into the location and read from the location is shown in a 16*2 LCD with the help of functions from the library <LiquidCrystal.h>. Few functions from the library <LiquidCrystal.h> including those which are used in this particular project are already discussed in the previous projects on how to interface an LCD, how to display sensor value on LCD, how to connect the LCD with the PC and how to make an LCD scrolling display.
The code displays the data which is written into the EEPROM in the first line of the 16*2 LCD and the data which is read back from the same location in the second line of the LCD. Once the display on the second line of the 16*2 LCD is done the code starts blinking an LED connected to the pin number 6 continuously with the help of pinMode(), delay() and digitalWrite() functions explained in the previous projects on how to start with Arduino and how to use digital input and output of arduino.
When the coding is finished one can verify and upload the code to the Arduino board as explained in the project how to get started with the Arduino and the test result will be updated in the 16*2 LCD. If there is no problems found in the entire EEPROM memory locations the LCD reads “EEPROM [ OK ]” otherwise “ERROR OCCURED”.


Project Source Code

###


/*================================= EG LABS =======================================

Test the entire EEPROM storage locations and update the result in an LCD


 The circuit:

 * LED attached from pin 6 to ground through a 1K resistor

 * Potentiometer attached to analog input A0

 * one side pin (either one) to ground

 * the other side pin to +5V


 LCD:

 * LCD RS pin to digital pin 12

 * LCD Enable pin to digital pin 11

 * LCD D4 pin to digital pin 5

 * LCD D5 pin to digital pin 4

 * LCD D6 pin to digital pin 3

 * LCD D7 pin to digital pin 2

 * LCD R/W pin to ground

 * 10K resistor:

 * ends to +5V and ground

 * wiper to LCD pin 3

 * LED anode attached to digital output 6

 * LED cathode attached to ground through a 1K resistor

//================================= EG LABS =======================================*/


#include <EEPROM.h>

#include <LiquidCrystal.h>


LiquidCrystal lcd(12, 11, 5, 4, 3, 2);               // initialize the LCD library with the numbers of the interface pins


int address = 0;                                    // the variable which holds the address in the eeprom

int write_value = 100;                               // the variable which holds the data need to be written to the eeprom

int read_value = 0;                                  // the variable which holds the data which is read from the eeprom


int led = 6;                                         // variable which holds the pin number at which the LED is connected


void setup()

{

  pinMode(led, OUTPUT);                               // initialize the led pin as an output.


  lcd.begin(16, 2);                                   // set up the LCD's number of columns and rows: 

  lcd.print("ENGINEERS GARAGE");

  delay(2000);

  lcd.clear();


  lcd.print("TESTING EEPROM..");

  delay(1000);


  for(address == 0; address < 1024; address ++)

  {  

    EEPROM.write(address, write_value);                 // write the value to the EEPROM address

    read_value = EEPROM.read(address);                  // read the value from the address


    if(read_value != write_value)

      break;

    else;

  }


  lcd.setCursor(0, 1);   

  if(read_value != write_value)

    lcd.print(" ERROR OCCURED");    

  else

    lcd.print(" EEPROM [ OK ]");      


}


void loop()

{

   //---- blink LED -----//

  digitalWrite(led, HIGH);       

  delay(1000);

  digitalWrite(led, LOW);

  delay(1000);

   //---- blink LED -----//

}
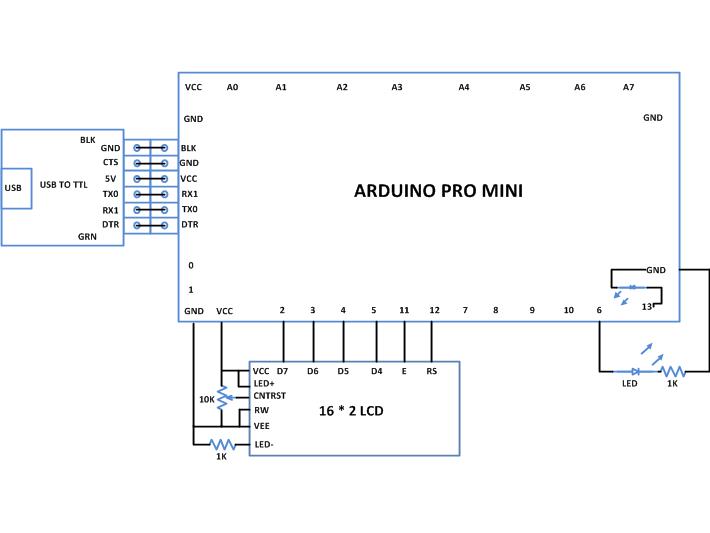
###


Circuit Diagrams

Circuit-Diagram-Test-Built-In-EEPROM-Arduino-ARD

Project Components

  • Arduino Pro Mini
  • LCD
  • LED
  • Resistor

Project Video


Filed Under: Arduino Projects
Tagged With: Arduino, eeprom
 

Next Article

← Previous Article
Next Article →

Questions related to this article?
👉Ask and discuss on Electro-Tech-Online.com and EDAboard.com forums.


Tell Us What You Think!! Cancel reply

Log in to leave a comment:

Lost your password?

Don't have an account? Register here

Submit a Guest Post

submit a guest post

EE TECH TOOLBOX

“ee
Tech Toolbox: Wide Bandgap Semiconductors
Moving from silicon to GaN or SiC feels like a whole new ballgame, doesn’t it? It isn’t just about faster switching; it’s about managing the layout parasitics and thermal realities that come with that speed. This month’s Tech Toolbox features a curated eBook that tackles these design hurdles head-on.

EE Learning Center

EE Learning Center
“engineers
EXPAND YOUR KNOWLEDGE AND STAY CONNECTED
Get the latest info on technologies, tools and strategies for EE professionals.

HAVE A QUESTION?

Have a technical question about an article or other engineering questions? Check out our engineering forums EDABoard.com and Electro-Tech-Online.com where you can get those questions asked and answered by your peers!


RSS EDABOARD.com Discussions.

  • PFC current sense transformer
  • SMPS with slow diodes?
  • UC1842 timing components
  • Question tweezers esd
  • testing VNA cables for proper funtioning

RSS Electro-Tech-Online.com Discussions

  • ISO: Reliable Battery Spot Welder
  • causes for causality in s-parameters question
  • transistor
  • What is the most suitable light source for making a book light like this?
  • Swimming Pool Electrocution and Safety

Featured Tutorials

Learn - AWS IoT Tutorials

  • How to enable device-to-device messaging on AWS IoT Core using MQTT
    How to enable device-to-device messaging on AWS IoT Core using MQTT
  • How to connect Raspberry Pi to Amazon AWS IoT Core using MQTT
    How to connect Raspberry Pi to Amazon AWS IoT Core using MQTT
  • How to connect ESP32 to AWS IoT Core using MQTT
    How to connect ESP32 to AWS IoT Core using MQTT
  • How to connect a computer to AWS IoT Core
    How to connect a computer to AWS IoT Core
  • Arduino compatible coding 02: Getting started with Arduino
    Arduino compatible coding 02: Getting started with Arduino
  • Arduino compatible coding 03: Basics of Arduino sketches and Embedded C
    Arduino compatible coding 03: Basics of Arduino sketches and Embedded C
More Tutorials >

Recent Articles

  • AAEON launches 4-inch SBC with 180 TOPS
  • Microchip adds six-output space-grade clock generator
  • Melexis adds sigma-delta output to Hall sensor
  • Würth Elektronik adds nanocrystalline cable cores
  • STMicroelectronics adds PQC hardware to mobile security chip

EE ENGINEERING TRAINING DAYS

engineering
Engineers Garage
  • Analog IC TIps
  • Connector Tips
  • Battery Power Tips
  • EDABoard Forums
  • EE World Online
  • Electro-Tech-Online Forums
  • EV Engineering
  • Microcontroller Tips
  • Power Electronic Tips
  • Sensor Tips
  • Test and Measurement Tips
  • 5G Technology World
  • Subscribe to our newsletter
  • About Us
  • Contact Us
  • Advertise

Copyright © 2026 WTWH Media LLC. All Rights Reserved. The material on this site may not be reproduced, distributed, transmitted, cached or otherwise used, except with the prior written permission of WTWH Media
Privacy Policy

Search Engineers Garage

  • Electronic Projects & Tutorials
    • Electronic Projects
      • Arduino Projects
      • AVR
      • Raspberry pi
      • ESP8266
      • BeagleBone
      • 8051 Microcontroller
      • ARM
      • PIC Microcontroller
      • STM32
    • Tutorials
      • Sensor Series
      • Engineering Deep Dives
      • AI
      • ARDUINO Compatible Coding
      • Audio Electronics
      • Battery Management
      • Beginners Electronics Series
      • Brainwave
      • Digital electronics (DE)
      • Electric Vehicles
      • EMI/EMC/RFI
      • EVs
      • Hardware Filters
      • IoT tutorials
      • LoRa/LoRaWAN
      • Power Tutorials
      • Protocol
      • Python
      • RPI Python Programming
      • Sensors
      • USB
      • Thermal management
      • Verilog
      • VHDL
    • Circuit Design
    • Project Videos
    • Components
  • Articles
    • Tech Articles
    • Insight
    • Invention Stories
    • How to
    • What Is
  • News
    • Electronic Product News
    • Business News
    • Company/Start-up News
    • DIY Reviews
    • Guest Post
  • Forums
    • EDABoard.com
    • Electro-Tech-Online
    • EG Forum Archive
  • DigiKey Store
    • Cables, Wires
    • Connectors, Interconnect
    • Discrete
    • Electromechanical
    • Embedded Computers
    • Enclosures, Hardware, Office
    • Integrated Circuits (ICs)
    • Isolators
    • LED/Optoelectronics
    • Passive
    • Power, Circuit Protection
    • Programmers
    • RF, Wireless
    • Semiconductors
    • Sensors, Transducers
    • Test Products
    • Tools
  • Learn
    • eBooks/Tech Tips
    • Design Guides
    • Learning Center
    • Tech Toolboxes
    • Webinars & Digital Events
  • Resources
    • Digital Issues
    • EE Training Days
    • LEAP Awards
    • Podcasts
    • Webinars / Digital Events
    • White Papers
    • Engineering Diversity & Inclusion
  • Guest Post Guidelines
  • Advertise
  • Subscribe