Engineers Garage

  • Electronic Projects & Tutorials
    • Electronic Projects
      • Arduino Projects
      • AVR
      • Raspberry pi
      • ESP8266
      • BeagleBone
      • 8051 Microcontroller
      • ARM
      • PIC Microcontroller
      • STM32
    • Tutorials
      • Sensor Series
      • Engineering Deep Dives
      • AI
      • ARDUINO Compatible Coding
      • Audio Electronics
      • Battery Management
      • Beginners Electronics Series
      • Brainwave
      • Digital electronics (DE)
      • Electric Vehicles
      • EMI/EMC/RFI
      • EVs
      • Hardware Filters
      • IoT tutorials
      • LoRa/LoRaWAN
      • Power Tutorials
      • Protocol
      • Python
      • RPI Python Programming
      • Sensors
      • USB
      • Thermal management
      • Verilog
      • VHDL
    • Circuit Design
    • Project Videos
    • Components
  • Articles
    • Tech Articles
    • Insight
    • Invention Stories
    • How to
    • What Is
  • News
    • Electronic Product News
    • Business News
    • Company/Start-up News
    • DIY Reviews
    • Guest Post
  • Forums
    • EDABoard.com
    • Electro-Tech-Online
    • EG Forum Archive
  • DigiKey Store
    • Cables, Wires
    • Connectors, Interconnect
    • Discrete
    • Electromechanical
    • Embedded Computers
    • Enclosures, Hardware, Office
    • Integrated Circuits (ICs)
    • Isolators
    • LED/Optoelectronics
    • Passive
    • Power, Circuit Protection
    • Programmers
    • RF, Wireless
    • Semiconductors
    • Sensors, Transducers
    • Test Products
    • Tools
  • Learn
    • eBooks/Tech Tips
    • Design Guides
    • Learning Center
    • Tech Toolboxes
    • Webinars & Digital Events
  • Resources
    • Digital Issues
    • EE Training Days
    • LEAP Awards
    • Podcasts
    • Webinars / Digital Events
    • White Papers
    • Engineering Diversity & Inclusion
  • Guest Post Guidelines
  • Advertise
  • Subscribe

Interfacing 4×3 keypad and 16×2 lcd with 8051(89c51,89c52) microcontroller

By EG Projects April 17, 2019

In this tutorial i am going to explain how to interface 4×3, 4×4 numeric keypad and 16×2 lcd and 8051(89c51,89c52) microcontroller? Project function is simple when any one presses the button on keypad the particular character associated with that button will be displayed on the screen of 16×2 lcd. Project code is open source you can download it from the bottom of the page. Project code is tested on hardware and it is efficiently working. If you are new and don’t know about the working of 16×2 lcd. Here is a good tutorial 16×2 lcd working.

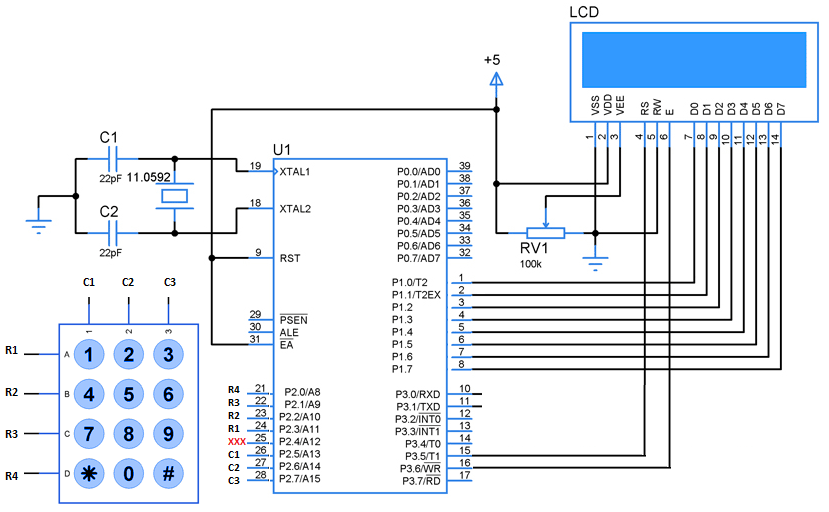
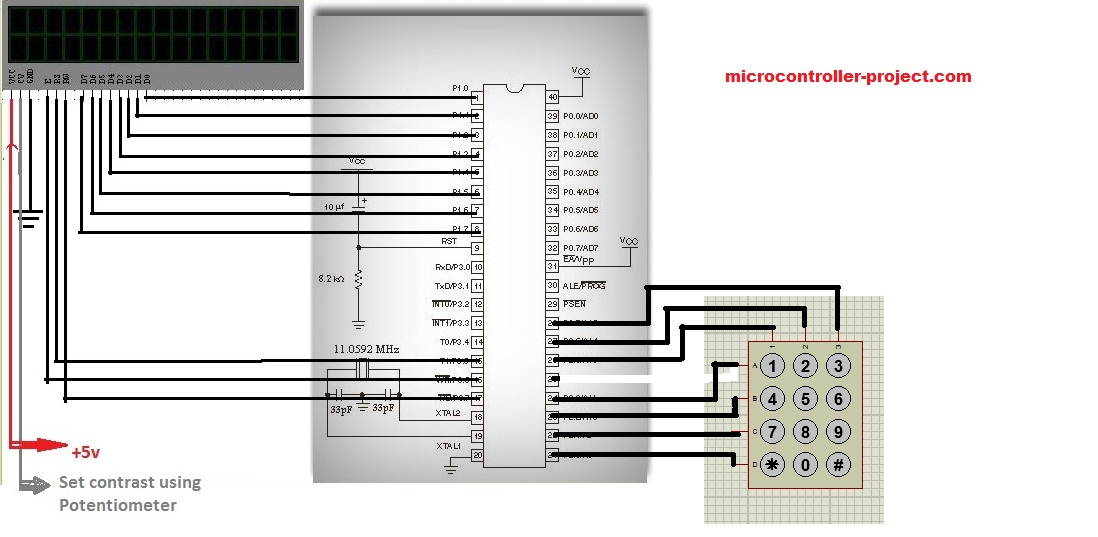
Keypad and Lcd interfaced with 8051 microcontroller – Project requirements

  • 16×2 lcd   
  • 4×4,4×3 numericc keypad 
  • 8051(89c51,89c52) Microcontroller 
  • Power supply(5 volts)
  • Crystal Oscillator(11.0592 MHz)
  • Bread board (To build circuit)
  • Potentiometer(Variable Resistor) To adjust Lcd contrast

4×3 Keypad, 16×2 Lcd interfaced with 89c51 microcontroller – Project code

The circuit is of the project is simple. Just connect Port-1 of 89c51 microcontroller to your 16×2 lcd data pins(D0-D7). Connect Port-2 of 89c51 microcontroller to your keypad. Connect rows of 4×3 keypad to Port-2 pins 0,1,2,4. Connect coulombs of 4×3 keypad with Port-2 pins 5,6,7 of 89c51 microcontroller. Connect enable pin of lcd with Port-3 pin#6. RS(register select) pin of lcd with Port-3 pin# 5. RW(read-write)pin of lcd to 8051 Port-3 pin#7. Rest of the connections are manual which we do in our all circuits. Ground Pin 20. Apply 5 volts to pin 40 and 31. Connect Oscillator with pin#18(XTAL-1) and 19(XTAL-2) of 8051 in parallel to two 30 pF capacitors. Connect reset button with pin#9(reset) of 89c51 microcontroller.
16x2 lcd, 4x3 numeric keypad interfacing with 8051 microcontroller

16×2 lcd, 4×3 numeric keypad interfacing with 8051 microcontroller

Interfacing 4x4,4x3 keypad and 16x2 lcd with 8051(89c51,89c52) microcontroller

Interfacing 4×4,4×3 keypad and 16×2 lcd with 8051(89c51,89c52) microcontroller

Lcd keypad with 8051 microcontroller- Project code

Coming to code. Code is written in c language and it is compiled in keil u vision 4. First the initial s-bits are defined for rows and coulombs of 4×3 keypad. Enable, Register-select and Read-Write pins are also defined as s-bit. Then a character array is initialized. This character array is displayed on the first line of 16×2 lcd. delay() function is for providing necessary delay. lcdcmd() function is for sending commands to 16×2 lcd. lcddata() function is sending data to the lcd. lcdint() function is initializing our lcd. keypad() function scans the key pressed on the keypad.

Main() function executes first. The first four statements of main function initializes Port-1 as output, Port-3 as output, Port-2 upper nibble as input and lower nibble as output. Port-2 upper nibble(4 bits) are connected to 4×3 keypad rows and lower nibble is connected with coulombs of 4×3 numeric keypad. Since there are only three coulombs so pin(25 P2.4) of lower nibble is left void. Then lcdint() function is called to initialize the 16×2 lcd. After initializing the 16×2 next comes the while() loop. lcd The while loop then prints “KEYPAD WITH LCD” string on first line of 16×2 lcd. lcdcmd(0xC0) command jumps the control to second line. Now the for loop is running 16 times and calling the keypad() function 16 times. Actually i am using it to print 16 characters on the second line of 16×2 lcd. Whats going on in keypad() function is important.

Keypad key scanning function with 89c51 microcontroller code

When control is shifted to keypad() function it polls, scans and checks if any key on keyboard is pressed. It first makes row-1 low and all other rows high. Now if any key on row-1 is pressed by the user the associated coulomb with that pin also become low(Rows are declared output and coulombs input). Checks the coulombs if any one is low. If low than prints the character associated with that button on 16×2 lcd. This system goes on for all rows. 
​

Note: The the condition for checking rows and coulombs is placed in a while loop the while loop condition runs until c=’s’, and i am making c=’s’ when any key is pressed. Thus the control will stuck in to the while loop when no key is pressed.This logic is very important and you have to learn it very deeply. If you are interested. 
Next tutorial on how to build an alphanumeric keypad with 8051(89c51,89c52) microcontroller. This is an advance tutorial on 16×2 and 4×4 alphanumeric keypad interface with 89c51 microcontroller. Project is open source you can use all resource(code, circuit) of project and modify it according to your needs.  

8051 Alphanumeric keypad and 16×2 lcd interface

Download the Project Code, Folder includes the project code and keil u-vision4 project files. If you have any questions or queries please write them below in the comments section.
Keypad with lcd code/files


Filed Under: 8051 Microcontroller, Microcontroller Projects


Next Article

← Previous Article
Next Article →

Questions related to this article?
👉Ask and discuss on EDAboard.com and Electro-Tech-Online.com forums.


Tell Us What You Think!! Cancel reply

Log in to leave a comment:

Lost your password?

Don't have an account? Register here

Submit a Guest Post

submit a guest post

EE TECH TOOLBOX

“ee
Tech Toolbox: Sensors
In this Tech Toolbox, we cover some of those technologies driving the next generation of connected systems, including ultra-low-power sensing strategies that extend node battery life, and 60 GHz CMOS radar for contactless health and presence detection.

EE Learning Center

EE Learning Center
“engineers
EXPAND YOUR KNOWLEDGE AND STAY CONNECTED
Get the latest info on technologies, tools and strategies for EE professionals.

HAVE A QUESTION?

Have a technical question about an article or other engineering questions? Check out our engineering forums EDABoard.com and Electro-Tech-Online.com where you can get those questions asked and answered by your peers!


RSS EDABOARD.com Discussions.

  • PA Matching Network Analysis
  • Simulator phantom DC level in Current sense transformer
  • avr Fuse dr.
  • Average power measurement of a 65nm CMOS FA
  • Altium outjob status report

RSS Electro-Tech-Online.com Discussions

  • Replacement IGBT for DGG4015 for Honda Motorcycle ECU
  • Have a bucket list of capacitors to buy for repair - but where can I purchase a low number of each type
  • causes for causality in s-parameters question
  • Qi Wireless Charging
  • hard to find electrolytes from mid 90's with slim body form

Featured Tutorials

Learn - AWS IoT Tutorials

  • How to enable device-to-device messaging on AWS IoT Core using MQTT
    How to enable device-to-device messaging on AWS IoT Core using MQTT
  • How to connect Raspberry Pi to Amazon AWS IoT Core using MQTT
    How to connect Raspberry Pi to Amazon AWS IoT Core using MQTT
  • How to connect ESP32 to AWS IoT Core using MQTT
    How to connect ESP32 to AWS IoT Core using MQTT
  • How to connect a computer to AWS IoT Core
    How to connect a computer to AWS IoT Core
  • Arduino compatible coding 02: Getting started with Arduino
    Arduino compatible coding 02: Getting started with Arduino
  • Arduino compatible coding 03: Basics of Arduino sketches and Embedded C
    Arduino compatible coding 03: Basics of Arduino sketches and Embedded C
More Tutorials >

Recent Articles

  • Bourns launches ±30 kV automotive TVS diodes
  • SCHURTER launches PPTCs rated up to 72 V
  • RFMW showcases pSemi RF switches to 8.5 GHz
  • Epson Microdevices improves holdover with low-phase-noise OCXO
  • Bourns launches 30 kV automotive TVS series

EE ENGINEERING TRAINING DAYS

engineering
Engineers Garage
  • Analog IC TIps
  • Connector Tips
  • Battery Power Tips
  • EDABoard Forums
  • EE World Online
  • Electro-Tech-Online Forums
  • EV Engineering
  • Microcontroller Tips
  • Power Electronic Tips
  • Sensor Tips
  • Test and Measurement Tips
  • 5G Technology World
  • Subscribe to our newsletter
  • About Us
  • Contact Us
  • Advertise

Copyright © 2026 WTWH Media LLC. All Rights Reserved. The material on this site may not be reproduced, distributed, transmitted, cached or otherwise used, except with the prior written permission of WTWH Media
Privacy Policy

Search Engineers Garage

  • Electronic Projects & Tutorials
    • Electronic Projects
      • Arduino Projects
      • AVR
      • Raspberry pi
      • ESP8266
      • BeagleBone
      • 8051 Microcontroller
      • ARM
      • PIC Microcontroller
      • STM32
    • Tutorials
      • Sensor Series
      • Engineering Deep Dives
      • AI
      • ARDUINO Compatible Coding
      • Audio Electronics
      • Battery Management
      • Beginners Electronics Series
      • Brainwave
      • Digital electronics (DE)
      • Electric Vehicles
      • EMI/EMC/RFI
      • EVs
      • Hardware Filters
      • IoT tutorials
      • LoRa/LoRaWAN
      • Power Tutorials
      • Protocol
      • Python
      • RPI Python Programming
      • Sensors
      • USB
      • Thermal management
      • Verilog
      • VHDL
    • Circuit Design
    • Project Videos
    • Components
  • Articles
    • Tech Articles
    • Insight
    • Invention Stories
    • How to
    • What Is
  • News
    • Electronic Product News
    • Business News
    • Company/Start-up News
    • DIY Reviews
    • Guest Post
  • Forums
    • EDABoard.com
    • Electro-Tech-Online
    • EG Forum Archive
  • DigiKey Store
    • Cables, Wires
    • Connectors, Interconnect
    • Discrete
    • Electromechanical
    • Embedded Computers
    • Enclosures, Hardware, Office
    • Integrated Circuits (ICs)
    • Isolators
    • LED/Optoelectronics
    • Passive
    • Power, Circuit Protection
    • Programmers
    • RF, Wireless
    • Semiconductors
    • Sensors, Transducers
    • Test Products
    • Tools
  • Learn
    • eBooks/Tech Tips
    • Design Guides
    • Learning Center
    • Tech Toolboxes
    • Webinars & Digital Events
  • Resources
    • Digital Issues
    • EE Training Days
    • LEAP Awards
    • Podcasts
    • Webinars / Digital Events
    • White Papers
    • Engineering Diversity & Inclusion
  • Guest Post Guidelines
  • Advertise
  • Subscribe