We all know, how revolutionary raspberry Pi series are in terms of price and performance. Its usage are indefinite and completely based on your imagination to explore. Moreover, we also know the role Microsoft is playing by making investments in the Internet of Things (IOT). Company has also launched support to bring Node.js to the Windows 10 IoT Core Insider Preview. Here, we will explore how to install the newly released Windows 10 IoT on a Raspberry Pi 2.
For newbies in this field, let me explain you that Windows 10 IoT is not like a normal windows distribution. It has a graphical user interface and then you can also pull up using the HDMI connection. It will not act as a normal version of windows and therefore will not be able to install a word processor and games in your computer. To be very precise it will not let you use the Raspberry Pi as a mini personal computer.
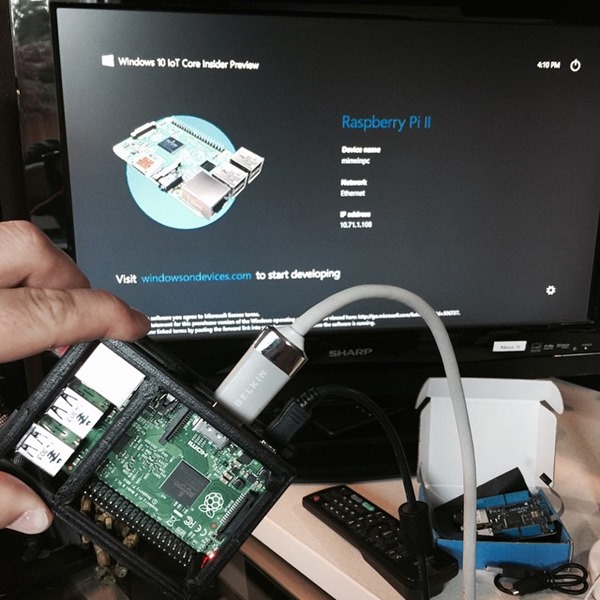
Moreover, Raspberry Pi 2 is a $35, credit-card sized computer that can be plugged into a TV or monitor, allowing you to use it with a standard keyboard and mouse.
In recent announcement of Microsoft, it is offering Windows 10 IoT Core for free to Makers as well as the commercial device builders as the new edition of Windows are for small-footprint and also low-cost devices. Taking the advantage, you can easily install Windows 10 IoT Core on your Raspberry Pi 2 and make an extraordinary impact on your projects
Checklist for installing Windows 10 IoT on raspberry pi 2
1.A computer running Windows 10.
2.A Raspberry Pi 2.
3.HDMI cable
4.An 8GB Class 10 micro SD card or better.
5.Ethernet cable.
6.A 5V USB power supply with at least 1A current
Raspberry Pi 2 Complete Starter Kit
– Raspberry Pi 2 (RPi2) Model B Quad-Core 900 MHz 1 GB RAM
– 8 GB MicroSD Card (Class 10) – Raspberry Pi Recommended MicroSD Card with NOOBS
– WiFi Adapter / Dongle (RT5370 chipset)
– 2.5A Micro USB Power Supply with Noise Filter (UL Listed) specially designed for the Raspberry Pi 2 (5-foot cable)
– High Quality Raspberry Pi 2 Case
– Premium Quality HDMI Cable with CEC support (6-foot cable)
– Heat Sink
– GPIO Quick Reference Card
Transferring Windows 10 IoT Core Insider Preview Image on SD Card:
All you have to follow the instructions given below to put the Windows 10 image on your card. This must be done on a PC where the Windows are installed on it physically.
1.From the Microsoft Download Center, download the ISO for the Raspberry Pi 2
2.Then, Save the ISO to a folder.
3.As you double click on the ISO, it will automatically mount itself as a virtual drive and you can access the contents.
4.Next you have to install Windows_10_IoT_Core_RPi2.msi. After the installation is completed, it will be located at local disk C
5.When done, eject the Virtual CD.
6.Now, Insert a micro SD card into your SD card reader
7.Search for “Windows IoT” from start menu.
8.Further, select the SD card where you want to flash and then provide the location of the installation and flash the image.
9.Select your USB SD card reader to safely remove it from the system.
Insertion of SD card in Raspberry Pi 2:
1.Now insert the SD card loaded with Windows 10 IoT image
2.Connect network cable to the Ethernet port.
3.Connect HDMI monitor to the HDMI port.
4.Connect the power supply to the micro USB port.
How to boot Windows 10 IoT Core Preview:
1.As you switch on the power supply, the Windows 10 IoT image in your Raspberry Pi will automatically boot.
2.You will have blue windows logos followed by a black screen for about 2 minutes. This is normal while booting any windows version
3.Now, as the Pi will reboot to a blue-screened window, you have to wait for a long time. The pi will appear with “MinWin” written on the top.
4.Finally, to display your Raspberry Pi’s IP address, the Pi will reboot for the second time to display the Default App
5.Follow the PowerShell documentation to use PowerShell to connect to your running device.
6.Make sure you update the default password for the Administrator account. This can be done by following commands in your PowerShell connection: Replace [new password] with a strong password:
After this is completed, you will have to re-establish the current session using enable-psSession with the new credentials.
Filed Under: Reviews

Questions related to this article?
👉Ask and discuss on EDAboard.com and Electro-Tech-Online.com forums.
Tell Us What You Think!!
You must be logged in to post a comment.