
Have you ever thought who could be the father of the glorious machines that make most of the casino revenues these days? A casino owner, a researcher, a young lad interested in gambling? None of these. It was a car mechanic who changed the face of gambling entertainment. Charles Fey from San Francisco came up with the first ever slot machine in the year 1887. Until 20th century term ‘slot machines’ was used not just to address gambling devices but also the automatic vending machines. These machines were called by unusual named like one armed bandit and fruit machine. Before your imagination starts running wild with the names, let me tell you that it is because prior to Fey’s invention, there were some poker machines that allowed the users to win free drinks or cigars on hitting the winning combination. These were also known as trade simulators because they paid winners in merchandise.
Invention Story of Electric Motor
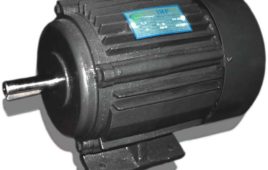
Ever tried to count how many things around you have electric motor at its heart? The list is endless, starting from your clocks, cars, washing machines, DVD players, vacuum cleaners to hair dryers – most of the electric appliances around us have electric motor inside them. In case your heart is filled with gratitude for its inventor and you want to flip through the pages of the past to know how this miracle machine was invented, read on…Like many other creations, this one was also a result of many brilliant and inquisitive minds. The foundation of this invention was only laid after battery, magnetic fields from the electric currents and electromagnet made their way. Throughout the world, there were many inventors who passionately worked towards developing solutions in the electrical science field.
Building of An Iot Gauge with Arduino, Yaler and IFTTT
Tomas Amberg has built a Web-enabled, Arduino-based IoT Gauge with a REST API, and connect it to the IFTTT mash-up platform, via the Yaler.net relay service. In simple language, it is somewhat like the weasley clock of harry potter, which can show the current location of the owner.Since the designing and coding of IoT gauge is generic, it is also used to display subjects like weather events.
Turn your ProMicro into a USB Keyboard/Mouse
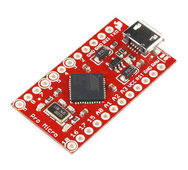
It would be a fun ride to metamorphose any switch, joystick, sensor or other electrical gadgets into a USB keyboard and/or mouse. To begin with, you can convert any input device into a controller for your computer programs or games. And the most fascinating portion of this tutorial is yet to be explored as you can do every conversion with one line of code, inside the relaxing margins of Arduino. This interesting tutorial by Jimb0 of Sparkfun is dependent to this micro friend: the SparkFun Pro Micro! The Pro Micro is a small, Arduino-compatible microcontroller positioned around an ATmega32U4 – an 8-bit AVR akin to the ATmega328 with one colossal limitation: The 32U4 comes fitted out with a full-speed USB transceiver.
DIY LED Video Wall

Who doesn’t get fascinated towards those bizarre optimistic professional LED wall with endless repetitive patterns. Now, if you have some experience in wiring and other technical stuffs, why not take a further step to enhance your professionalism. Well, this tutorial by Adafruit is definitely a savior if you are interested in building a professional LED wall by using a 16×32 RGB LED matrix panels and a bit of patience.They have used 18 panels to construct a 96×96 pixel display, which measures roughly 2ft square. As you can see that the video decoder boards do all the diligence, therefore all you require is a DVI/HDMI/Displayport
DIY Nespresso Capsule Detector

Coffee is one true love for every heart that pumps their blood in hard work, want to escape the boredom from all tedious work or push the limits to meet the deadline. This tutorial by Arduino Project hub allows you to solve the puzzle arising out of diverse capsules, placed in a different jar and then have no idea which color to pick.To resolve the confusion of finding the correct jar containing the correct capsules, the Nespresso capsule detector is introduced. The notion is rather effortless. All you need is to drop a capsule into the tube, and as soon as it’s absolutely dim, a distinct LED lights up. The RGB light sensor states the brightness concentration of each color channel – Red, Green, and Blue.
DIY Arduino Motion Sensor
Who doesn’t like to get greetings from people and when you get the same from your house, it gives you an overwhelming experience. Houses with modern sensors, not only makes your life easy and comfortable but also saves the environment and assist humankind.This tutorial by Hacktronis aims to lend a hand in constructing your own Arduino motion sensor/detector so that you can experience something as soon as you enter your room like have the lights turn on, or have your theme song play whenever you enter.
Internet of pants? This ultra-thin thread could make your clothes part of the IoT

What if your embroidered fancy clothes hold the ability to observe your fitness levels or improve your smartphone reception? And here, the vision does not limit to several wiring and equipment tailored inside your dress. Cheers to an innovative technique that uses ultra-thin electronic thread to stitch circuits into the fabric, where each embroidered antenna transmit test signals with near-perfect productivity.The most exciting feature is its proportion, measuring just 0.1 mm in diameter. The thread encompasses seven filaments made of copper and silver. Using this advantage, researchers have discovered a mode to embroider circuits into textile with sufficient accuracy to assimilate electronic components such as sensors and memory devices into clothing.
How to Make an Amazing Raspberry Potter Gesture Control Wand

We have seen various occasions when technology was mixed with creativity to demonstrate universal magic. In this tutorial of Adafruit, get ready to say “Lumos” as this exciting project, known as Raspberry Potter, syndicates everyone’s two beloved things—the open source Raspberry Pi and the magic Potter wand.This interactive magic band can either be purchased or you can DIY your own by adding a sequin or pearl button to the tip of any wand you have lying around the house. The wand act together with a magic lantern that is essentially a hacked hurricane lamp.
Basic Arduino Web Server

This intermediate tutorial of arduinomylifeup defines an upfront process to develop your own Arduino web server. The steps covering this procedure involves the dynamics of getting it up and running. Further, this tutorial also aims to cover some core concepts such as using ajax for updating rather than refreshing the page over and over.In order to understand this tutorial and fully execute it, it is crucial to learn some basic HTML concepts, which is exceptionally simple to grasp. For newbies, it is recommended to go through w3schools for a basic introduction, to gather some basic notions about HTML.
Arduino LCD: How to Connect a Liquid crystal display up to the Arduino
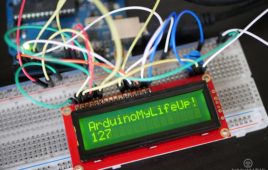
You are aware of various pros of an LCD (liquid crystal display) and its ability to perform and therefore in this Arduino LCD tutorial of arduinomylifeup, we will learn how to connect a simple 16×2 LCD up to the Arduino with this good little device.If you had some experience with the LCD boards, you must be aware of the fact that they are not assembled with header pins and hence, will need to be soldered on. With the availability of header pins, you can perhaps skip soldering but getting a worthy connection to the board will be challenging. The potentiometer in the circuit is used to control the brightness of the screen.
How-to: Make Your Own Metronome
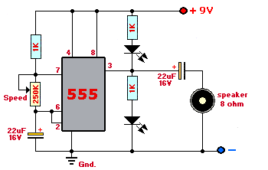
Engineering your mind in electronic inventions is not everyone’s cup of tea but a born enthusiast cannot ignore its guts for a long period. Dansku or Daniel Andrade in his recent post has detailed about its unsurpassed urge to create DIY projects while pursuing electric engineering.In this simple project, Daniel has shared a blog that defines how to shape a metronome via some simple parts, which are readily available in any electronic shop. To begin with, a Metronome is any device that generates a structured audible and visual pulse, habitually utilized to create a stable beat, or tempo and computed in beats-per-minute (BPM) for the execution of musical compositions.
DIY: Home UBUNTU NAS Server

In yet another post, dansku has attempted to relive the past of technology. From connecting computer to the old 32′ TV in order to watch things from the internet to the era of eMule, which was ruling the p2p community or to the introduction of HTPC (Home Theater PC), a dedicated computer that gets connected to the TV, with good Motherboard/VGA/Soundboard and with gaming aptitudes.The inventions never stopped and so the demand for technology. In this tutorial, Daniel has used a 2TB Lacie Network Space 2, which is a simple NAS Server, and a WD plus Live. The WD PLUS LIVE is a small computer with an operating system to playback videos and music with no storage facility.
Solar Oven in a Pizza Box
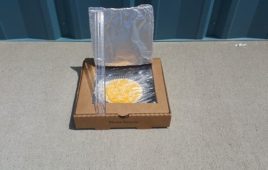
Time and again, it is entertaining to make use of daily items to create something innovative and ironically, this project itself is using a pizza box to bake itself. In one of the DIY projects of statusorel, they have developed a solar oven by using a pizza box.All they have used is to make this device are Cardboard pizza box, Box knife or scissors, Aluminum foil, Clear tape Plastic wrap or a heavy-duty or freezer zip lock bag will also work, Black construction paper, NewspapersRuler or wooden spoon and a Thermometer.
Modifying Casio PT-82
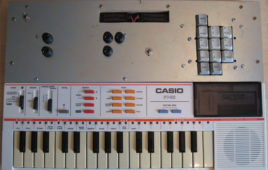
A Casio PT-82 was considered as a classic of Casio 8 bit technology before the famous SK-1 came in market. A LushOne kit can be used to modify simple keyboards. But PT-82 does not has a circuit bend as the SK-1.The useful modifications that can be made are quite limited. The sliding switches can be stripped back to individual components, plastics can be removed from the debris and the springs can be adjusted on the sliding switches.In one of the tutorials of Lushproject, base can be used to add a filter with LFO input to the cut-off frequency and a ring modulator with second oscillator input to the PT-82.
Multi-Cell LiPo Charging

We are completely familiar with the fact that Lithium Polymer Batteries contains great power in a small package. But they are designed in a manner which is considered tricky in order to charge securely. In a tutorial of Adafruit LiPo Chargers project, a charging cycle is designed for safely charging 3.7v Lithium Polymer cells.This project aims to design the batteries that can adjust more than 3.7v. But forcing more voltage into a multi-cell pack is dangerous. Therefore, Adafruit has come up with another tutorial that shows how to safely charge multiple cells while maintaining a balanced charge.
A Wireless Case for Recharging Your Battery

Yes, you got it right, you are now free from carrying an extra charger for charging your mobile batteries. We all use mobile phones and definitely, a discharged battery makes the phone useless. A wireless recharging battery case can be a solution. You just have to make sure that it is gently placed near the battery and the power transmitter, How can we do this? The following tutorial of the Adafruit has the answer.Have a closer look, firstly just to protect the battery case from getting damaged. Make sure that the Qi charging stickers must be used that terminate in Micro/Mini USB connectors. Be careful while modifying high capacity batteries.
Motorize Your DSLR Zoom Lens

This project by Do-It-Yourself directs you to develop a motorized zoom machine, which can be perfectly used for spiral star trails or for zooming the lens in and out. Further, the gear sizes and the lens gear can be altered accordingly to suit your camera’s zoom lens. In this project, a Nikon D800 with a 14-24mm zoom lens is used as an example.Servo City list of this project includes Gear Motor, Aluminum Clamping Motor Mount, Aluminum Channel, Square Screw plates, Zinc-Plated Alloy Steel Socket Head Cap Screw, Bore Set Screw Hub, Shafting & Tubing Spacers, OD Flanged Ball Bearing (Stainless Steel), DC Power Cable, Digital Manual Speed Controller, 12v Battery Tray, Female Crimp Terminals ad D-Shaft ad some essential tools.
Mobile Raspberry Pi Computer: Build your own portable Pi-to-Go

In another DIY project of a raspberry engineer, they have attempted to make a Raspberry Pi Computer that only cost $35. This mini-sized PC hold various possibilities and can be used in the form of PVRs (personal video recorders), retro gaming machines, weather stations, in-car PCs, jukeboxes etc. The creativity completely lies in your hand and brain that how you want to use this product.This ultra-portable, mobile Raspberry Pi that you can take to-go is an open source project. And here, the developer has explained every bit of this project. Talking about the LCD screen, in this budget-friendly project, the LCD is used from an aftermarket backup camera system that can be installed in a car.
Make a Pseudo Heart Rate Monitor Based On Arduino/Genuino Starter Kit

This is a simple yet effective project by DFRobot, where he has introduced a heart rate monitor. Basically, this device has the ability to acquire a heart rate equivalent from a pot meter and exhibits the range one of 3 LED. Moreover, this is also displayed by pointer controlled by a servo motor and on mobile phone Apps.We must understand that this project is the combination of two rudimentary Arduino example projects that uses Intel Curie BLE capability and Servo motor. The DFRobotGravity: Starter Kit for Genuino / Arduino 101 is being used that permits connection establishment to the Pot meter, three LEDs and the Servo Motor in the simplified manner.