To make any board/microcontroller visible to arduino ide we need to include its name in the boards.txt file. You can locate the boards.txt file at C:\Program Files (x86)\Arduino\hardware\arduino\avr\boards.txt. After locating the file you need to include the following to the end of the file and save the file.
############################################################## atmega162.name= ATmega162 atmega162.upload.tool=avrdude atmega162.upload.protocol=arduino atmega162.upload.maximum_size=14336 atmega162.upload.speed=57600 atmega162.bootloader.tool=avrdude atmega162.bootloader.low_fuses=0xFF atmega162.bootloader.high_fuses=0xD8 atmega162.bootloader.extended_fuses=0xFB atmega162.bootloader.path=optiboot atmega162.bootloader.file=optiboot_atmega162.hex atmega162.bootloader.unlock_bits=0x3F atmega162.bootloader.lock_bits=0x0F atmega162.build.mcu=atmega162 atmega162.build.f_cpu=16000000L atmega162.build.core=arduino atmega162.build.variant=atmega162 ##############################################################
|
The above piece of statements will make the atmega162 visible to arduino IDE. Now you can see the “Atmega162” option appearing under the Arduino IDE-> Tools>board drop down menu. The above statements also sets the atmega fuse bits and we tell the arduino ide about the atmega162 bootloader. The statements also sets the frequency of the crystal that we are going to use with the atmega162. The statement atmega162.build.f_cpu=16000000L sets the atmega162 frequency to 16Mhz. You can also change the value of the crystal like if you want to use the 4Mhz just replace the statement with atmega162.build.f_cpu=4000000L.
|
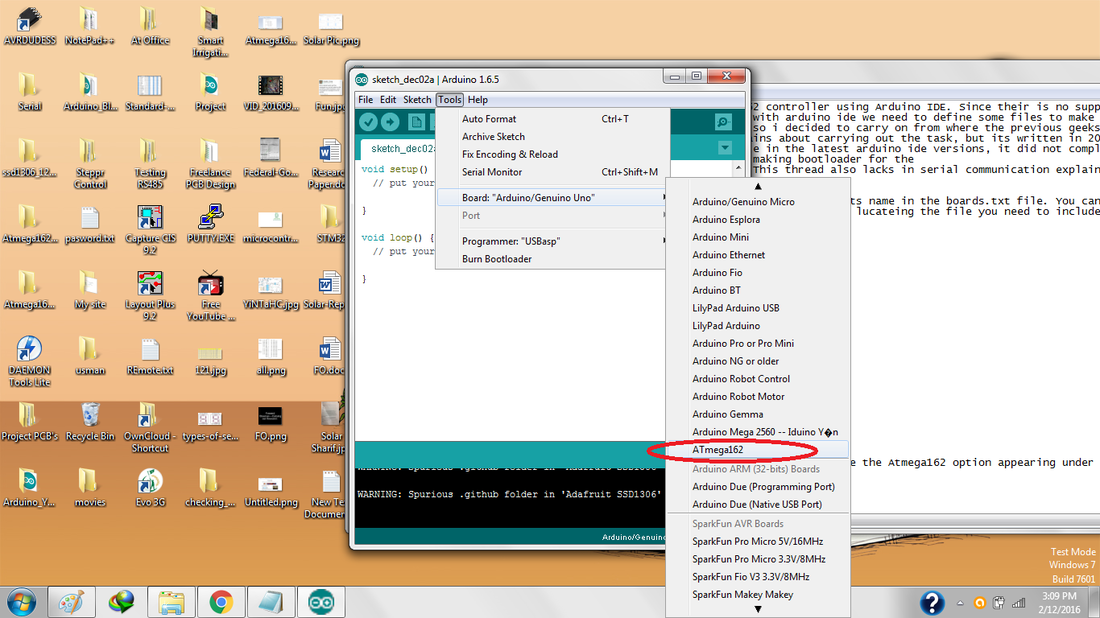
Atmega162 with Arduino IDE
|
|
Now its time to define the arduino pins map. These pins are defined by the previous geeks so we are going to use the same pin out. But you can change it if you want.Creat a new folder name “atmega162″ at location C:\ProgramFiles(x86)\Arduino\hardware\arduino\avr\variants\”atmega162” Place this file in it arduino pins_arduino.h. Download the file from below.
|
|
||
|
Note: Their is a difference between the original Pin out of the atmega162 and the ones that are used for the programming. For programming scheme the pins are defined in the pins_arduino header file. The pins are not defined according to the numbers that the pins originally occupied. But rather a new scheme is declared. Recall arduino uno in which the pins are defined by numbers D0, D1–D13. The same rules applies here the original numbers of pins are defined as 1,2,3–40 etc and for programming the pins are defined as D0,D1,D2,D3–D30 respectively. So for programming the use the numbers that are denoted with the letter D.
Now overwrite the file “iom162.h” file located at C:\Program Files (x86)\Arduino\hardware\tools\avr\avr\include\avr\iom162.h Download the file from below. iom162 contains the registers that are associated with atmega162 microcontroller. |

Atmega162 PinMap for Arduino IDE
|
||
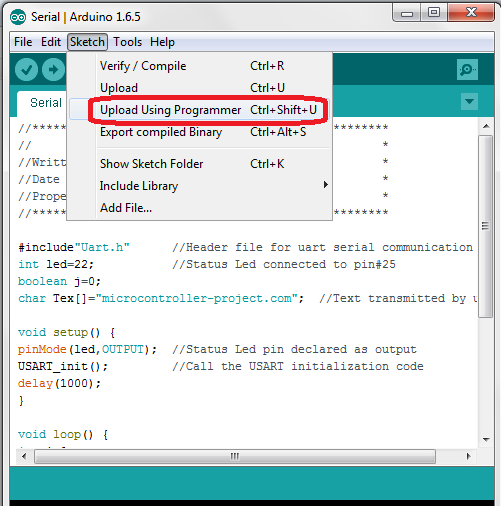
Atmega162 BootloaderNow its time to tell the Arduino ide about the atmega162 microcontroller boot loader. Each Arduino board boot loader is placed at C:\Program Files (x86)\Arduino\hardware\arduino\avr\bootloaders\optiboot. So place the atmega162 boot loader(optiboot_atmega162.hex file) in this optiboot folder. Download the Boot loader from the link on right side. Although the boot loader is uploaded in the microcontroller but it does not worked for me. I program the atmega162 using an external USBasp programmer.
Burning Bootloader in Atmega162 Microcontroller 
Atmega162 support for arduino Ide
|
Atmega162 programmed with USBasp and Arduino Ide
|
Interfacing 7-Segment Display with Atmega162 Microcontroller
int blinkl=20; void setup() { // put your setup code here, to run once: pinMode(blinkl,OUTPUT); DDRA=0xFF; //Port-A as Output //PortA-6 to A //PortA-0 to F } void loop() { digitalWrite(blinkl,HIGH); delay(500); digitalWrite(blinkl,LOW); delay(500); PORTA=0x02; //Displaying 0 on 7-segment Display delay(500); PORTA=0x4F; //Displaying 1 on 7-segment Display delay(500); PORTA=0x11; //Displaying 2 on 7-segment Display delay(500); PORTA=0x05; //Displaying 3 on 7-segment Display delay(500); PORTA=0x4C; //Displaying 4 on 7-segment Display delay(500); PORTA=0x24; //Displaying 5 on 7-segment Display delay(500); PORTA=0x20; //Displaying 6 on 7-segment Display delay(500); PORTA=0x0F; //Displaying 7 on 7-segment Display delay(500); PORTA=0x00; //Displaying 8 on 7-segment Display delay(500); PORTA=0x0C; //Displaying 9 on 7-segment Display } Filed Under: Arduino, Microcontroller Projects

Questions related to this article?
👉Ask and discuss on Electro-Tech-Online.com and EDAboard.com forums.
Tell Us What You Think!!
You must be logged in to post a comment.