In the previous tutorial, we discussed the universal asynchronous receiver-transmitter (UART) protocol and voltage levels, covering USB-serial boards and other serial adaptors. We also learned how to find a serial port name on Linux, Windows, macOS, and Raspberry Pi (RPi).
In this tutorial, we’ll learn how to use the Python Serial library to setup bidirectional communication with a computer.
Configuring UART on RPi
As discussed in the serial communication on Raspberry Pi tutorial, the default serial Linux console on Raspberry Pi OS must be disabled to use RPi’s serial TTL port for UART communication.
Follow these steps to disable RPi’s serial Linux console:
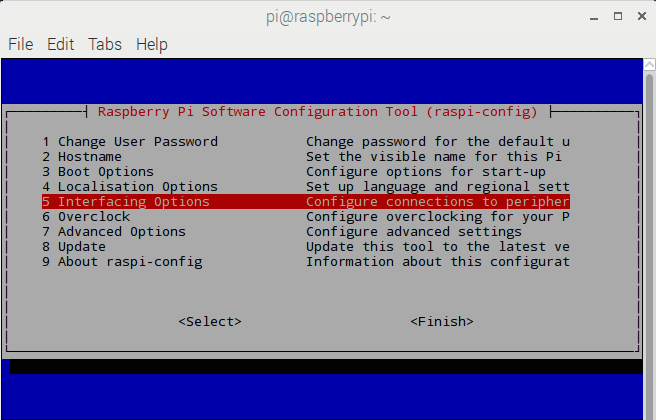
1. In Raspberry Pi, open the Terminal window (Bash shell) and execute this command:
sudo raspi-config
2. Navigate to the “Interfacing Options.”
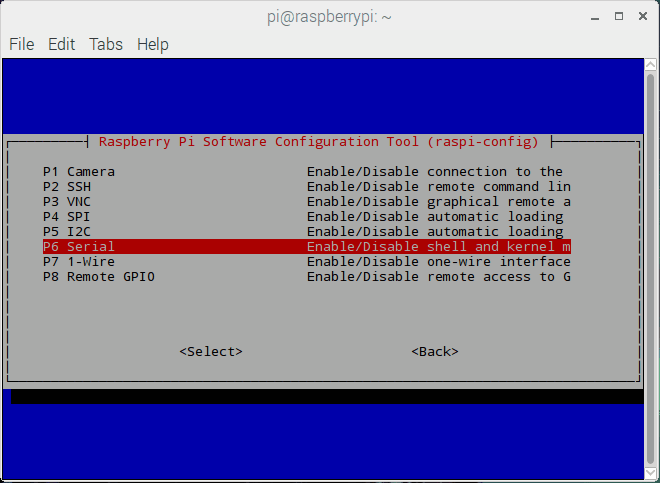
3. Next, select the “Serial” option.
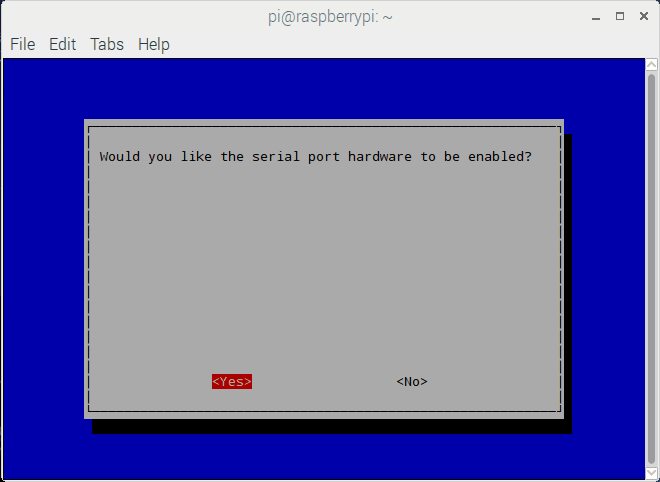
4. The configuration window will ask if you’d like the login shell to be accessible over serial. Select “No.”

5. The configuration window will then ask you to enable the serial port hardware. Select “Yes.”
6. Now, the serial TTL port (GPIO14 and GPIO15) are enabled for serial communication on Raspberry Pi.
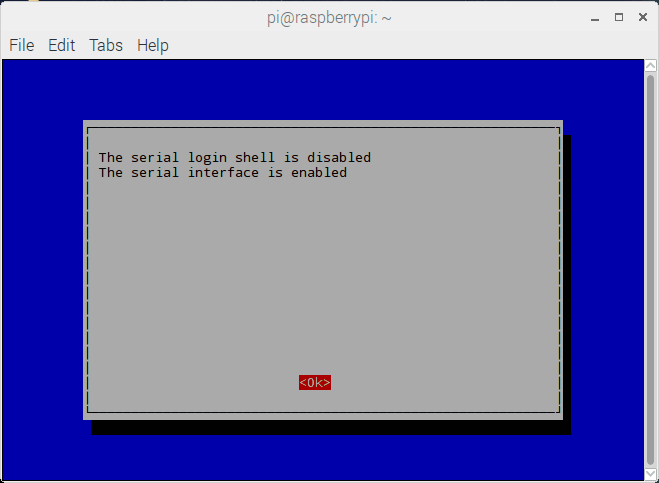
7. Reboot Raspberry Pi for these changes to take effect.
After rebooting RPi, its serial TTL port can be used for serial communication over the UART protocol. The port can be addressed by name /dev/serial0.
Alternatively, /dev/ttyS0 or /dev/ttyAMA0 can be used as port names, depending on whether PL011 or mini-UART is the primary UART (on the respective Raspberry Pi model). It’s possible to know which UART type is the primary one by inspecting the /boot/config.txt file.
If in the /boot/config.txt file, the enable_uart flag is set to 0 by default, then the mini-UART is the primary UART on that RPi model. However, if the enable_uart flag is set to 1 by default, then PL011 is the primary UART on that RPi model.
Selecting a USB-serial board
There are several USB-serial boards available. FTDIs are the oldest and most common one. The one for use with Raspberry Pi must have 3.3V UART voltages. If a 5V USB-serial board is used, the TTL port channels of RPi can get permanently damaged.
Some USB-serial boards offer jumpers that can be set between 5 and 3.3V UART voltages. Be sure to select the 3.3V option before connecting to Raspberry Pi.
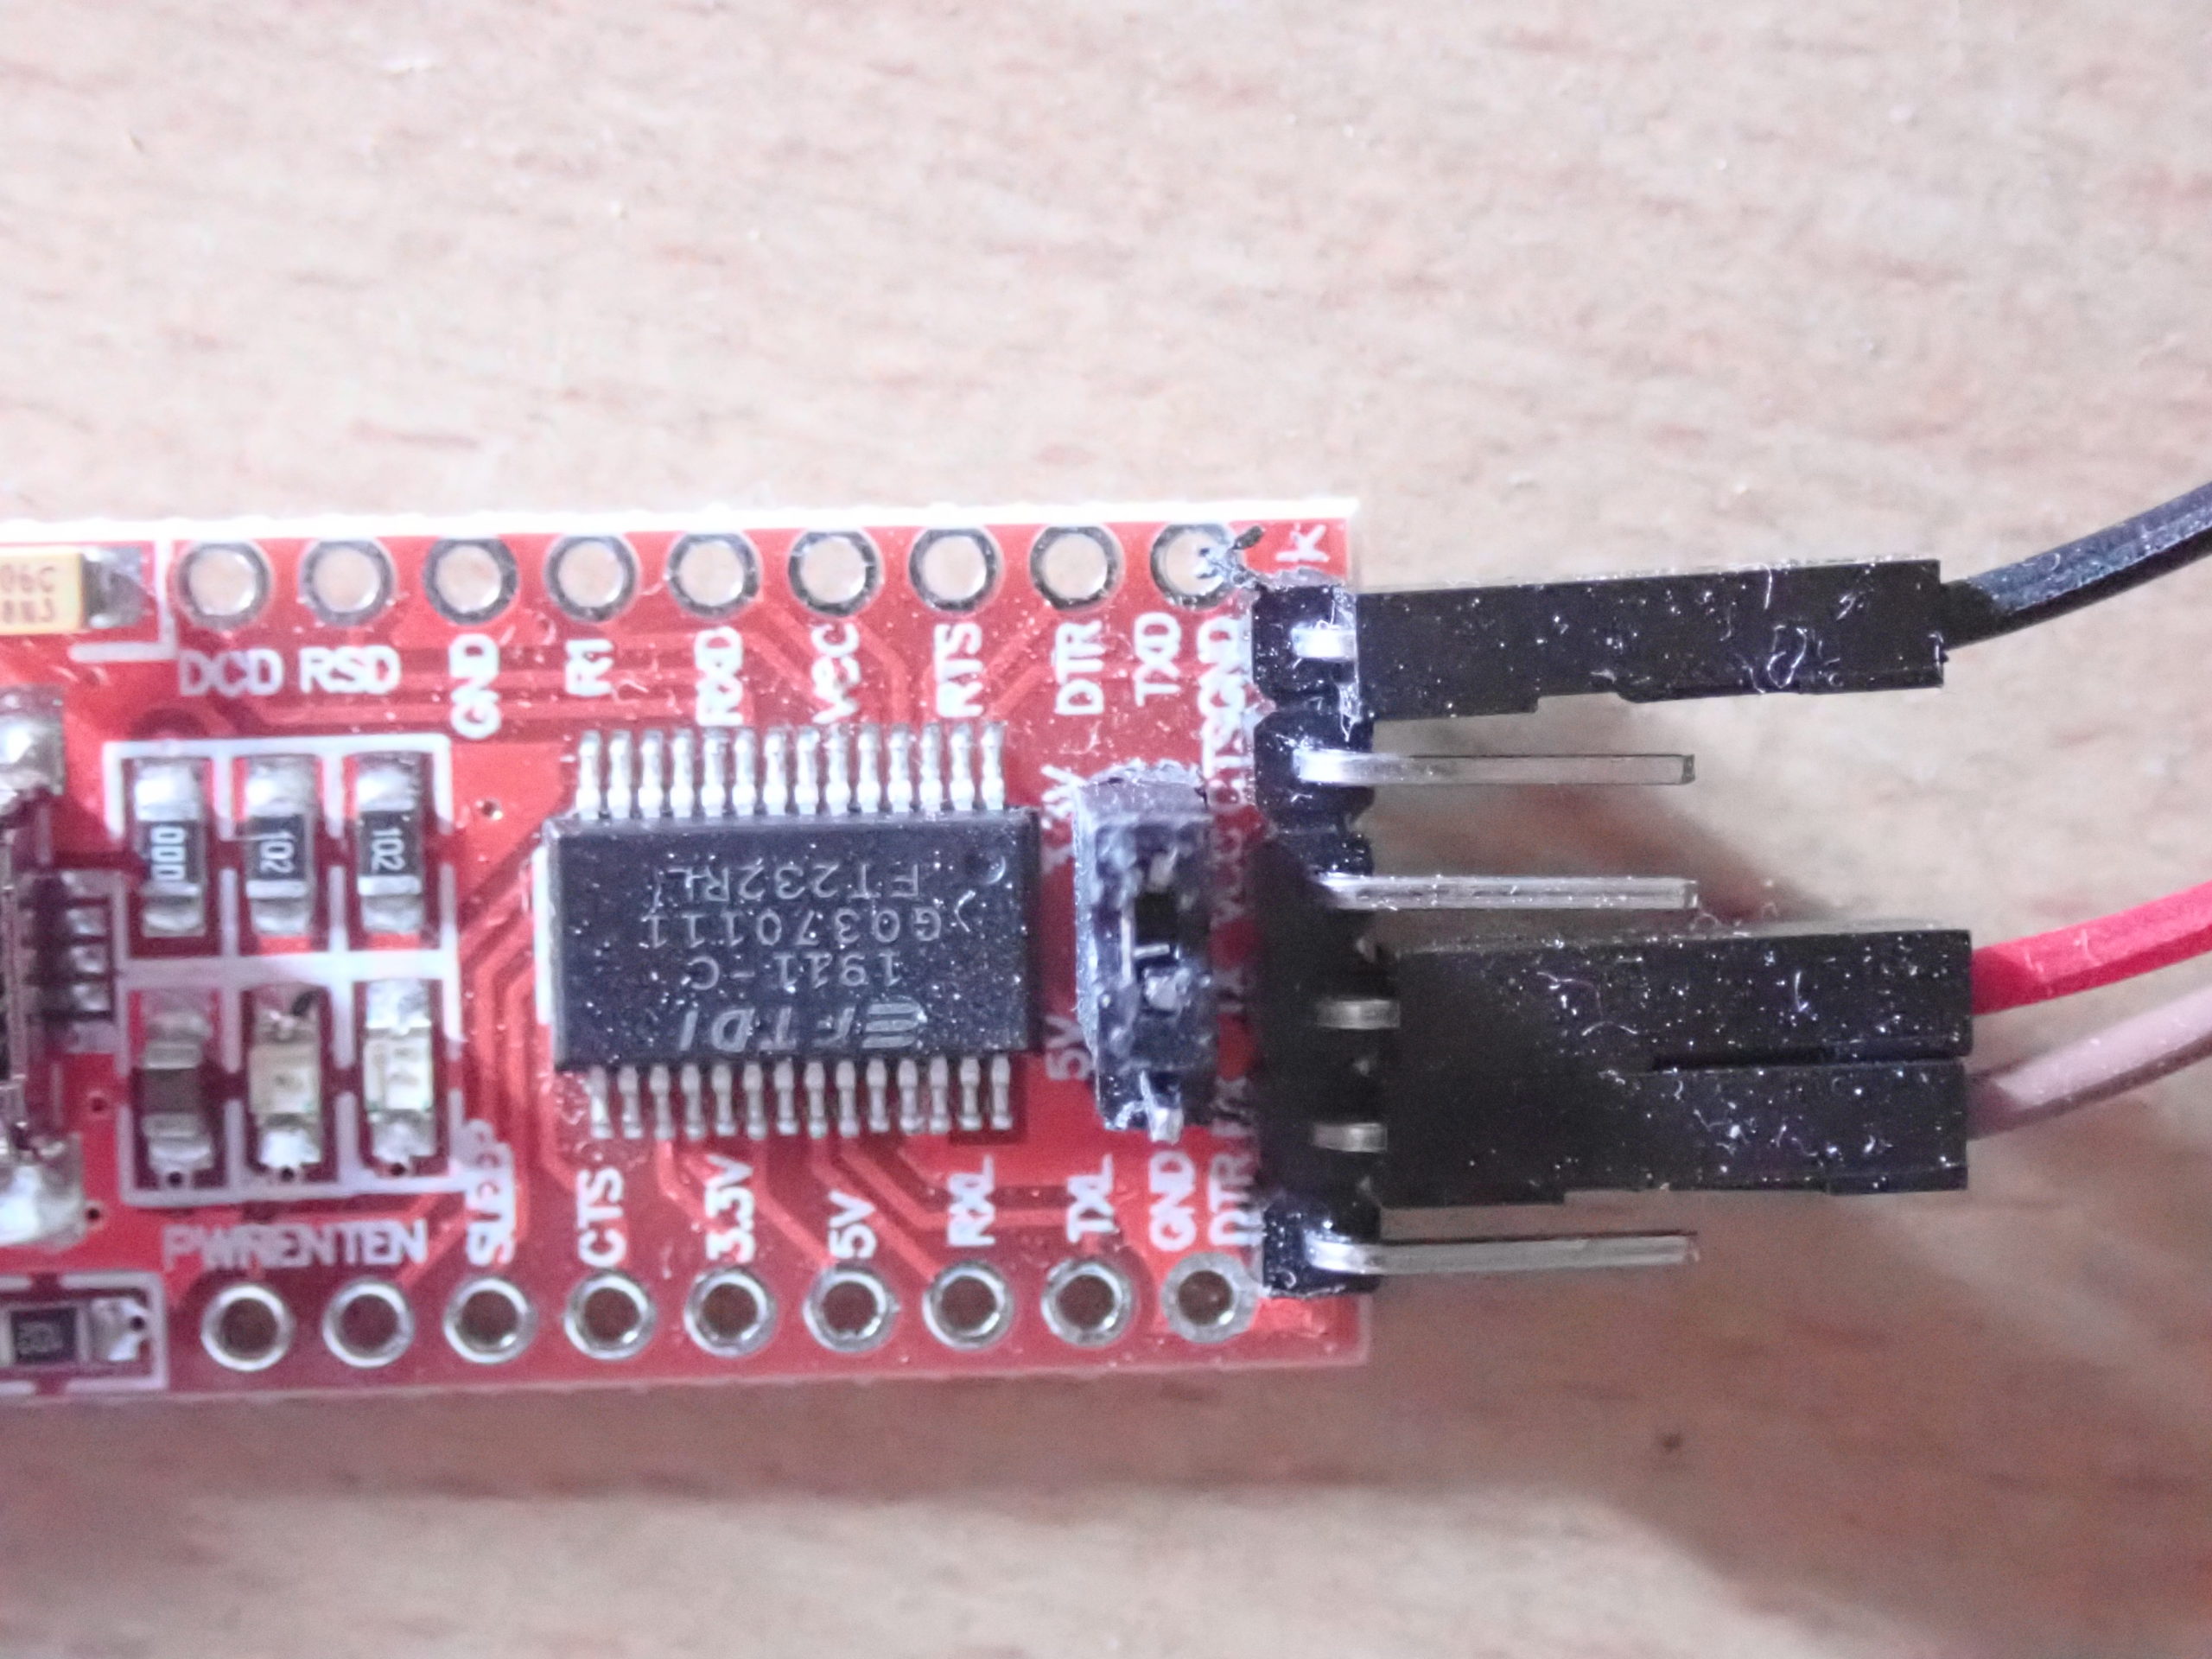
USB-serial boards also have an option to receive supply voltage directly from the Raspberry Pi. For this to occur, RPi’s 3.3V pin should be connected to the VCC terminal of the board.
It’s important to ensure that:
- RPi’s Rx (GPIO15) connects to the Rx of the USB-serial board
- RPi’s Tx (GPIO14) connects to Tx of the USB-serial board.
- The USB-serial board’s ground pin connects to RPI’s ground (because this is the reference ground for the UART voltages).
- The USB-serial board’s USB port connects to the USB port of a computer (desktop) via a USB-to-USB cable.
If the serial TTL port has to connect directly with the serial TTL port of another device with the same 3.3V UART voltage levels:
- RPi’s Rx (GPIO15) connects to the Tx of the other device
- RPi’s Tx (GPIO14) connects to the Rx of the other device.
Hardware permissions for serial
To use RPi’s serial TTL port, the Raspberry Pi user must be a member of the dialout group. The default user is pi but there can be other users created on a Raspberry Pi system.
If the current user is not a member of the dialout group, an attempt to access the TTL serial port will result in this warning:
serial.serialutil.SerialException: [Errno 13] could not open port /dev/ttyS0: [Errno 13] Permission denied: ‘/dev/ttyS0’
If you’re not the default user (pi), you can add yourself to the dialout group by entering the following command on the Terminal window (Bash Shell):
sudo adduser your_username dialout
After executing the command successfully, reboot Raspberry Pi for the changes to take effect.
Python serial library
For a Python script to use Raspberry Pi’s serial port, it requires a library to interface with it. PySerial is the library that’s used as the Python Serial Port Extension for Linux, BSD, OSX, Win32, and even Jython and IronPython.
It’s available under the free software license on GitHub. The module encapsulates access to the serial port, including access over various interfaces (such as TTL ports, RS232, RS485, and RFC 2217) and various URL handlers.
This library is a class-based interface that supports all major platforms. It’s a purely Python library and is compatible with Python’s io library.
Installing PySerial
By default, PySerial is installed on RPi. If it’s been removed, it can be installed by executing these commands on the Terminal:
python3 -m pip install pyserial
or
easy_install -U pyserial
However, if the pip is not installed, first install it by entering the commands below. Then, install PySerial.
sudo apt install python3-pip
PySerial API
The library includes a serial class that’s used to access a serial (UART) port.
The class supports these read-only attributes:
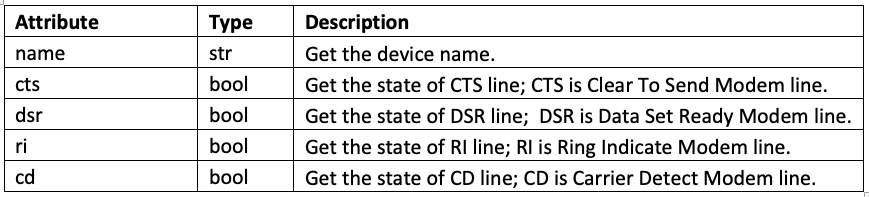
The class supports these configurable attributes:

The class supports these constants:

The serial class supports these methods:
serial.Serial() — This method creates a serial object in the Python script that must point to a serial port. At the same time, it’s a constructor and supports configuration of the following parameters:
1. port – Device name or none.
2. baudrate – The baud rate in bits per second (bps). It can be any of the standard values like 50, 75, 110, 134, 150, 200, 300, 600, 1200, 1800, 2400, 4800, 9600, 19200, 38400, 57600, 115200. Standard values above 115200 are also supported on many platforms and devices but not on Raspberry Pi.
3. bytesize – The number of data bits. The possible values can be FIVEBITS, SIXBITS, SEVENBITS, EIGHTBITS.
4. parity – This enables parity checking. The possible values can be PARITY_NONE, PARITY_EVEN, PARITY_ODD PARITY_MARK, PARITY_SPACE.
5. stopbits – The number of stop bits. The possible values can be STOPBITS_ONE, STOPBITS_ONE_POINT_FIVE, STOPBITS_TWO.
6. timeout – This sets the read timeout value.
7. xonxoff – This enables software flow control.
8. rtscts – This enables hardware (RTS/CTS Modem lines) flow control.
9. dsrdtr – This enables hardware (DSR/DTR Modem lines) flow control.
10. write_timeout – This sets a write timeout value.
11. inner_byte_timeout – This sets the inter character timeout. It can be set to None to disable. It is disabled by default.
When a serial object is created with a port name given, the port is immediately opened. If the port is set to None, it needs to be opened using a successive call to the open() method.
serial.open() — This method opens a port. If the RTS and DTR lines of a modem are used, the state of rts and dtr can be applied using this method.
serial.close() — This method immediately closes a port.
serial.__del__() — This method closes the port and destroys the serial object.
serial.read() — This method reads size bytes from the serial port. If a timeout is applied, it may return fewer characters than requested. Without the timeout, it blocks the execution of a program until the requested number of bytes is read. In version 2.5 and above, the method returns the bytes when available; otherwise, it will return the complete string.
serial.read_until(expected=LF, size=None) — This method reads serial data until an expected sequence (such as, line-break ‘\n’) is found, the size is exceeded, or there is timeout.
serial.write() — This method writes byte data to the serial port (and the data should be the bytes type). This means the Unicode strings must be encoded by using the encode() method of str library. In version 2.5 and above, it will write the bytes or bytearray when available. Otherwise, it writes the str type.
serial.readline(size) — This method has been provided via the io.IOBase.readline(). It reads and returns one line from the serial port. If a parameter size is specified, that size bytes are read from a line.
serial.readlines(hint=-1) — This method has been provided via the io.IOBase.readlines(). This method reads and returns a list of lines from the serial port. The parameter hint can be specified to control the number of lines that are read.
serial.writelines(lines) — This method has been provided via the io.IOBase.writelines(). It writes a list of lines to the serial port. However, each line must have a line separator at the end (like newline character ‘\n’).
serial.flush()— This method will flush file-like objects. It also makes the port wait until all of the data is written.
serial.in_waiting() — This method returns the number of bytes in the received buffer.
serial.out_waiting() — This method returns the number of bytes in the output buffer.
serial.reset_input_buffer() — This method will flush the input buffer, discarding all of its content. It’s replaced the flushinput() method in the versions before 3.0.
serial.reset_output_buffer() — This method clears the output buffer, aborting the output and discarding all of its content. For some USB serial adapters, this may only flush the buffer of the OS — and not all of the data that may be present in the USB port. It’s replaced the flushoutput() method in the versions before 3.0.
serial.send_break(duration=0.25) — This method sends a BREAK condition. If the duration is specified (in seconds), the port returns to an idle state after that time period. It’s only possible to apply a break condition when the hardware flow control modem lines are used.
serial.get_settings() — This method returns a dictionary with the port settings. The settings can be stored in a variable and later restored using the apply_settings() method. It’s replaced the getSettingsDict() method in the versions before 3.0.
serial.apply_settings(d) — This method applies a dictionary that was created by the get_settings(). When a key is missing and the changes are applied, this means that the setting remains unchanged. It’s replaced the applySettingsDict() method in the versions before 3.0.
The methods that are used in a Python script depend on the version of PySerial installed on the system. If the version is before 2.5, older methods may be used. However, if PySerial version 2.5 or above is installed, the new methods must be used.
The PySerial library can be imported in a Python script using this code: import serial
After importing the library in a script, various methods and attributes can be used to configure and execute serial communication over the UART protocol.
Recipe: Sending serial data from the RPi to the PC
In this recipe, we will send data from Raspberry Pi to a desktop computer.
Components required
1. Raspberry Pi 3/4 Model B x1
2. FTDI USB-to-serial converter x1
3. USB-to-USB cable x1
4. Female-to-female jumper wires
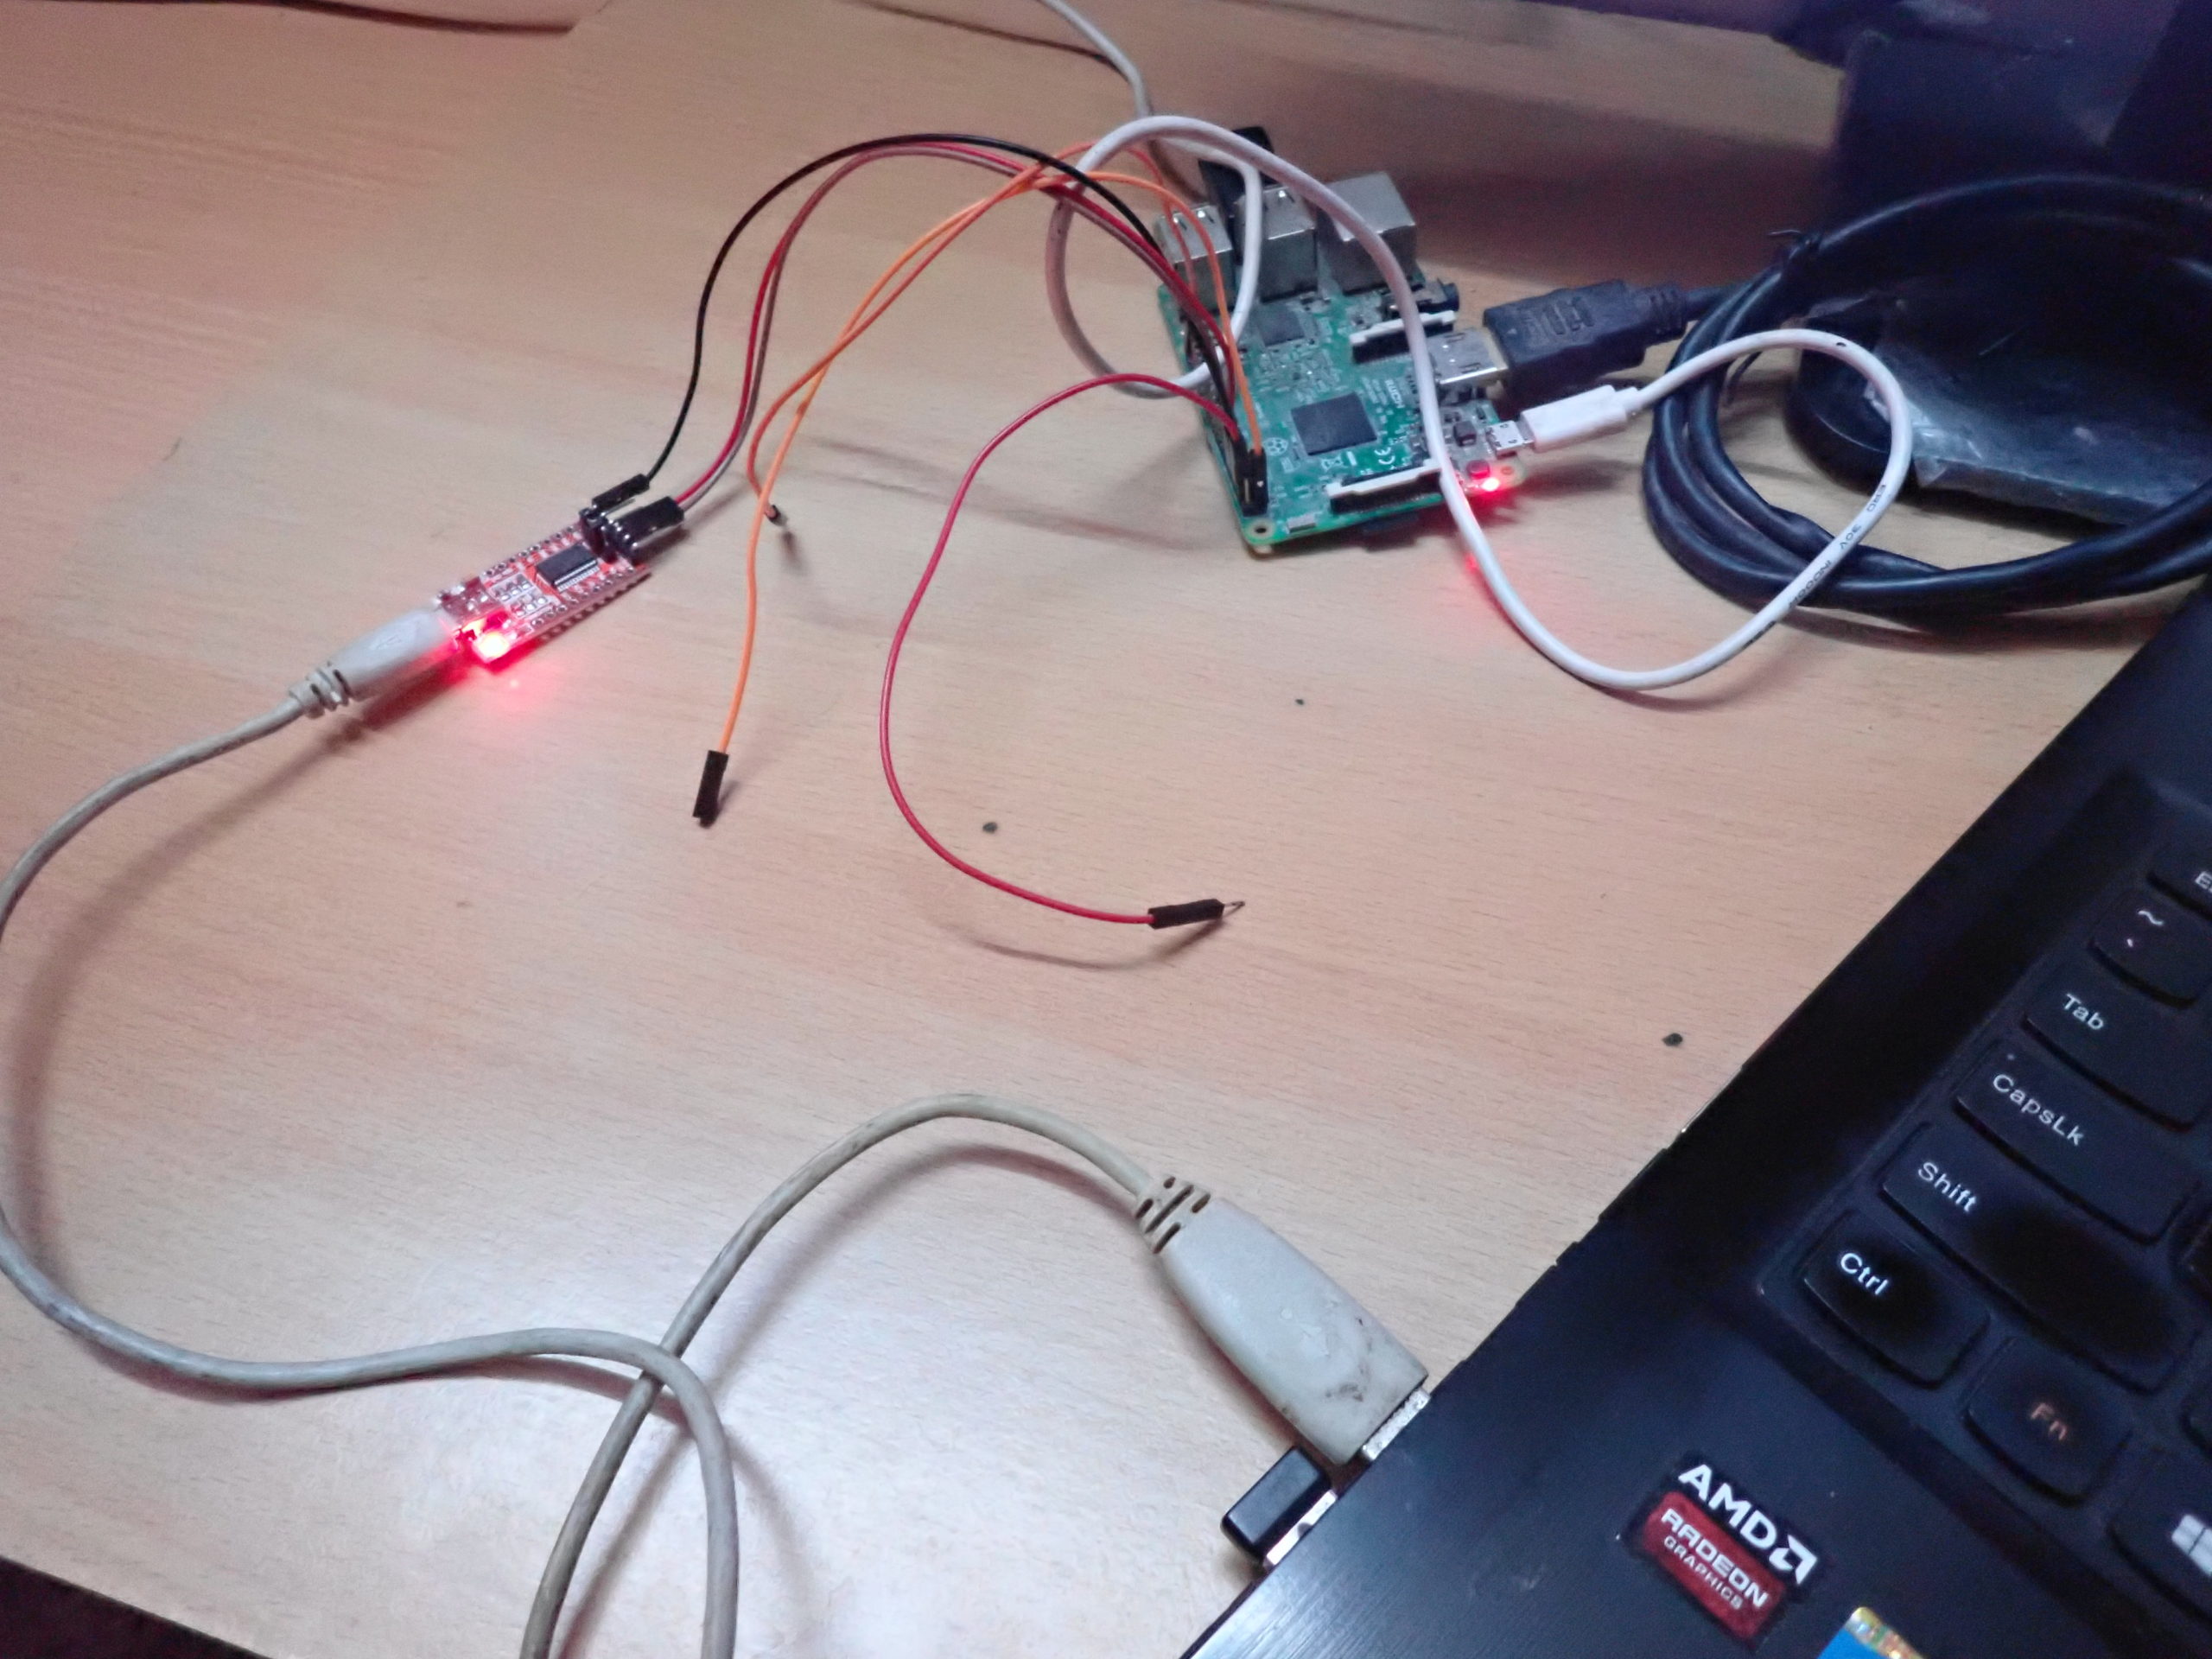
Circuit diagram
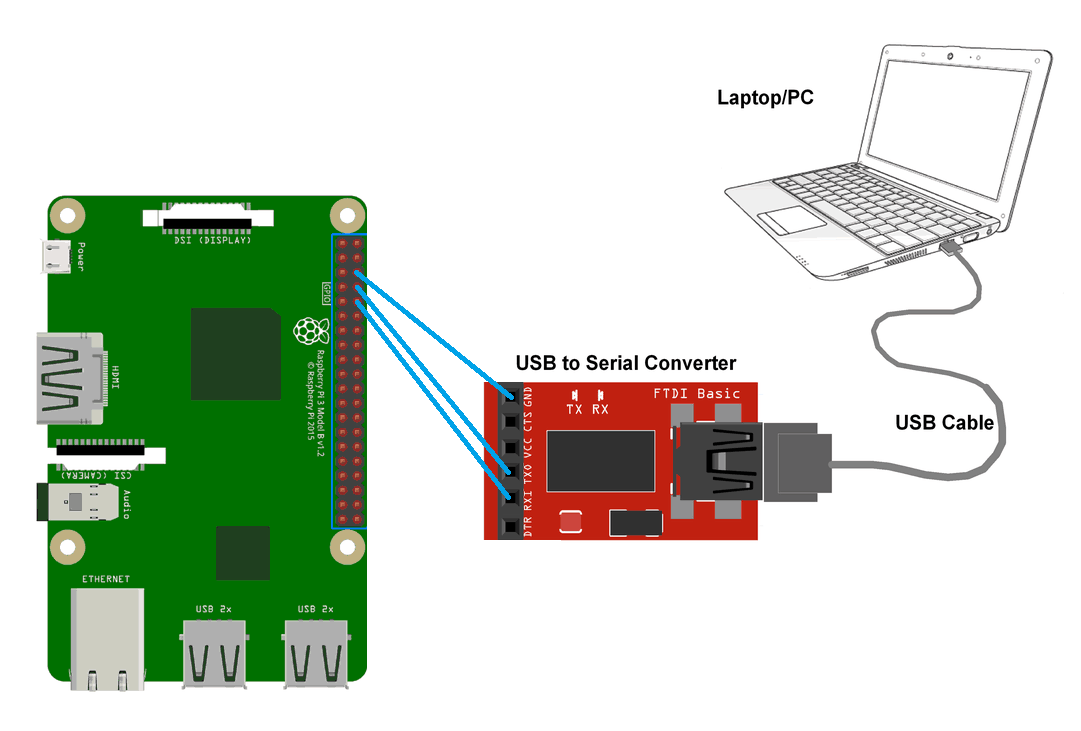
Circuit connections
- Connect the GPIO14(UART_TXD0, board pin number 8) to the Tx of USB-serial board
- Connect the GPIO15 (UART_RXD0, Board pin number 10) to the Rx of USB-Serial board using jumper wires
- Connect any one of RPi’s ground pins (such as board pin number 6) to the USB-serial board’s ground.
- Connect the USB-serial board to the USB port of a desktop computer using a USB-to-USB cable.
Python script 1
 How the project works
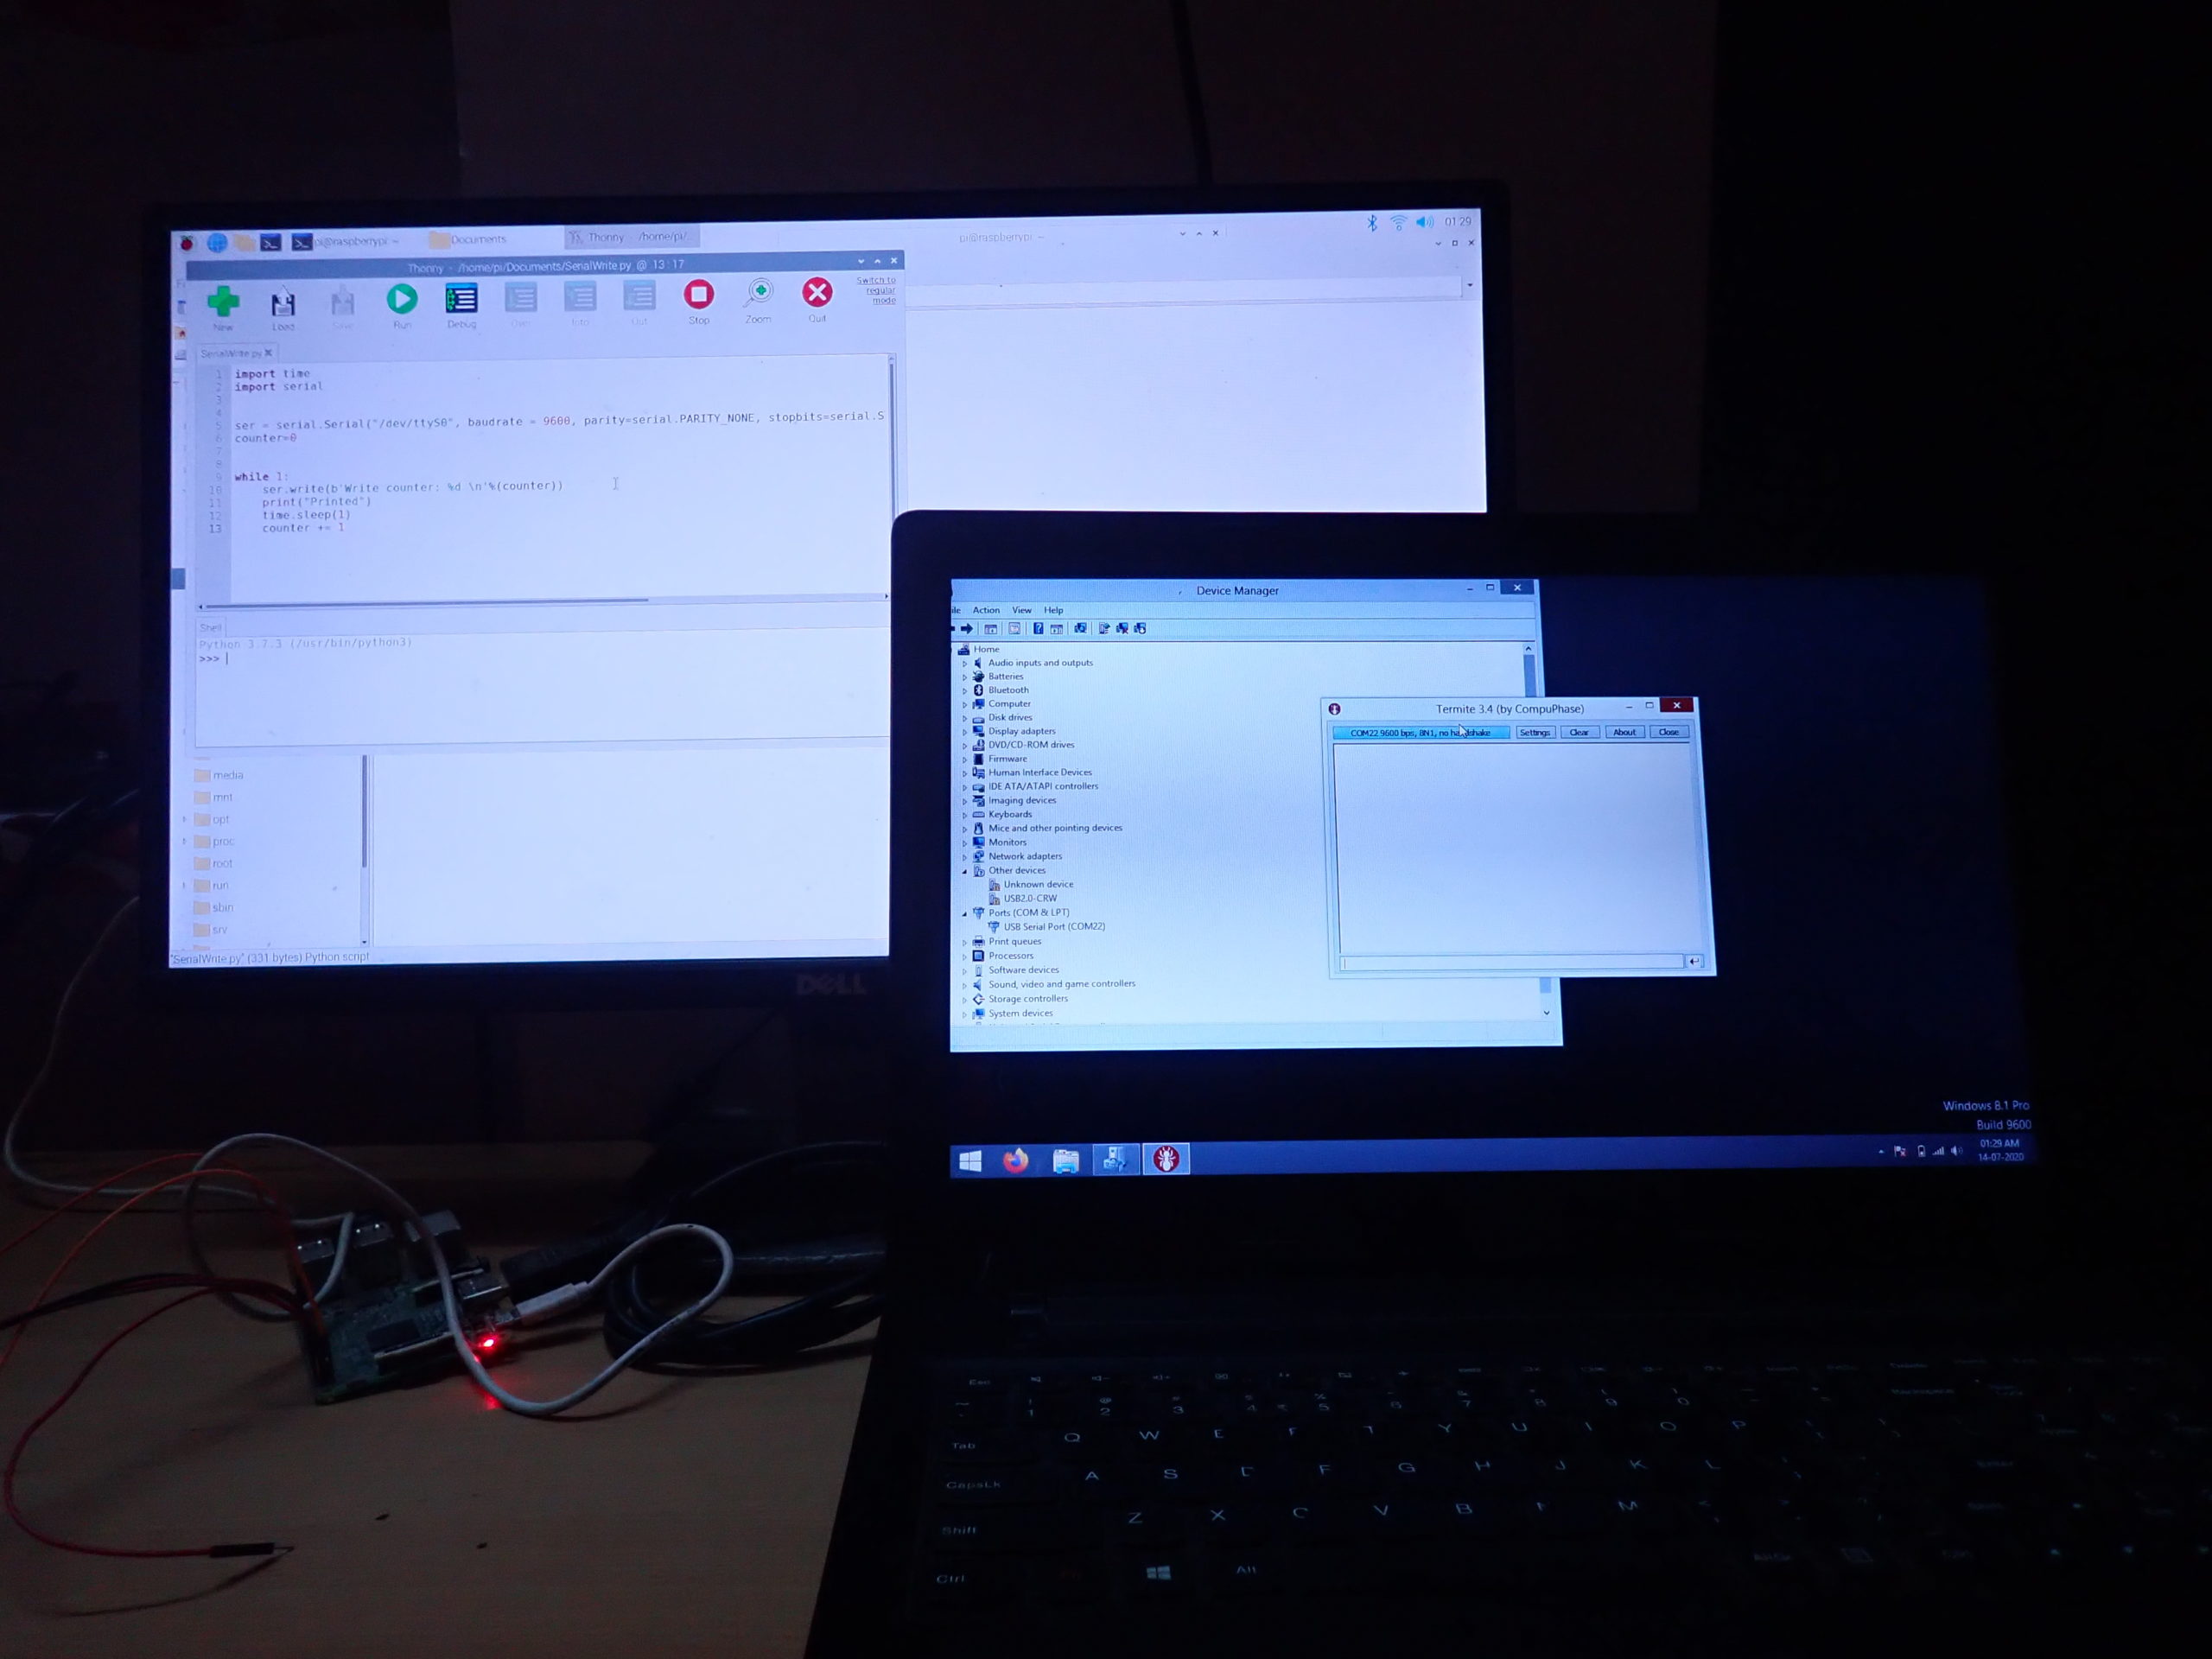
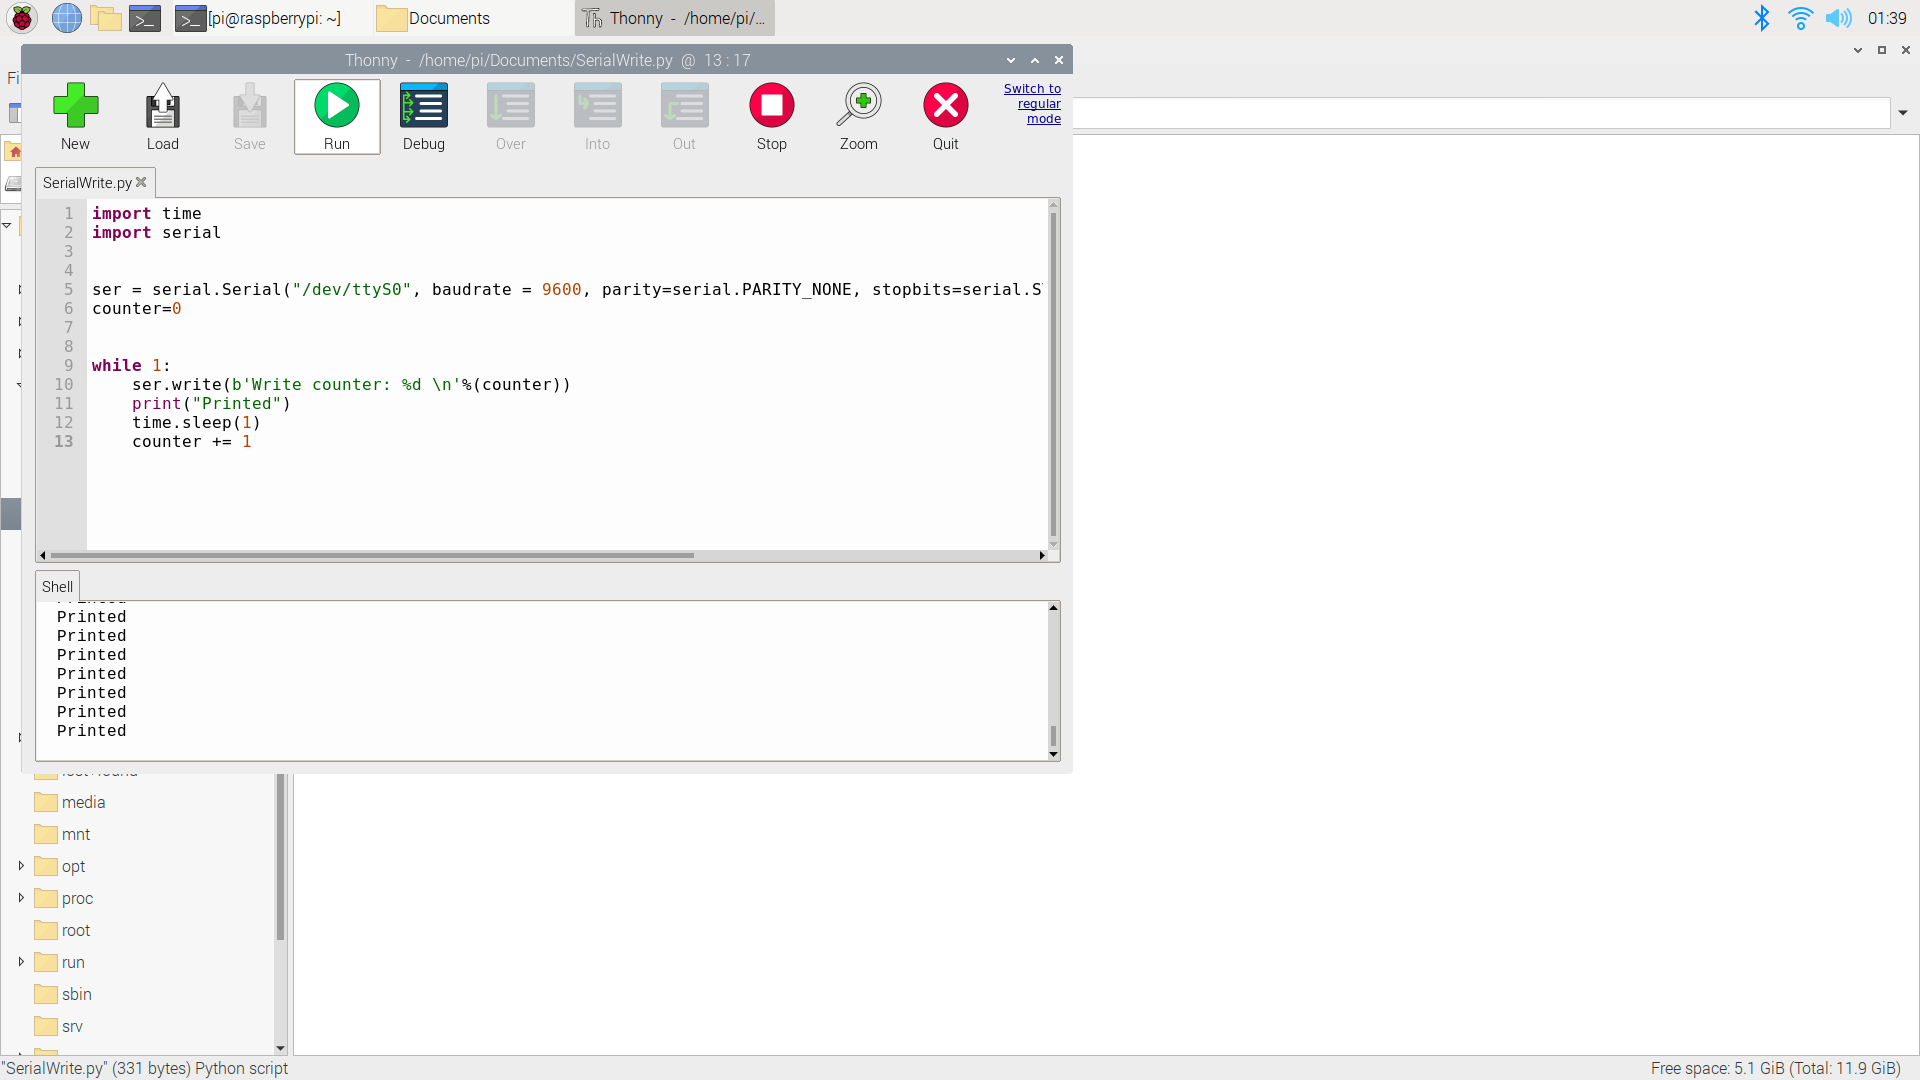
The Raspberry Pi and a desktop computer are connected via the USB-serial board. On RPi, a python script is used to send the serial data to the desktop computer. The script updates a counter value and sends it to the serial port. RPi is configured to use the serial TTL port for UART communication.
The sent data is passed as an 8-bit data chunk over the UART protocol at a baud rate of 9600 bps with no parity, one stop bit, and a timeout of one second. Each time a counter value is sent over the serial port, the message “Printed” is printed on the console (of Python IDLE) and the counter variable is increased by one.
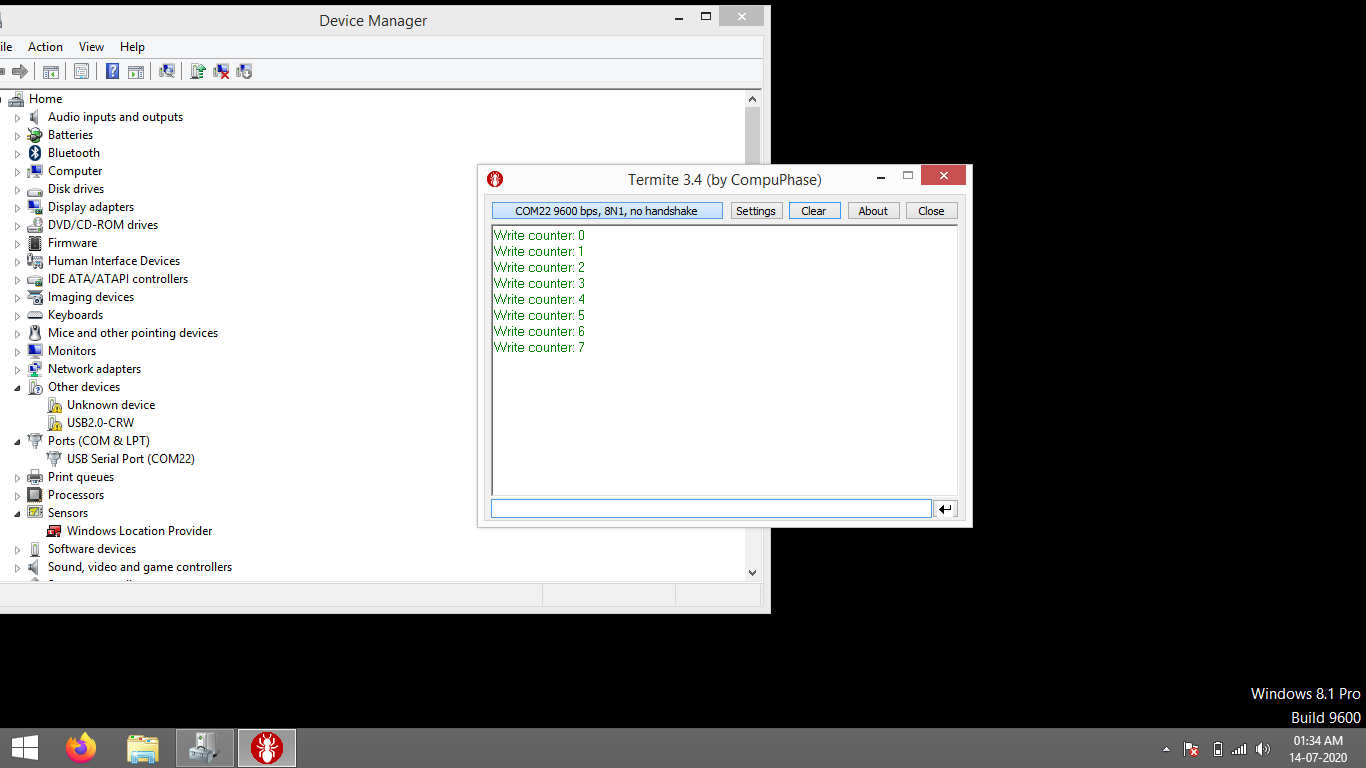
On the desktop side, the Termite serial application is used on a Win32 system to receive serial data. The Termite will automatically detect the USB-serial device when it’s connected to the desktop computer (laptop) as COM22.
The UART settings are set to 9600 8N1 on the Termite, which are the same settings used in the Python script on Raspberry Pi.
 Programming guide
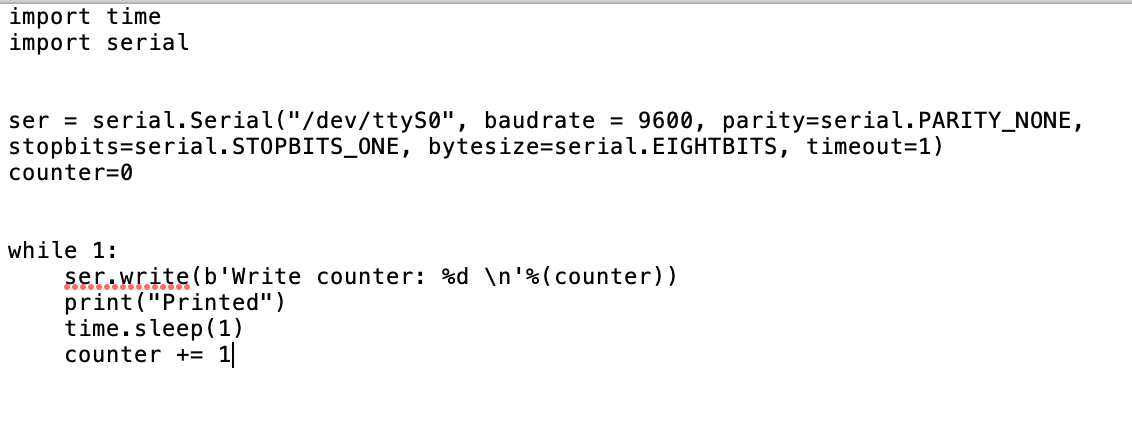
The script begins by importing the serial and time library. A serial object is created using the serial.Serial() method with the port specified to /dev/ttyS0.
A counter variable “counter” is declared and initialized to 0. In an infinite while loop, the value of the counter is sent in a string by using the serial.write() method. The message “Printed” is printed on Python IDLE’s Console using the print() method.
A delay of one second is given using the sleep() method and the value of the counter is increased by one. The loop will keep iterating until the script is forced to shut down from the console.
import time
import serial
ser = serial.Serial(“/dev/ttyS0”, baudrate = 9600, parity=serial.PARITY_NONE, stopbits=serial.STOPBITS_ONE, bytesize=serial.EIGHTBITS, timeout=1)
counter=0
while 1:
ser.write(b’Write counter: %d \n’%(counter))
print(“Printed”)
time.sleep(1)
counter += 1
Demonstration video
Recipe: Bidirectional serial communication
In this recipe, we will setup a bidirectional communication between a desktop computer and Raspberry Pi. When a message is sent from the computer to RPi’s serial port, it will send back the same message to the computer.
Components required
These are the same as in the previous recipe.
Circuit diagram
These are the same as in the previous recipe.
Circuit connections
These are the same as in the previous recipe.
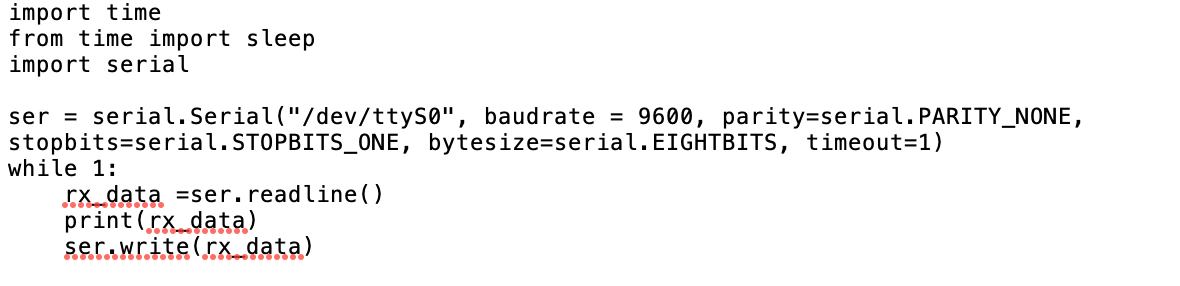
Python Script 2
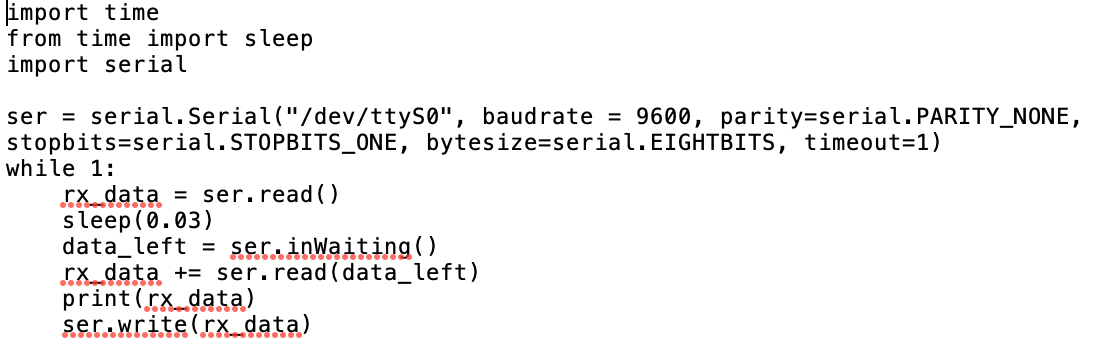
 Python Script 3
How the project works
The Raspberry Pi and a desktop computer are connected via the USB-serial board. On the desktop side, the Termite serial application is used on a Win32 system to send and receive the serial data. The Termite automatically detects the USB-serial device when it’s connected to the desktop computer (laptop) as COM22.
The UART settings are set to 9600 8N1 on the Termite, which are the same settings used in the Python script on RPi. From the Termite, we’ll send different messages (such as “Hello,” or “How r u?”) to RPi’s serial port.
On Raspberry Pi, a python script is used to:
Read the serial data at its serial hardware port
- Print that data to the console
- Send the same data back to the desktop computer
RPi is configured to use the serial TTL port for UART communication. The sent data is passed as an 8-bit data chunk over the UART protocol at a baud rate of 9600 bps with no parity, one stop bit, and a timeout of one second.
There are two scripts written for the same functions (i.e. to read data from the serial port, print it to console, and send the same message back through the serial port to the desktop computer). However, both scripts use different methods of PySerial library to execute these same functions.

Programming guide
Script 1 begins by importing the time, sleep, and the serial library. A serial object is created using the serial.Serial() method with the port specified to /dev/ttyS0.
In an infinite while loop, the serial data on the TTL port is read by using the readline() method. The read data is then printed to the console using the print() method. The same thing is then written through the serial port to the desktop computer by using the write() method.
import time
from time import sleep
import serial
ser = serial.Serial(“/dev/ttyS0”, baudrate = 9600, parity=serial.PARITY_NONE, stopbits=serial.STOPBITS_ONE, bytesize=serial.EIGHTBITS, timeout=1)
while 1:
rx_data =ser.readline()
print(rx_data)
ser.write(rx_data)
Script 2 is similar to script 1, however, it uses the read() method to read the serial port data and waits for any data left using the inWaiting() method. Afterwards, it reads the left data using the read() method again.
The second script only differs in the way it reads the data from RPi’s serial port.
while 1:
rx_data = ser.read()
sleep(0.03)
data_left = ser.inWaiting()
rx_data += ser.read(data_left)
print(rx_data)
ser.write(rx_data)
Demonstration video
>
Now, you can read and write data over Raspberry Pi’s serial hardware port.
In the next tutorial, we will learn how to interface SIM900A GSM-GPRS modem with it.
Filed Under: Raspberry pi

Questions related to this article?
👉Ask and discuss on EDAboard.com and Electro-Tech-Online.com forums.
Tell Us What You Think!!
You must be logged in to post a comment.