
OpenCV is a popular cross-platform framework for image processing and real-time computer vision. The software framework is useful for efficiently developing real-time computer vision applications that would be extremely time-consuming to create from scratch. The power of OpenCV’s framework is that it runs seamlessly on embedded platforms like microcomputers. This means developing and running embedded…
How to use Raspberry Pi camera module with Python

One of the main attractions of the Raspberry Pi platform is its camera module. At present, Raspberry Pi Foundation offers three camera modules: • Camera Module 2 • Camera Module 2 NoIR • Raspberry Pi High-Quality Camera The camera module 2 is a replacement for the original camera module in April 2016. The V2 module…
RPi Python Programming 20: Interfacing the SIM900A GSM-GPRS modem and hacking earphones
In the previous tutorial, we learned how to use Raspberry Pi’s (RPi) serial hardware port for serial data communication over the universal asynchronous receiver/transmitter (UART) protocol. Most of the embedded devices have the UART port for exchanging console data. In fact, most of the sensor modules that are designed for peer communication with controllers/computers have the…
RPi Python Programming 21: The SIM900A AT commands
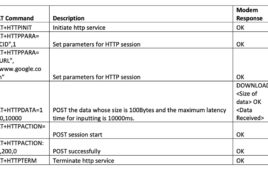
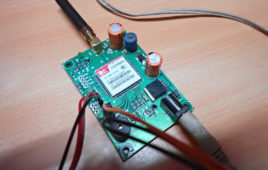
In the previous tutorial, we covered how to interface a SIM900A GSM-GPRS modem with Raspberry Pi, Arduino, and desktop computers. SIM900A can communicate data with the controlling device over the universal asynchronous receiver/transmitter (UART), I2C, or SPI protocol. The modem is a piece of mobile equipment with an IMEI number that’s capable of all cellular…
RPi Python Programming 22: Calls & SMS using a SIM900A GSM-GPRS modem

In the previous tutorial, we covered the AT commands that are supported by a SIM900 GSM-GPRS modem. We’ve already discussed how to interface a SIM900A GSM-GPRS modem with Raspberry Pi, Arduino, as well as other microcontrollers and desktop computers. Now, it’s time to use this modem to make and receive calls, and send and receive…
RPi Python Programming 23: Interfacing a NEO-6MV2 GPS module with Raspberry Pi

In the previous tutorial, we learned how to interface a SIM900 GSM-GPRS modem with Raspberry Pi (RPi) and a desktop computer. We employed serial UART communication to “talk” with the SIM900 modem. By using bidirectional data communication with the modem via a standard UART interface, we were able to make/receive calls and send/receive SMS messages on RPi and…
RPi Python Programming 24: I2C explained
In the previous tutorial, we covered how to interface a NEO-6M GPS module with Raspberry Pi (RPi). The module communicates with RPi over the universal asynchronous receiver/transmitter or UART protocol. The UART is the most common point-to-point data communication protocol. But, it’s not the only serial communication protocol. In embedded electronics, I2C and SPI protocols are…
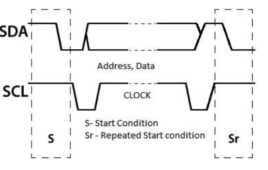
RPi Python Programming 25 – Synchronous serial communication in Raspberry Pi using I2C protocol

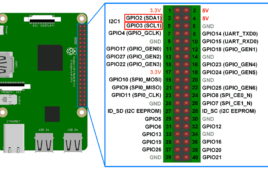
In the previous tutorial, we discussed the basics of the I2C protocol. In most of the embedded devices, either UART otherwise I2C is used for console messages. In this tutorial, we will discuss serial communication in Raspberry Pi using the I2C protocol. I2C in Raspberry Pi For serial communication over the I2C protocol, the Broadcom…
RPi Python Programming 01: Introduction to Raspberry Pi 4
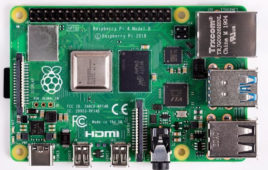
Raspberry Pi is a credit-card sized, single-board computer developed by the Raspberry Pi Foundation, a UK-based charity that works to ensure global access of computing and digital technology. It was initially developed as a low-cost microcomputer to impart digital skills to kids. It comes without any power supply or peripherals as it’s meant to be programmed…
How to configure Scratch GPIO- (Part 1/12)
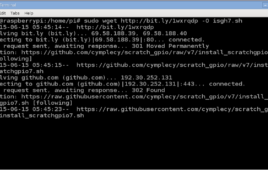
Scratch is a programming tool for creating embedded games,stories and animations without using any written codings, rather using visually organized syntax which is in blocks with a drag-and-drop interface. One can use these blocks according to one’s requirement, scratch’s control of hardware is not only limited to the external inputs such as the keyboard and mouse.This article explains how to configure Scratch to extend its power to access GPIO(General Purpose Input and Output) of the Raspberry Pi.
How to Connect Raspberry Pi to WiFi- (Part 3/12)
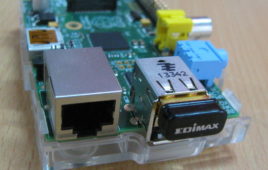
This article is to make the procedure of setting up the WiFi. The Raspberry Pi is connected to Windows PC through Ethernet cable and the GUI is obtained using a VNC server. Although Raspberry Pi Model B comes with 100Mbps wired Ethernet, it is also essential to connect WiFi.The best arrangement is to purchase a cheap USB WiFi connector and utilize one of the USB ports to get to our WiFi home router. Setting up a Raspberry Pi utilizes the Raspbian OS to get to your remote system is simple – This article will guide you through the procedure.
Setup Apache Web Server- (Part 4/12)
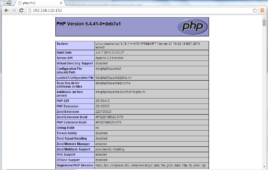
This article is to provide step by step instructions for making Raspberry Pi as a web server where we can publish our web pages over local network. Apache is a prevalent web server application you can introduce on the Raspberry Pi to permit it to serve pages. All alone, Apache can serve HTML documents over HTTP, and with extra modules can serve element website pages utilizing scripting tools, for example, PHP. The fundamental services which are required to turn your Raspberry Pi into a web server are, Apache (the web server itself), PHP (scripting language).
Transferring Files from a Windows PC to Raspberry Pi- (Part 5/12)

This article is to make the process of transferring files from a Windows PC to Raspberry Pi easier. The Raspberry Pi is connected to a Windows PC through Ethernet cable and the GUI is obtained using a VNC server. Sharing files between Raspberry Pi and Windows is often very useful for Raspberry Pi users. Whether we need to transfer media files to the Raspberry Pi or want to share some software packages. This article discusses how to enable file sharing for a folder on the Raspberry Pi running the Raspbian OS.Microsoft developed the protocol called Common Internet File System (CIFS) for transfer of files between windows machines. The most popular implementation of CIFS in LINUX system is known as Samba and it allows Raspberry Pi to act as a CIFS file server, which allows a Windows PC to mount a folder on a Raspberry Pi and then allowing to modify(copy, delete, read and write) the files on it.
The pros and cons of the Raspberry Pi 400

In many ways, Raspberry Pi falls short as a full-fledged personal computer. The Raspberry Pi Foundation has tried to change this with its latest addition, the Raspberry Pi 400. Launched in November of 2020, the Raspberry Pi 400 is a single-board computer in the form of a keyboard, retailing at $70 per unit or $100…
Optical Character Recognition Robot- (Part 12/12)
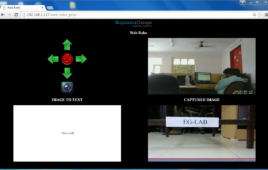
In this project, our ultimate goal is to find and solve the different requirements in making a web controlled robot that recognizes and converts textual messages placed in real world to the computer readable text files. Our objective is to integrate the appropriate techniques to explain and prove that such capability, using their limited hardware and software capabilities and not to develop new character recognition algorithms or hardware for doing that.
Streaming Videos using Webcam- (Part 10/12)

This article is to provide step by step instructions for making Raspberry Pi as a webcam server where we can live stream video over a local network using python scripts and some required packages. A software package used in this tutorial is Motion which is an open source software with a number of configuration options which can be changed according to our needs.
RPi Python Programming 27 – SPI protocol explained
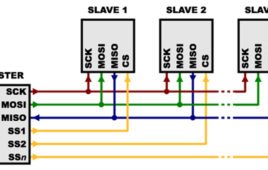
In the previous tutorial, we discussed interfacing with the ADXL345 accelerometer sensor with Raspberry Pi using the I2C interface. UART, I2C, and SPI are the most common serial communication interfaces used in embedded systems. UART is used for point-to-point full-duplex asynchronous serial communication between two devices. I2C is used for synchronous serial communication among multiple…
RPi Python Programming 26 – Interfacing ADXL345 accelerometer sensor with Raspberry Pi
In the previous tutorial, we discussed synchronous serial communication in Raspberry Pi using I2C protocol. In this tutorial, we will use the I2C interface of Raspberry Pi to communicate with a digital sensor. The digital sensor that we will talk with is the ADXL345 accelerometer. ADXL345 is a small, ultra-low power, 3-axis accelerometer sensor that…
How to use Alarm Signal in Raspberry Pi -(Part 19/38)
The operating systems like Archlinux ARM, OpenELEC, Pidora, Raspbmc, RISC OS and the Raspbian and also Ubuntu versions are available for the Raspberrypi board. Linux operating systems especially Ubuntu is preferred for all kind of programming and development. The immediate advantage of having an Operating System like Ubuntu running on an embedded system device is multitasking. The Raspberrypi is a board actually designed for helping computer education for remote schools but it is a nice platform for programmers especially beginners to explore various coding techniques. In a multi-tasking system several processes will be running at a time. The Operating System can control a process by sending signals to it. A user can sometimes initiate a signal sending and the processes can also send signals to each other. This project demonstrates how a process can receive the signal called SIGALRM from the OS and use it.
RPi Python Programming 19: Serial UART communication on RPi’s TTL port

In the previous tutorial, we discussed the universal asynchronous receiver-transmitter (UART) protocol and voltage levels, covering USB-serial boards and other serial adaptors. We also learned how to find a serial port name on Linux, Windows, macOS, and Raspberry Pi (RPi). In this tutorial, we’ll learn how to use the Python Serial library to setup bidirectional…