
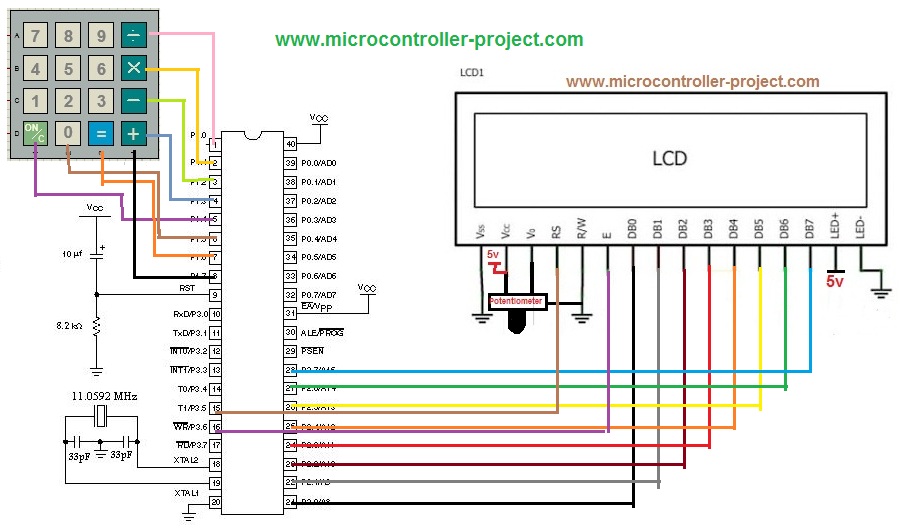
8051 microcontroller clock – Project requirements
- 16×2 lcd (To display time)
- 8051 (89c51 or any of 8051 series microcontroller)
- Potentiometer/variable resistor (For setting LCD contrast)
- Crystal(11.0592 MHz) (For clock generation)
- 4×4 keypad (For setting time)
- 5 volts power supply for driving lcd and microcontroller.
89c51 microcontroller digital clock – Project circuit diagram
Note: These tutorials are very important because the coding in the project heavily depends on these tutorials.
- How 16×2 lcd is programmed.
- Difference between 8-bit and 4-bit lcd interference.
- difference between commands and data send to 16×2 lcd.
- 4×4 numeric keypad programming.
Time delay generation is also very difficult using 8051(89c51,89c52) microcontroller. You have to be familiar with the internal timer registers of the 8051. For delay generation take the following tutorials.
89c51 digital clock – Functions used in code
int scan_key1(); Used to set time if 1 is pressed.
The difference between the above two functions is one is used to set time initially when you power on the hardware. The second one is used to set time when clock is operational. For example clock is running and you want to set time again so pressing ‘1‘ on keypad will lead you into scan_key1() function and you can set time according to your desire.
void display(); Used to check increments in seconds, hours and minutes and display time.
void start(); Used to check increments in seconds , hours and minutes and display time.
void tochar(unsigned int value); Used to display time by converting integer in character.
To display a numeric character on 16×2 lcd we have to convert it in character form. The above function is used to achieve this task.
void onemintdelay(); Used to start the internal timer till one second.
One minute delay is generated with the above function. For knowing how to generate one second delay with 89c51 microcontroller? You have to take the tutorial mentioned above.

8051 digital clock – Working
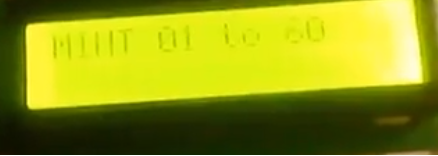
Note: You can also set the time at any instance just press 1 and you can see settings , set the time, and your clock starts running from updated time.
Important note: The seconds starts from 3 and goes to 60. This is not an error in coding simply just because after each second i have to check some readings like hour minutes etc in which three seconds are required from each minute. Time displayed on the 16×2 lcd is perfect their is no error in it.
Filed Under: 8051 Microcontroller., Microcontroller Projects

Questions related to this article?
👉Ask and discuss on Electro-Tech-Online.com and EDAboard.com forums.
Tell Us What You Think!!
You must be logged in to post a comment.