We live in a world of communications and in a constant process to transfer communication technologies to other platforms that can be used by intelligent machines like robots. In three steps can be built a powerful communication system by plugging the Ethernet module into the Arduino board, create network connections, and building the application for data transfer.
Full-duplex data transmission means that data can be transmitted in both directions on a signal carrier at the same time. For example, on a local area network with a technology that has full-duplex transmission, one workstation can be sending data on the line while another workstation is receiving data. Full-duplex transmission necessarily implies a bidirectional line (one that can move data in both directions).
We have developed the project which uses UDP protocol for communication between two Arduino UNO boards through Ethernet cable.
Here actually both device work as a transmitter/receiver.it is full duplex communication so both parties can communicate with each other simultaneously. An example of a full-duplex device is a telephone; the parties at both ends of a call can speak and be heard by the other party simultaneously.
Following Components are required to build this Project.
| Sr. No. | COMPONENTS REQUIRED | QUANTITY REQUIRED |
|---|---|---|
| 1 | Arduino UNO R3 | 2 |
| 2. | Ethernet Shield | 2 |
| 3. | Push Button | 3 |
| 4. | Flam Detection Sensor | 1 |
| 5. | LED | 3 |
| 6. | Temperature Sensor (LM-35) | 1 |
| 7. | 16×2 LCD | 1 |
| 8. | Resistor -330 Ohm | 4 |
| 9. | Transistor BC 547 | 2 |
| 10. | Relay (5V) |
WORKING
Here circuit -1 consists of Arduino Uno, Ethernet Shield, LM-35 (Temperature Sensor), 2 led, 2-Push button and flame detection Sensor. It will transmit various data like temperature reading, Flame detection Status, and Push Button Status (On/Off) to the Circuit-2 using UDP Protocol through Ethernet cable. It will transmit the information in form of UDP packets.
And it will also receive the button status from Circuit-2.
So when the button is pressed from circuit-2 then LED Connected with circuit-1 will be ON and if button pressed again then LED will be OFF so the LED Status will Toggle When button is pressed.
Circuit-1 Will Continuously transmit the temperature reading, Flame detection Status, and Push button status to Circuit-2.
Circuit -2 at another side Consist of Arduino Uno, Ethernet Shield, 16×2 LCD, Relay-1, 2- Push Button and one LED.
All this is connected with second Arduino board. The LCD will Continuously Display the temperature reading in Celsius and Fahrenheit from circuit-1.And it will continuously read the flame detection status from remote place (Circuit-1). If flame is detected then at another side LCD will display the message that flame is detected at the remote place.
Two Relay Are connected in Second Circuit (Circuit -2) can be controlled from first circuit Relay-1 Can be Turn On when Button-1 pressed from first circuit and it will be Turn OFF when Button-1 pressed again. Similarly, Relay-2 can be controlled by Button-2.
ACTUAL IMPLEMENTATION (FOR CIRCUIT 1)

Fig. 1: Prototype of One Arduino Circuit for Arduino to Arduino Full Duplex Communication
ACTUAL IMPLEMENTATION (FOR CIRCUIT 2)

Fig. 2: Prototype of Another Arduino Circuit for Arduino to Arduino Full Duplex Communication
Project Source Code
###
//Rx #include <SPI.h> // ( Net surf for SPI pins ) #include <Ethernet.h> #include <EthernetUdp.h> #include<LiquidCrystal.h> // initialize the library with the numbers of the interface pins LiquidCrystal lcd(8, 9, 5, 4, 3, 2); //code start int pinButton = 14; int pinButton1= 15; int stateLED,stateLED1 = LOW; int stateButton,stateButton1; int previous,previous1 = LOW; long time = 0; long debounce = 100; int codeS1 = 2; //Codes must be even int codeS2 = 4; //Device IP & MAC (Variable) byte mac[] = { 0x2A, 0x00, 0x22, 0x22, 0x22, 0x44 }; //(Naming rules) IPAddress ip(192, 168, 1, 10); //(IP rules according to subnet/gateway) // -------- Do not change the section below ----------------- const unsigned int localPort = 1369; // Process ID port (TCP/UDP Alternate port = 8888) char remote_IP1[]="192.168.1.20"; int remote_Port1 = 9631; char UDP_TX_Buffer[80]; char recvdBuffer[UDP_TX_PACKET_MAX_SIZE + 1]; // Buffer for incoming data EthernetUDP Udp; //Class variable (Initiates process of UDP) // ------------------------------------------------------------ int temperature =atoi(recvdBuffer); int flamedet=0; int threshold =400; void setup() { lcd.begin(16, 2); lcd.clear(); lcd.print("Welcome"); delay(500); lcd.setCursor(0, 1); lcd.clear(); lcd.print("Manless Subtration"); lcd.setCursor(0,2); lcd.print("Optical Fiber"); delay(2000); //lcd.print(temperature); pinMode(6,OUTPUT); pinMode(pinButton, INPUT); pinMode(pinButton1,INPUT); pinMode(7,OUTPUT); Ethernet.begin(mac, ip); // Set up the Ethernet Shield Udp.begin(localPort); // Open a socket for this port Serial.begin(9600); // Set up serial monitor with PC4 delay(500); } char first; int i = 0, flag = 0; char text; void loop() { //transmit int recvdSize = Udp.parsePacket(); int count,count1,flag1; int Pressed = 0; int incomingByte = 0; /* //flam detector int sensorvalue; sensorvalue=analogRead(flamedet); Serial.println(sensorvalue); delay(1); if(sensorvalue>threshold) { Serial.print("low"); } else Serial.print("high"); */ stateButton = digitalRead(pinButton); if(stateButton == HIGH && previous == LOW && millis() - time > debounce) { if(stateLED == HIGH){ lcd.print("One"); remote_send(codeS1); stateLED = LOW; } else { stateLED = HIGH; remote_send(codeS1 + 1); lcd.print("two"); } time = millis(); } previous == stateButton; stateButton1 = digitalRead(pinButton1); if(stateButton1 == HIGH && previous1 == LOW && millis() - time > debounce) { if(stateLED1 == HIGH){ remote_send(codeS2); stateLED1 = LOW; } else { stateLED1 = HIGH; remote_send(codeS2 + 1); } time = millis(); } previous1 == stateButton1; //compare //strcpy (recvdBuffer,""); if(strcmp(recvdBuffer,"3")==0) { lcd.clear(); digitalWrite(6,HIGH); lcd.print("Relay 1 ON "); delay(1000); } else if(strcmp(recvdBuffer,"2")==0) { lcd.clear(); digitalWrite(6,LOW); lcd.print("Relay 1 OFF "); delay(1000); } else if(strcmp(recvdBuffer,"5")==0) {lcd.clear(); digitalWrite(7,HIGH); lcd.print("Relay 2 ON "); delay(1000); } else if(strcmp(recvdBuffer,"4")==0) {lcd.clear(); digitalWrite(7,LOW); lcd.print("Relay 2 OFF "); delay(1000); } else if(strcmp(recvdBuffer,"6")==0) {lcd.clear(); lcd.print("Flame Detected "); delay(1000); lcd.setCursor(0, 1); lcd.print("Take necessary action"); delay(1000); } else if(strcmp(recvdBuffer,"7")==0) {lcd.clear(); lcd.print("Flame Detected "); delay(1000); lcd.setCursor(0, 1); lcd.print("Take action"); delay(2000); } /* } first=1; itoa(first,UDP_TX_Buffer,10); Udp.beginPacket(remote_IP1,remote_Port1); Udp.write(UDP_TX_Buffer); Udp.endPacket(); strcpy(UDP_TX_Buffer,""); delay(200); */ if (Udp.available()) { IPAddress remote = Udp.remoteIP(); Udp.read(recvdBuffer, UDP_TX_PACKET_MAX_SIZE); recvdBuffer[recvdSize] = '�'; recvdSize -= 8; // Gets rid of the message header int temperature =atoi(recvdBuffer); // Conversion from celsius to feranheat int degreef=((temperature)*1.8000+32); lcd.clear(); lcd.print("Temp (C)=> "); lcd.print(temperature); lcd.setCursor(0,2); lcd.print("Temp (F)=> "); lcd.print(degreef); Serial.println(temperature); } } //Serial.print("Temp = > "); ///Serial.println(recvdBuffer); /*if (flag == 1) { // Serial.print((i++) % 100); // Serial.print("> "); // Serial.print(" Control Message >> ASCII : "); // Serial.print(recvdBuffer); // Serial.print(" TEXT : "); Serial.print(temperature); // text = atoi(recvdBuffer); //Serial.println(text); flag = 0; } else { if (atoi(recvdBuffer) == 1) { flag = 1; } else { // Serial.print((i++) % 100); // Serial.print("> "); // Serial.print("Control Code : "); // Serial.println(recvdBuffer); // Prints received data to serial } } } } */ void remote_send(int data) { itoa(data,UDP_TX_Buffer,10); Udp.beginPacket(remote_IP1,remote_Port1); Udp.write(UDP_TX_Buffer); Udp.endPacket(); delay(200); } //Tx #include <SPI.h> #include <Ethernet.h> #include <EthernetUdp.h> //PIN on board int pinButton = 4; int pinButton1= 5; int flame =8; int LED = 12; int LED1 =13; int stateLED,stateLED1,stateLED2 = LOW; int stateButton,stateButton1,stateButton2; int previous,previous1,previous2 = LOW; long time = 0; long debounce = 100; //-------- system config ----------------- byte mac[] = {0x2A, 0x00, 0x22, 0x22, 0x22, 0x22}; IPAddress ip(192, 168, 1, 20); const unsigned int localPort = 9631; char remote_IP[] = "192.168.1.10"; int remote_Port = 1369; char UDP_TX_Buffer[80]; // For future use... char recvdBuffer[UDP_TX_PACKET_MAX_SIZE + 1]; //char UDP_RX_Buffer[80]; // For future use... EthernetUDP Udp; //----------------------------------------- int analogPin = 3; int firstpin=2; int reading; float tempC; void setup() { Ethernet.begin(mac, ip); // Set up the Ethernet Shield Udp.begin(localPort); // Open a socket for this port Serial.begin(9600); // Set up serial monitor with PC //pinMode(13, OUTPUT); analogReference(INTERNAL); pinMode(6,OUTPUT); pinMode(7,OUTPUT); pinMode(8,INPUT); pinMode(pinButton, INPUT); pinMode(pinButton1,INPUT); pinMode(LED, OUTPUT); pinMode(LED1,OUTPUT); delay(1000); } int newS1, oldS1 = 0, newS2, oldS2 = 0, newS3, oldS3 = 0, newS4, oldS4 = 0; int sData_code = 1; int codeS1 = 2; //Codes must be even int codeS2 = 4; int codeS3 = 6; int codeS4 = 8; void loop() { int recvdSize = Udp.parsePacket(); reading = analogRead(analogPin); tempC = reading / 9.31; Serial.println(tempC); delay(1000); itoa(tempC, UDP_TX_Buffer, 10); Udp.beginPacket(remote_IP, remote_Port); Udp.write(UDP_TX_Buffer); Udp.endPacket(); strcpy(UDP_TX_Buffer,""); delay(200); stateButton = digitalRead(pinButton); if(stateButton == HIGH && previous == LOW && millis() - time > debounce) { if(stateLED == HIGH){ remote_Send(codeS1); stateLED = LOW; } else { stateLED = HIGH; remote_Send(codeS1 + 1); } time = millis(); } digitalWrite(LED, stateLED); previous == stateButton; stateButton1 = digitalRead(pinButton1); if(stateButton1 == HIGH && previous1 == LOW && millis() - time > debounce) { if(stateLED1 == HIGH){ remote_Send(codeS2); stateLED1 = LOW; } else { stateLED1 = HIGH; remote_Send(codeS2 + 1); } time = millis(); } digitalWrite(LED1, stateLED); previous1 == stateButton1; stateButton2 = digitalRead(flame); if(stateButton2 == HIGH && previous2 == LOW && millis() - time > debounce) { if(stateLED2 == HIGH){ remote_Send(codeS3); stateLED2 = LOW; } else { stateLED2 = HIGH; remote_Send(codeS3 + 1); } time = millis(); } previous == stateButton; if(strcmp(recvdBuffer,"2")==0) { digitalWrite(6,HIGH); delay(500); } else if(strcmp(recvdBuffer,"3")==0) { digitalWrite(6,LOW); delay(500); } /* //Conversion of celcius to fernhit float val = analogRead(analogPin); int degreeF = (val*(9/5)+32); char text; Serial.println(degreeF); itoa(degreeF, UDP_TX_Buffer, 10); Udp.beginPacket(remote_IP, remote_Port); Udp.write(UDP_TX_Buffer); Udp.endPacket(); strcpy(UDP_TX_Buffer,""); delay(200); if(digitalRead(firstpin)==HIGH) { Udp.beginPacket(remote_IP, remote_Port); strcpy(UDP_TX_Buffer,"First"); Udp.write(UDP_TX_Buffer); Udp.endPacket(); strcpy(UDP_TX_Buffer,""); } */ //Receive data if (Udp.available()) { IPAddress remote = Udp.remoteIP(); Udp.read(recvdBuffer, UDP_TX_PACKET_MAX_SIZE); recvdBuffer[recvdSize] = '�'; recvdSize -= 8; Serial.println(recvdBuffer); } } /* if (digitalRead(control) == HIGH) { read_inputs(); if (newS1 != oldS1) { if (newS1 == 1) remote_Send(codeS1); else if(newS1==0) remote_Send(codeS1 + 1); delay(200); } oldS1=newS1; if (newS2 != oldS2) { if (newS2 == 1) remote_Send(codeS2); /* else remote_Send(codeS2 + 1); delay(200); } if (newS3 != oldS3) { if (newS3 == 1) remote_Send(codeS3); /* else remote_Send(codeS3 + 1); delay(200); } if (newS4 != oldS4) { if (newS4 == 1) remote_Send(codeS4); /* else remote_Send(codeS4 + 1); delay(200); } } else { Serial.println("E"); delay(2000); //Future purpose } } */ void remote_Send(int data) { itoa(data, UDP_TX_Buffer, 10); Udp.beginPacket(remote_IP, remote_Port); // REMOTE IP/Port Udp.write(UDP_TX_Buffer); //Byte/string Udp.endPacket(); delay(200); } /*void read_inputs() { if (Serial.available()) { char sData = Serial.read(); remote_Send(sData_code); delay(50); remote_Send(sData); } oldS1 = newS1; if (digitalRead(s1) == HIGH) newS1 = 1 ; else newS1 = 0 ; oldS2 = newS2; if (digitalRead(s2) == HIGH) newS2 = 1 ; else newS2 = 0 ; oldS3 = newS3; if (digitalRead(s3) == HIGH) newS3 = 1 ; else newS3 = 0 ; oldS4 = newS4; if (digitalRead(s4) == HIGH) newS4 = 1 ; else newS4 = 0 ; } */###
Circuit Diagrams
| Circuit-Diagram-One-Arduino-Setup-Arduino-Arduino-Full-Duplex-Communication | 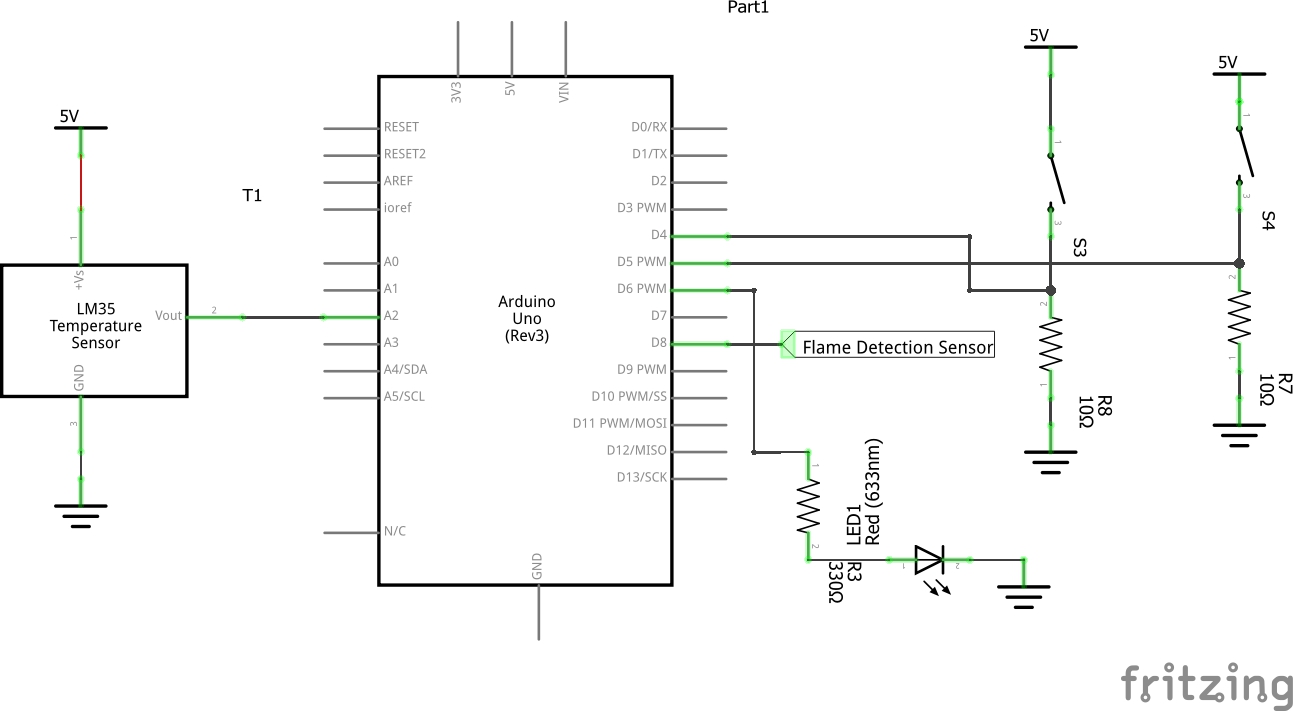 |
| Circuit-Diagram-Another-Arduino-Setup-Arduino-Arduino-Full-Duplex-Communication | 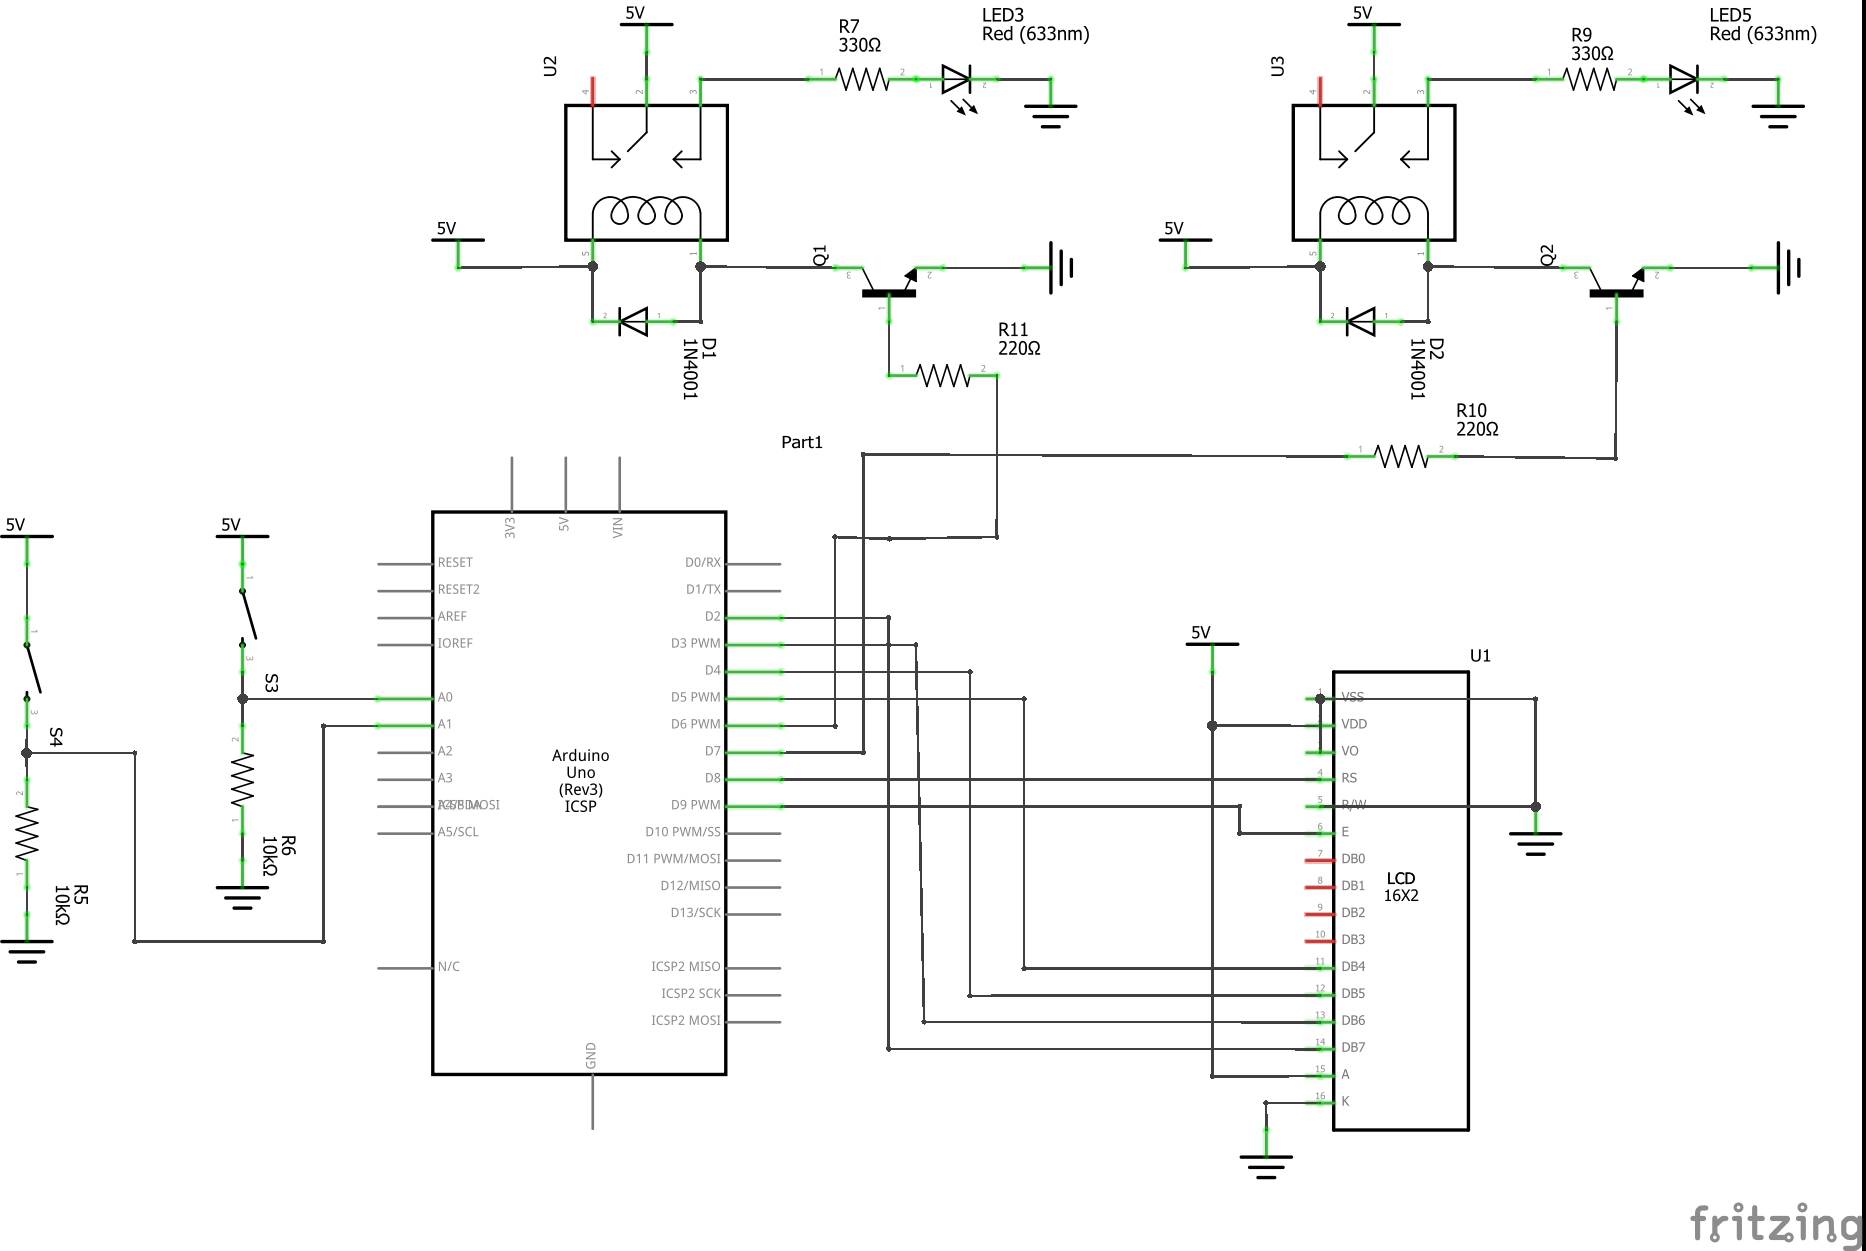 |
Project Video
Filed Under: Electronic Projects
Filed Under: Electronic Projects

Questions related to this article?
👉Ask and discuss on EDAboard.com and Electro-Tech-Online.com forums.
Tell Us What You Think!!
You must be logged in to post a comment.