Mobile apps play a crucial role in the Internet of Things (IoT) ecosystem, serving as interfaces through which users can interact with and control IoT devices. Several IoT devices used in consumer electronics, home automation, logistics and inventory, and others are controlled or managed through mobile applications.
For example, users can rely on an app installed on their smartphone to control different appliances, security systems, alarms, or other devices — much like a remote control. An app can also offer real-time monitoring of these devices, providing timely notifications and alerts. They can also be useful for visualizing data (like sensor data) received from IoT systems in a comprehensive manner.

Essentially, an app serves as a centralized control center to manage multiple IoT devices sharing a common or different network. Mobile applications let users securely access their connected devices and provide a platform to personalize IoT systems and customize settings to user preferences.
For embedded engineers, app development is a unique domain. Understanding how mobile apps interact with and manage different devices is a must. For those who must develop a mobile app or prototype for IoT devices (for smaller or intermediate IoT projects), there are useful visual programming platforms—including those for non-tech-savvy users.
One such programming platform for developing apps is MIT App Inventor. In this article, we’ll discuss the MIT App and how to best get started with it.
What is MIT App Inventor?
MIT App Inventor is an open-source, web-based platform to make mobile applications for Android devices. Google initially developed it and is now maintained by the Massachusetts Institute of Technology (MIT). The platform provides a visual programming interface where users can create a mobile app using drag-and-drop visual elements. Instead of writing code, users assemble blocks that represent different app functions and behaviors. App development in this way requires no knowledge of any programming language.
Users can create an elegant, fully functional mobile app by combining various visual elements according to appropriate logic. Although MIT App Inventor only works for Android devices, third-party tools exist for adapting a developed app to iOS.
MIT App Inventor is the first platform to introduce block-based programming to mobile application development. Many other block-based programming platforms for mobile application development, like Thunkable, Kodular, and AppyBuilder, are based on or inspired by MIT App Inventor.
The history
Around 2007, MIT professor Hal Abelson at Google created the concept for App Inventor. This was during a Google initiative to make application development accessible to non-programmers. In 2009, Google began testing App Inventor in various schools and universities. A year later, Google decided to make the technology open-source, seeing its educational potential.
Thereafter, MIT took over the project, integrating it into the newly established MIT Center for Mobile Learning, which Abelson co-directs. MIT re-launched App Inventor in 2012, hosting it on its own servers and continuing its advancement.
Since its re-launch, MIT App Inventor has undergone several improvements with a new update on a near-monthly basis. In 2021, support for iPhones and iPads was also added with the release of the iOS Companion app.
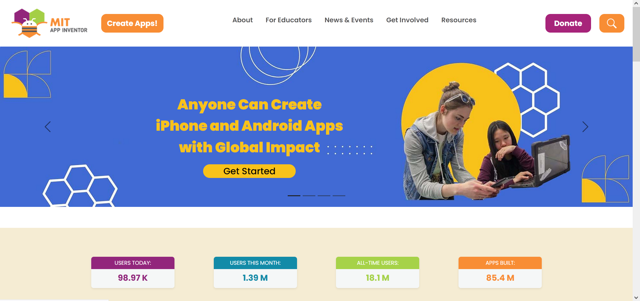
Currently, MIT App Inventor continues to lead in block-based mobile app development despite competition from platforms like Thunkable, Kodular, and AppyBuilder. More than a million monthly users have more than 85.4 million apps built using MIT App Inventor.
Why choose MIT App Inventor?
You should try MIT App Inventor for developing mobile applications for IoT projects for several reasons. The platform has a fairly long history and has evolved, providing a beginner-friendly block-based option for app development. Zero programming language is required for use, meaning there’s little likelihood of syntax errors and other text-programming complexities.
Of course, one significant advantage is that MIT App Inventor is free and open-source. Although the apps created only run on Android, they can be easily adapted to iOS using third-party tools like PhoneGap/Cordova, Kodular, Thunkable, or AppyBuilder. MIT App is ideal for rapid prototyping and well-suited for the IoT.
Apps developed using the MIT App remain on the MIT server so that a project can be managed and resumed from anywhere at any time. The apps can also be live tested using an emulator (aiStarter), a WiFi connection, a USB connection, and an Android smartphone or Chromebook.
IoT integration, location services, social media integration, artificial intelligence, and multi-language support are some of the more tempting features to use with MIT App Inventor.
What can you do with MIT App Inventor?
You can build apps for controlling IoT devices, location tracking, multimedia, utility, social media-integrated applications, and much more. MIT App Inventor is also an excellent solution for quickly prototyping app ideas. Advanced users can build their own custom extensions to add new functionalities and features.
It’s an easy-to-use platform for learning and experimenting with mobile app development. However, this block-based programming platform has limitations for advanced or enterprise-level app development.
Inventor interface
To build a mobile app using MIT App Inventor, first visit the MIT App Inventor website.
Click on the ‘Create Apps’ button and sign-in to App Inventor through your Google account. Be sure to complete authentication to continue. Once, you’re properly logged-in to App Inventor, you’ll see the project dashboard.

Click on the ‘Start A Blank Project’ button and name the project. Consider naming your first project, ‘HelloAppInventor.’ After you create a new project, an App Inventor Designer and an App Inventor Block Editor will appear on the dashboard.

The App Inventor Designer features the interface where you can add the visual components to your app. The components are added to a screen so you can see how it would appear in the app. A mobile application can contain one or more screens.
In the App Inventor Block Editor, program blocks can be added, which define the logic of the app and how the visual components should behave.
At the top of the App Inventor Designer, there are buttons that allow you to add, remove, and navigate screens.
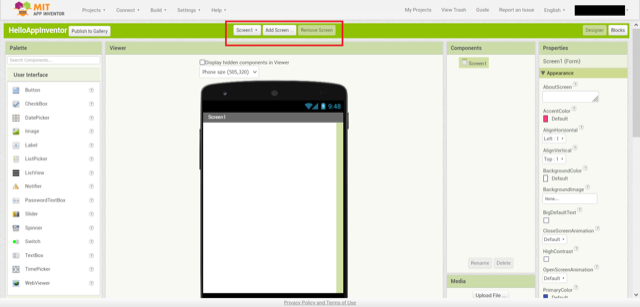
On the left-hand side, you’ll see a Palette window where you can find components for your app, which can be dragged to the main screen in the ‘Viewer.’ In the center, there’s a viewer window where the screens for the app are displayed. You’ll find the ‘Component’ and ‘Media’ windows to the right of the viewer window.
The component window shows the components dragged and added to a mobile app screen. The media window shows the multimedia components added to the screen. The ‘Properties’ window is on the right-hand side of the App Inventor Designer. It indicates which of the properties are selected in the component window.

In the App Inventor Block Editor, the ‘Blocks’ window is on the left side, where you’ll find the blocks for behaviors you can add to the app. In the block window, there are drawers to expand various types of program blocks.
Below the blocks window is the media window, where you’ll find blocks for adding behaviors to the Media components. To the right is the Viewer window, where you can drag and add program Blocks to the app.

App architecture
A mobile app built on MIT App Inventor consists of four main building blocks.
1. Components
2. Variable
3. Behaviors/Event handlers
4. Procedures
The components are the visual objects or elements you add to your mobile application. The components are added to a mobile screen through the App Inventor Designer.
There can be multiple screens in an app. The components can be visible or invisible elements. Some examples of visible components are Button, Label, Textbox, Password Textbox, etc. Examples of invisible components are the LocationSensor, TextToSpeech, and Texting, etc. Variables are used to store and access data in the app.
MIT App-Inventor is an event-driven programming platform. It works by running procedures (actions) in response to events. These functions are called behaviors or event handlers, defining how the mobile app should respond to user-initiated or external events.
Procedures are reusable groups of program blocks. They’re similar to a function in a programming language, which encloses a group of program statements into a callable identity.
Components
The components are the visual objects or elements you add to your mobile app, and hundreds are available in MIT App Inventor. There are so many available components, it’s not even possible to list or name each one of them. Also, new ones are continually being added.
Most of the components can be categorized as follows.
- User Interface Components: Examples are Buttons, Labels, TextBoxes, Slider, Picker, CheckBox, RadioButton, Switch, Image, VideoPlayer, Canvas, Layout (Horizontal, Vertical, Table), etc.
- Media Components: Camera, Camcorder, Player, Sound, ImagePicker, VideoPicker, SpeechRecognizer, TextToSpeec,h etc.
- Sensors: LocationSensor, ProximitySensor, LightSensor, AccelerometerSensor, GyroscopeSensor, etc.
- Connectivity Components: BluetoothClient, BluetoothServer, Web, WebViewer, WiFiDirect, etc.
- Storage Components: CloudDB, File, TinyDB, FusionTablesControl, etc.
- Social Components: ContactPicker, PhoneNumberPicker, Twitter, Sharing etc.
- Drawing and Animation: ImageSprite, Ball, Canvas, etc.
- LEGO MINDSTORMS Components: NXT Direct Commands, EV3 Motors, and Sensors
- Custom components contributed by advanced users.
Variables
The variables store data that can be changed and accessed throughout the app. They can be global or local variables. Global variables are accessible from anywhere in the app and store data that needs to be shared across different parts of the app. They’re declared in the Blocks Editor using the ‘initialize global name to’ block.
Local variables are accessible in the procedure or event handler where they’re declared and are used to store temporary data only needed within a specific block of code. Local variables are declared using the ‘initialize local name to’ block within a procedure or event handler.
Events and event handlers
The events are specific actions or occurrences that trigger the execution of blocks in the Blocks Editor. They can be user-initiated or external events.
Examples include:
The event handlers are blocks that define how an app responds to different types, such as user interactions or system changes. These handlers control the app behavior in MIT App Inventor. They allow the developed apps to react dynamically to user inputs, sensor data, and external events. The event handlers are defined by dragging-dropping and combining various program blocks in the App Inventor Block Editor.
- User Interaction Events: Button.Click, ListView.AfterPicking, CheckBox.Changed, Slider.PositionChanged etc.
- Touch Events: Canvas.Touched, Canvas.Dragged, etc.
- Sensor Events: AccelerometerSensor.Shaking, OrientationSensor.OrientationChanged, LocationSensor.LocationChanged, etc.
- Timer Events: Clock.Timer.
- Communication Events: BluetoothClient.ReceiveText, Web.GotText, etc.
- Data Storage and Retrieval Events: File.GotText, TinyDB.DataChanged, etc.
- Screen Events: Screen.Initialize, Screen.BackPressed, etc.
- Media Events: Player.Completed, Sound.Error, etc.
- Component-Specific Events: VideoPlayer.Completed, Camera.AfterPicture, etc.
Procedures
Procedures are a way to group program blocks into reusable units in MIT App Inventor. While program blocks are analogous to program statements in a programming language, the procedures are similar to functions in a programming language.
Like functions, procedures in the MIT App can return a value or execute a task without returning any value. Procedures that do not return a value are defined using the ‘procedure do’ blocks. The procedures that do return a value are defined using the ‘to procedure return’ blocks.
To use a procedure, you must call it from another part of your app. For those without a return value, you’ll need to use the ‘call procedure do’ block. For those with a return value, you’ll need to use the block that represents the procedure’s name, which will return a calculated value.
Designing for the IoT
MIT App Inventor is an excellent platform for developing mobile apps for the IoT, supporting several IoT protocols and devices, including Bluetooth and WiFi. The IoT capabilities can be expanded by adding custom extensions to the App Inventor. This is the most beginner-friendly block-based mobile app development platform for quick prototyping IoT apps without learning code.
MIT App Inventor is specifically popular among educators, students, and hobbyists who are interested in creating their own apps without programming language knowledge.
The platform is maintained by MIT and supported by a large user base. It also allows live testing of IoT mobile apps through various methods. However, for enterprise app projects, conventional software frameworks like React Native and Flutter are ideal.
Getting started with MIT App Inventor
Building IoT mobile apps on MIT App Inventor is simple. After creating a new project in the App Inventor, you can design your app’s user interface in the Designer interface without knowledge of code.
To build your app’s user interface, drag and drop the desired components on the dashboard screen and configure their properties. You can add multiple screens to a mobile app.
After completing this, you can define how your app should behave by adding program blocks in the Block Editor interface. You can also combine multiple program blocks into procedures for reusability. Remember, these blocks are similar to program statements, and the procedures are similar to functions in programming languages.
You may also like:


Filed Under: IoT tutorials, Tutorials

Questions related to this article?
👉Ask and discuss on Electro-Tech-Online.com and EDAboard.com forums.
Tell Us What You Think!!
You must be logged in to post a comment.