WHAT IS RASPBERRY?
Raspberry is a new (one year old), ultra small (credit card size) , and cheap (35USD), Linux computer.

Fig. 1: Typical Image of Raspberry Pi
The CPU is an ARM processor at 700MHz with 256 Mb (type A) or 500Mb (typeB) of RAM.
The flavors of Linux for Raspberry are Debian (Raspbian), Fedora (Pidora), RISC OS 5, Arch Linux ARM (derivate de Arch Linux). All in this article is dedicated to PIDORA.
WHAT A RASPBERRY PI DOES NOT HAVE?
– Don´t have Hard Disk but have SD Card, which is enough for Raspberry.
– Don´t have real time clock, but we can make one with ntp (network time protocol) server.
– Don’t have a case included, you must buy apart.
– The fact of don´t have mechanical parts, such us fan coolers or hardisk makes Raspberry strongest, with null hardware maintenance, and with very low electrical consumption (It’s Ecological).
WHAT CAN I DO WITH RASPBERRY?
– Develop programs in languages like C, Java, Python, Perl. It’s ideal for learning.
– Use General Purpose Input / Output (GPIO) Ports for control.
– Use in communications Ethernet, serial port, SPI, I2C.
– Send Emails since command lines.
– MySQL Server for Databases.
– Apache Server for websites server.
HOW CAN I INSTALL PIDORA LINUX
We need a SD card of 4GB or greater in
1. Download the SD Formatting Tool from
https://www.sdcard.org/downloads/formatter_4/eula_windows/
2. Install and run the Formatting Tool on your machine
3. Set “FORMAT SIZE ADJUSTMENT” option to “ON” in the “Options” menu
Fig. 2: Screenshot SDFormatter on Windows used to prepare SD Card
4. Check that the SD card you inserted matches the one selected by the Tool
5. Click the “Format” button
6. Download Pidora From
http://www.raspberrypi.org/downloads
7. Unzip pidora-18-r1c.zip
8. Download the software Win32DiskImager.exe and copy the image of pidora in the SD card for to do that select the unit in witch is the SD card.
http://sourceforge.net/projects/win32diskimager/
9. Introduce the SD card in Raspberry and switch ON the power, then automatically starts to install.
HOW CAN I USE FOR CONTROL WITH GPIO

Fig. 3: Pin Diagram of Raspberry Pi
GPIO is General Purpose Input Output, so for example we can control relays with it’s outputs or we can read the state of a switch with it’s inputs.
Watch out the maximum input voltage is +3,3V, if you apply +5V or more, you will burn the GPIO. Check the Circuit Diagram tab to get an example on how to use GPIO Pins.
Layout of P1 pin header GPIO
HOW CAN I INSTALL SOFTWARE FROM THE REPOSITORIES
In PIDORA we use the command “yum” for download and install software.
As root –> #yum install package
If you don’t know the exact name of the package you can use:
# yum search name and then all the packets that contain that name will be shown.
HOW CAN I INSTALL NTP (Network Time Protocol)
This is for to have a real time clock, that synchronize with a real time server in internet.
As root
#yum install ntp For install
#ntpd -qg
Set up to execute in the start
#chkconfig ntpd on
#service ntpd start
Test it
#date
HOW CAN I INSTALL MYSQL
As root:
#yum install mysql-server Install mysql server
#yum install mysql Install mysql client
Activate service and start it
#/sbin/chkconfig mysqld on
#/sbin/service mysqld start
# mysql -u root mysql
mysql> UPDATE user SET Password=PASSWORD(‘your_new_password’) where USER=’root’;
mysql> FLUSH PRIVILEGES;
#mysql -u root -p
mysql> exit
Create for example database with name oscommerce
#mysql -u root -p
mysql>SET PASSWORD FOR root@localhost=PASSWORD(‘password’);
mysql>create database oscommerce;
mysql> GRANT ALL ON oscommerce.* TO root@localhost IDENTIFIED BY “password”;
mysql>exit;
HOW CAN I INSTALL APACHE
As root:
#yum install httpd
#httpd –k start
#iptables -A INPUT -p tcp -m tcp –dport 80 -j ACCEPT
#service iptables restart
Edit iptables, go to /etc/firewall/zones and edit public.xml and add <service name=”http”/>
#service firewalld restart
Activate service and start it
# chkconfig httpd on
# service httpd start
The website must go in à /var/www/html/index.html must be named à index.html
To setup apache go à /etc/httpd/conf/httpd.conf
HOW I CAN SEND AN EMAIL
We can send emails trough command line with “mutt”, this is quite useful and have a lot of applications.
To install mutt, as root –> #yum install mutt
Next you must setup the file .muttrc of each user
For root is /root/.muttrc for another user will be /home/user/.muttrc
set from = “user_name@your_server.com”
set realname = “your_name”
set imap_user = ” user_name@your_server.com “
set imap_pass = “your_password”
set folder = “imaps://imap.gmail.com:993”
set spoolfile = “+INBOX”
set postponed =”+[Gmail]/Drafts”
set header_cache =~/.mutt/cache/headers
set message_cachedir =~/.mutt/cache/bodies
set certificate_file =~/.mutt/certificates
set smtp_url = “smtp://[email protected]:587/”
set smtp_pass = ” your_password “
Example of use:
#echo “Hello” | mutt -s “subject” user_name@your_server.com
Project Source Code
###
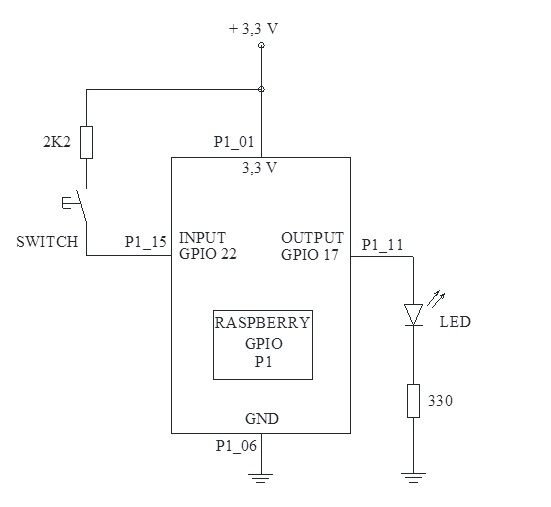
Example of connection Input GPIO_22 (P1_15) and Output GPIO_17 (P1_11)EXAMPLE OUTPUT GPIO IN “C”
// led.c
// Example for output data at GPIO17 that is PIN P1_11
// Turn on and off every 2 secs a Led connected to this pin
// we need the library bcm2835.h and bcm2835.c
// gcc -o led led.c -l bcm2835 (for compile)
// ./led (For execution)
//
#include <bcm2835.h>
#define PIN RPI_GPIO_P1_11
int main(int argc, char **argv)
{
if (!bcm2835_init())
return 1;
// Set the pin as Output
bcm2835_gpio_fsel(PIN, BCM2835_GPIO_FSEL_OUTP);
// Loop
while (1)
{
// Turn Led on
bcm2835_gpio_write(PIN, HIGH);
// wait 2 seconds
sleep(2);
// turn Led off
bcm2835_gpio_write(PIN, LOW);
// wait 2 seconds
sleep(2);
}
bcm2835_close();
return 0;
}
EXAMPLE OF INPUT GPIO IN “C”
// in.c
// Example of read GPIO22 that is PIN P1_15
// we need the library bcm2835.h and bcm2835.c
// gcc –o in in.c -l bcm2835 (For compile)
// ./in (For execution)
// Reads the input GPIO22 and prints the state
#include <bcm2835.h>
#include <stdio.h>// Input on pin GPIO 22
#define PIN RPI_GPIO_P1_15int main(int argc, char **argv)
{
if (!bcm2835_init())
return 1;
// Set GPIO 22 pin P1-15 as an input
bcm2835_gpio_fsel(PIN, BCM2835_GPIO_FSEL_INPT);
// with a pullup
bcm2835_gpio_set_pud(PIN, BCM2835_GPIO_PUD_UP);while (1)
{
// Read data
uint8_t value = bcm2835_gpio_lev(PIN);
printf("Value of pin 15: %dn", value);
// wait 2 seconds
sleep(2);
}
bcm2835_close();
return 0;
}
###
Circuit Diagrams
Filed Under: Electronic Projects

Questions related to this article?
👉Ask and discuss on Electro-Tech-Online.com and EDAboard.com forums.
Tell Us What You Think!!
You must be logged in to post a comment.