Engineers Garage

  • Projects and Tutorials
    • Electronic Projects
      • 8051
      • Arduino
      • ARM
      • AVR
      • PIC
      • Raspberry pi
      • STM32
    • Tutorials
    • Circuit Design
    • Project Videos
    • Components
  • Articles
    • Tech Articles
    • Insight
    • Invention Stories
    • How to
    • What Is
  • News
    • Electronic Products News
    • DIY Reviews
    • Guest Post
  • Forums
    • EDABoard.com
    • Electro-Tech-Online
    • EG Forum Archive
  • Digi-Key Store
    • Cables, Wires
    • Connectors, Interconnect
    • Discrete
    • Electromechanical
    • Embedded Computers
    • Enclosures, Hardware, Office
    • Integrated Circuits (ICs)
    • Isolators
    • LED/Optoelectronics
    • Passive
    • Power, Circuit Protection
    • Programmers
    • RF, Wireless
    • Semiconductors
    • Sensors, Transducers
    • Test Products
    • Tools
  • EE Resources
    • DesignFast
    • LEAP Awards
    • Oscilloscope Product Finder
    • White Papers
    • Webinars
  • EE Learning Center
  • Women in Engineering

Raspberry Pi camera QR code encoding and decoding

By Usman ali Butt

This tutorial is about creating a QR code (quick response code) using Raspberry Pi B and Python 3.7. QR code is an optical machine-readable code. Optical means it can be decoded using any camera device. A direct competitor of QR code is Bar code. QR’s advantage over Bar Code is it’s faster to read and can store much more information than Bar code. Any device with a camera can be turned in to QR code reader, whereas bar code needs a laser dedicated device to decrypt Bar codes.

For Raspberry Pi, a dedicated QR library/package is available for QR creation. To import the QR code package in the application code, you first need to install it. To install the package, open the Terminal of Raspberry Pi and type:

$ pip3 install qrcode

Note: If you are working with python 2 instead of pip3, use pip to install the library. You must use pip or pip3 to install all of your libraries or packages.

Encoding QR

A simple QR code generation using qrcode package is below.

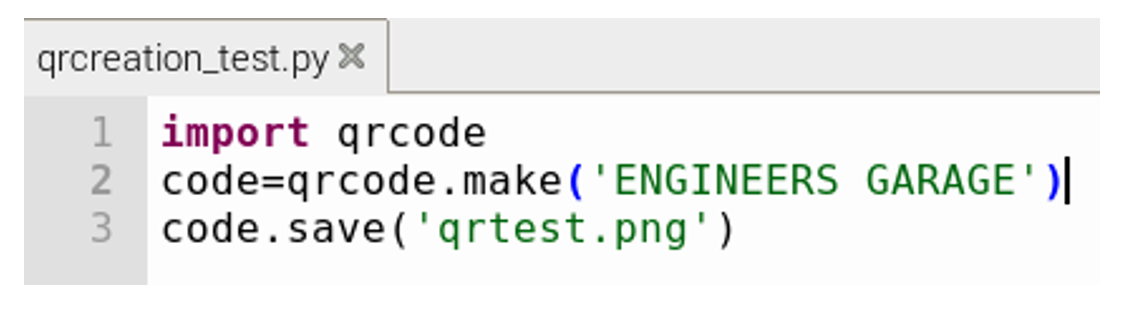
First, I imported the qrcode package into the application code. Then the statement qrcode.make(‘ENGINEERS GARAGE’) is encoding the text ‘ENGINEERS GARAGE’ in qrcode format. The encoded QR is saved in the code variable. Finally, to save the QR code in the image, I passed the file name code.save(‘qrtest.png’) in which the qrcode will be saved.

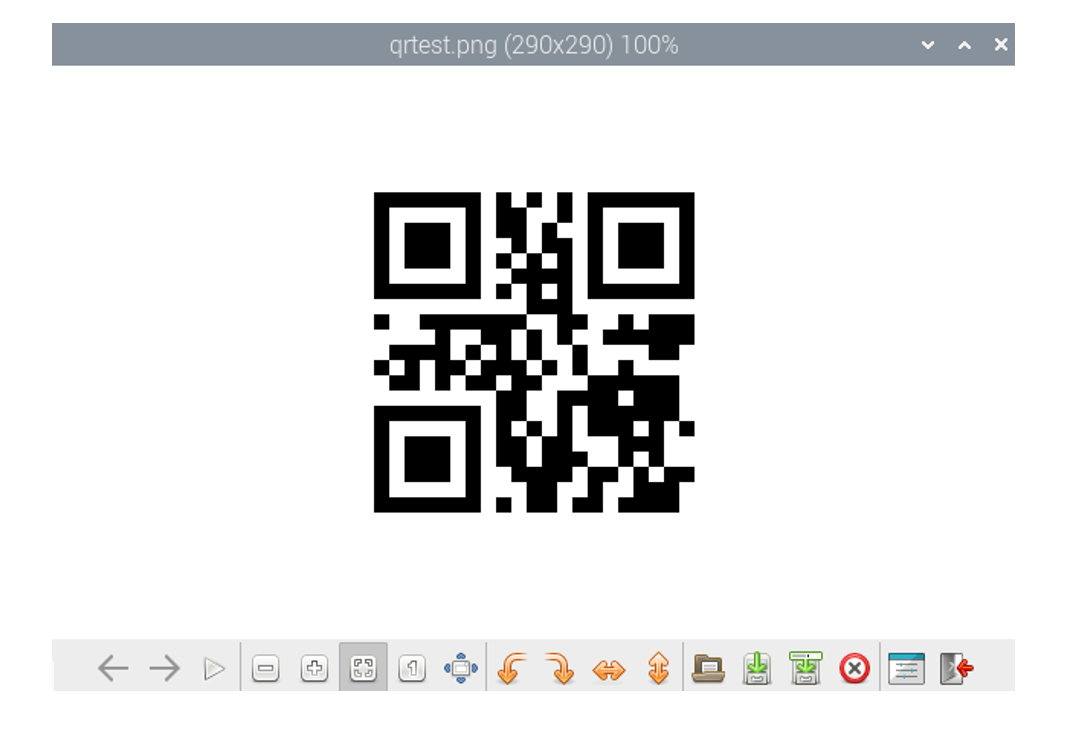
The output image is shown above. The size of the image is 290×290. Image parameters like size, color, background, borders, and QR box size can be adjusted using the qrcode library’s functions. You can import other image manipulation packages in the application code, and filters can be applied to the output image to enhance brightness, contrast and sharpness.

Decoding QR

To decode qrcode, we need to install some more packages. Zbarlight is a popular wrapper for python. It is used to decode and extract the qrcode from an image file.

Open Terminal in raspberry pi and enter the following:

$ apt-get install libzbar0 libzbar-dev

$ pip3 install zbarlight

Use pip if you are working with python 2. You may incur errors during compilation. Most probably, the error is a missing package. Zbarlight depends on other packages preinstalled in the Python directory, but sometimes you need to install them manually. Install all packages one by one (For each package installation, visit https://pypi.org/). If it says, PIL not found, install it using the command

pip install –no-index -f https://dist.plone.org/thirdparty/ -U PIL

After successful installation, import the zbarlight package in your code. You also need to import the image attribute from the PIL package. PIL package is used to import and work with images.

Variables and statements description

  • file_path variable is assigned the image address.
  • With open(file_path, ‘rb’) as image_file: Opens the file as image file
  • Image = Image.open(image_file) image object is created
  • load() loads the image object containing the pixel data
  • Codes = zbarlight.scan_codes([‘qrcode’],image) Fetches/decodes the text present in the pixels.

Finally print statement prints the decoded text.

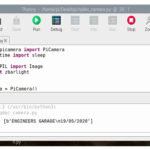
I used Thonny ide present in the Raspbian operating system to write and test code. On the left side, you can see the generated image placed on the desktop. You can see the Thonny ide qr in the extraction code. The qr image file path is pointing to the desktop. The result of the decode is displayed in the shell window beneath the code window.

Let’s Diy this project: Where to purchase parts?
Raspberry pi (Mouser Electronics)

You may also like:

  • Raspberry Pi 4
    RPi Python Programming 01: Introduction to Raspberry Pi 4

  • Raspberry Pi-based smart home security system

  • Raspberry Pi camera QR-code scanning

  • Getting started with Raspberry Pi
  • Python Basics
    RPi Python Programming 06: Python basics

Filed Under: Microcontroller Projects, Raspberry pi


Questions related to this article?
👉Ask and discuss on Electro-Tech-Online.com and EDAboard.com forums.


Tell Us What You Think!! Cancel reply

You must be logged in to post a comment.

HAVE A QUESTION?

Have a technical question about an article or other engineering questions? Check out our engineering forums EDABoard.com and Electro-Tech-Online.com where you can get those questions asked and answered by your peers!


Featured Tutorials

  • Adjustable 0 to 30V 2A DC Power Supply Circuit (Part 1/13)
  • Adjustable +/- 1.25V to +/-22V 1A Power Supply Circuit (Part 2/13)
  • Adjustable 0 to 15V 1A Mini Power Supply (Part 3/13)
  • Constant 12V Power Supply for LED Circuits (Part 4/13)
  • Constant +/-9V DC Symmetrical Power Supply Circuit (Part 5/13)
  • Making a Circuit Breaker (Part 6/13)

Stay Up To Date

Newsletter Signup

Sign up and receive our weekly newsletter for latest Tech articles, Electronics Projects, Tutorial series and other insightful tech content.

EE Training Center Classrooms

“ee

“ee

“ee

“ee

“ee

“ee

Recent Articles

  • STMicroelectronics and MACOM announce successful RF GaN-on-Si prototypes
  • Infineon expands its CoolSiC portfolio
  • STMicroelectronics and AWS collaborate for secure IoT connections
  • Pet feeding system using WhatsApp (protocol bridging with MQTT)
  • STMicroelectronics launches new MDmesh MOSFETs

Most Popular

5G 555 timer circuit 8051 ai Arduino atmega16 automotive avr dc motor display Electronic Part Electronic Parts Fujitsu ic infineontechnologies integratedcircuit Intel IoT ir lcd ldr led maximintegratedproducts microchip microchiptechnology Microchip Technology microcontroller microcontrollers mosfet motor powermanagement Raspberry Pi remote renesaselectronics Research robot samsung semiconductor sensor software STMicroelectronics switch Technology vishayintertechnology wireless

RSS EDABOARD.com Discussions

  • Space Vector PWM Help Needed
  • RFIC LNA cascode base and ground layout problem
  • Unable to launch virtuoso: libvisadev.so error
  • DIY test leads - source for lead ends?
  • P-Channel MOSFET always on

RSS Electro-Tech-Online.com Discussions

  • How to get lots of PCBs made cheap?
  • Adding Current Limit Feature to a Buck Converter
  • 24v dc relays not de-energising
  • How do I test amplifier speaker output polarity?
  • XOR Gate Circuit From Diodes
Engineers Garage
  • Analog IC TIps
  • Connector Tips
  • DesignFast
  • EDABoard Forums
  • EE World Online
  • Electro-Tech-Online Forums
  • Microcontroller Tips
  • Power Electronic Tips
  • Sensor Tips
  • Test and Measurement Tips
  • 5G Technology World
  • About Us
  • Contact Us
  • Advertise

Copyright © 2022 WTWH Media LLC. All Rights Reserved. The material on this site may not be reproduced, distributed, transmitted, cached or otherwise used, except with the prior written permission of WTWH Media
Privacy Policy | Advertising | About Us

Search Engineers Garage

  • Projects and Tutorials
    • Electronic Projects
      • 8051
      • Arduino
      • ARM
      • AVR
      • PIC
      • Raspberry pi
      • STM32
    • Tutorials
    • Circuit Design
    • Project Videos
    • Components
  • Articles
    • Tech Articles
    • Insight
    • Invention Stories
    • How to
    • What Is
  • News
    • Electronic Products News
    • DIY Reviews
    • Guest Post
  • Forums
    • EDABoard.com
    • Electro-Tech-Online
    • EG Forum Archive
  • Digi-Key Store
    • Cables, Wires
    • Connectors, Interconnect
    • Discrete
    • Electromechanical
    • Embedded Computers
    • Enclosures, Hardware, Office
    • Integrated Circuits (ICs)
    • Isolators
    • LED/Optoelectronics
    • Passive
    • Power, Circuit Protection
    • Programmers
    • RF, Wireless
    • Semiconductors
    • Sensors, Transducers
    • Test Products
    • Tools
  • EE Resources
    • DesignFast
    • LEAP Awards
    • Oscilloscope Product Finder
    • White Papers
    • Webinars
  • EE Learning Center
  • Women in Engineering