This article focus on the techniques in making a Raspberry Pi as a web server which controls the home appliances. It includes Graphical user interface in web server side and electronic part which is used to control the electrical system.
Here is a simple example of four LEDs controlled by web interface is used by utilizing apache web server with PHP and JAVA codings for GUI and electronic part is handled by WiringPI library.

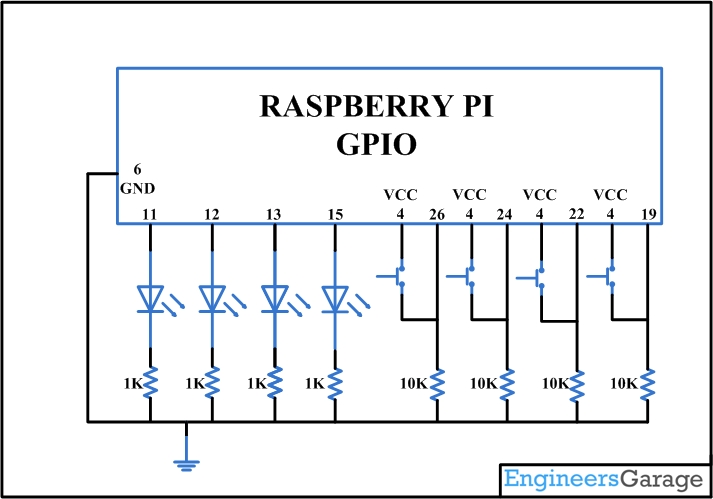
Web controlled LED connection diagram
Prerequisites & Equipment:
You are going to need the following:
-
A Raspberry Pi Model B or greater.
-
A USB WiFi Adapter (Edimax – Wireless 802.11b/g/n nano USB adapter is used here).
-
An SD Card flashed with the Raspbian OS (Here is a guide if you need)
-
Access to the Raspberry either via a keyboard and a monitor or remotely.
Installing Wiring Pi:
The Wiring Pi project is used here to switch the GPIO pins high and low. Run the following commands for downloading Wiring Pi and install.
sudo apt-get install git-core
git clone git://git.drogon.net/wiringPi
cd wiringPi
./build

Fig. 2: Download Wiring Pi On Raspberry Pi

Fig. 3: Installing Wiring Pi On Raspberry Pi
Let’s discuss about using the WiringPi library to turn on and off the first LED (Wiring pin 0). First need to set the pin as an output. Use the “gpio mode 0 out” command to do so. “0” is the wiring pin number and “out” is for output. Now you can use the “gpio write 0 1” command to turn on your LED. “0” is again the pin number and “1” is the status (1 for ON and 0 for OFF). If everything’s fine you should see your LED shining. By using the “gpio write 0 0” command you can turn it off.
If you want to use the actual pin number (GPIO-17) instead of the Wiring Pi number (0 is corresponding to GPIO-17), use the -g flag in your command. Ex: “gpio -g write 17 1” instead of “gpio write 0 1”.
The “gpio read” can be used to read the PIN status. It allows you to be sure of the pin’s status when you can’t see the Output. Using it is as simple as before, just type “gpio read 0” where “0” is the wiring pin number. The command returns the pin’s status (again 1 for ON and 0 for OFF).
Starting Apache web server:
Installing and Configuring of Apache web server is well discussed in previous articles. To start the server is simple as just copy the server files to the apache folder. Download the web server files and extract it to the home folder of Raspberry Pi using Samba webserver are FTP clients.
Copy these files to the apache web server folder which is /var/www and restart the web server. Now our website is alive you can navigate to the website by entering the IP address of the Raspberry Pi.
Controlling the LEDs with PHP:
We now have our apache web server and a Wiring Pi library. The PHP stands for “PHP: Hypertext Preprocessor” which will act as a bridge between these, and it’s a server side scripting language. It means that the PHP code is executed once (each time the page is requested) by the server and cannot be seen by the client. Executing system commands with a PHP code can be done with two different functions: exec (for execute) and system. Firstly, the “system” function. It takes two parameters: “system ( string $command, int $return_var )”.with this function you can execute “gpio mode 0 out” or “gpio write 0 1” commands.
Example:
<?php
system ( “gpio mode 0 out” );
system ( “gpio write 0 1” );
?>
Then, the “exec” function. This function is making exactly the same work than “system” but it reads and stores what the command printed. It takes three parameters: “exec ( string $command, array $output, int $return_var )”, again $command and $return_var are the same parameters and the only difference is the $output array. Thus, you can use this function if you need what the command prints like with the “gpio read 0” command.
Example:
<?php
exec ( “gpio read 0”, $status );
print_r ( $status );
?>
Building Graphical Interface:
We can now control our Raspberry Pi with simple PHP scripts, but the interaction with the user is pending. This can be done by the combination of Java script and the HTML. Each picture/bulb is corresponding to its LED, if you click on one of these, the LED corresponding will be turned on/off and the picture also will be changed accordingly. The page’s skeleton will be made with HTML, the server interactions with PHP and at finally JavaScript to manage interactions between the user and page’s animation. JavaScript is a client side language which is executed continuously by our browser. That’s why we can change the page’s look without reloading it. We first need an “index.php” file (extension is .php and not .html because we will use PHP code, it commands the browser that there is PHP to execute before sending the page). This main page contains 4 buttons with Bulb Picture. These buttons are first generated with a “exec ( “gpio read “.$i, $output );” and a for loop to replicate. To detect the user clicking on any one of these buttons, Java script is used which is in a separate file called “script.js” even though it’s still included in index.php. The script is to add an event listener to all of the four buttons and when one of these is pressed, it uses a function which is calling for gpio.php, receiving the answer then returning to the JavaScript which changes the button to ON or to OFF. You can download the full codes directly here.

Fig. 4: Building Raspberry Pi Graphical Interface
Project Source Code
###
//Program to###
Project Source Code
###
//Program to###
Circuit Diagrams
Project Components
Project Video
Filed Under: Electronic Projects, Raspberry pi.
Filed Under: Electronic Projects, Raspberry pi.

Questions related to this article?
👉Ask and discuss on Electro-Tech-Online.com and EDAboard.com forums.
Tell Us What You Think!!
You must be logged in to post a comment.