This is the Article to introduce the programming of ARM Cortex-M3 LPC1768 Microcontroller. First step in this journey is to get yourself introduced to the programming Environment. For programming LPC1768 plenty of free software are available online. For ARM-based Microcontrollers it is suggested to go with Keil µVision4. For the beginner, Demo version of Keil is more than enough to start with. Let’s start with the brief introduction to the LPC1768 ARM cortex M3 based Microcontroller.
CAN communication between PIC and Arduino
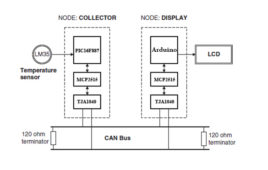
This project helps in understanding the insights of CAN protocol interfacing two different Microcontroller for example, PIC and Arduino. Controller Area Network or CAN protocol is a methodology of communication between various electronic devices like engine management systems, gear control, active suspension, ABS, lighting control, air conditioning, airbags, central locking etc. embedded in an automobile. For further learnings refer this article.
Temperature sensing using PIC microcontroller CAN interface

This project helps in understanding the insights of CAN protocol interfacing with PIC Microcontroller. Controller Area Network or CAN protocol is a methodology of communication between electronic devices like engine management systems, gear control, active suspension, ABS, airbags, lighting control, air conditioning, central locking etc. embedded in an automobile. For further learnings refer this article.
CAR REVERSE GUIDE USING CAN PROTOCOL

This Project is to design and implement an Ultrasonic Vehicular Parking Aid Display, which notifies the driver about obstacles coming in the way of parking. In light of the emerging traffic situation where parking space is at a premium such a device can be very useful and also facilitate parallel parking easily. The implementation of the idea with the ultrasonic sensor interfaced with Arduino and the technical details of this project follows later.
SPEEDOMETER USING ARDUINO AND CAN PROTOCOL

This Article is to make readers to explore about how Speedometer works in modern cars. Here you can get an idea on the CAN Bus which is used in the Communication of Sensors, Actuators and controllers in a car.Controller Area Network or CAN protocol is a methodology of communication between various electronic devices like engine management systems, gear control, active suspension, ABS, airbags, lighting control, air conditioning, central locking etc.
CLONING OF ARDUINO
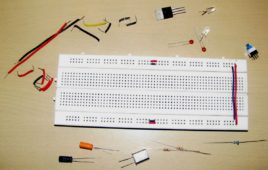
There are numerous motivations to assemble your own Arduino circuit on a breadboard or PCB. It consumes less space in the breadboard, cheaper than Arduino boards or perhaps you won’t be utilizing a shield, yet despite everything you need an Arduino as the heart of your Project.The following steps will outline how to assemble the circuit on a breadboard.
Creating Library for LPC1768- (Part 2/21)
This is the one another Article to introduce the programming of ARM Cortex-M3 LPC1768 Microcontroller. Most tutorials will use pre made libraries in the following tutorials. Sometimes it is needed to make a new library for your own project. This tutorial explains how making a custom library in Keil and this also includes a library built for the GPIO functions of the LPC1768. Setting up the Environment for the development of ARM cortex M3 is well discussed in this article.
JTAG Debugging With LPC1768- (Part 3/21)

The process of resolving bugs or defects that interferes with the proper working of a computer software or an operating system is known as Debugging. This write-up deals with the setup and use of a JTAG Debugger with ARM Cortex M3 Microcontroller. For setting up the Environment for the development of ARM cortex M3 refer this article.
Switch and Led interface with LPC1768- (Part 4/21)

This is the one another Article to introduce the programming of ARM Cortex-M3 LPC1768 Microcontroller. Here we are going to do input and output functions of GPIO of LPC1768. For better understanding we are going to use a button and the LED. Our idea is to program in such a way that when the button is pressed, the LED will be ON. Setting up the Environment for the development of ARM cortex M3 is well discussed in this article.
LCD interface in 4bit mode with LPC1768- (Part 5/21)

Interfacing of 5V LCD with a 3.3V Controller like LPC1768 is little tricky to handle. This is the Article to explain how a 16×2 LCD is interfaced with LPC1768 in 4-bit mode. LCD in 4 bit, which means we are going to use 4 lines instead of 8 line which save 4 GPIOs which can be used for other purposes. For setting up the Environment for the development of ARM cortex M3 is well discussed in this article.
Timers Programming in LPC1768- (Part 6/21)
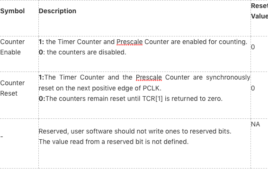
This is the Article to introduce the Timer programming of ARM Cortex-M3 LPC1768 Microcontroller. Here we are going to initialize the timer peripheral in LPC1768. Timer will improve the way of usage of any microcontroller. In this tutorial we are going to set up two timers which will blink two LEDs according to the setting of the timers. Setting up the Environment for the development of ARM cortex M3 is well discussed in this article.
DATA ACQUISITION ROBOT
This Project aims in the building of one application of robots in the automation of Collecting environmental aspects. The robot supports remote performance monitoring and maintenance of various factors of the environment in any given area. The details of the design, setup and the use of the robot in Data Acquisition (DAQ) system are given here. The sensors provide accurate and reliable real time data needed for autonomous monitoring and control of any type of area or industry. Data Acquired by the proposed system can be remotely accessed, plotted and analyzed. This provides a fully automated solution for the monitoring and control of remote locations.
ARDUINO BASED PHOTOVORE ROBOT
Sometimes Electronics hobbyist gets ideas to build robots from animals in nature. There are robot dogs, robot snakes, robot birds, and even robotic insects! In this project, you will build a robot of your own which will automatically drive chases a light source, mimicking a behavior called photo-taxis, seen in some insects and flowers. This is a robot that chases light, for this to work, the robot needs at least two lights detecting sensors, out in front and spaced apart from each other.
ANDROID GESTURE CONTROLLED ROBOT

This article is to make a gesture controlled robot or car. It will help you in building an gesture based android controlled robot without any experience in android app development by providing you the free android app. This app consists of touch and voice controlling interface of your robot. It is simple to start with downloading the app to your phone/tablet and start building your robot by following steps.
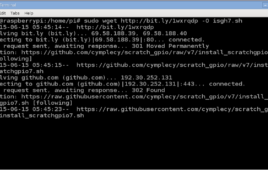
How to configure Scratch GPIO- (Part 1/12)
Scratch is a programming tool for creating embedded games,stories and animations without using any written codings, rather using visually organized syntax which is in blocks with a drag-and-drop interface. One can use these blocks according to one’s requirement, scratch’s control of hardware is not only limited to the external inputs such as the keyboard and mouse.This article explains how to configure Scratch to extend its power to access GPIO(General Purpose Input and Output) of the Raspberry Pi.
Raspberry Pi to Light a Led using Voice Control- (Part 2/12)
Now voice control is not only limited to high end devices such as smart phones or iPhones. The Raspberry Pi, which is an open source hardware and completely customizable offers you the same. Plus, it’s cheap! You can customize it to play music, open gmail or maybe tell you some jokes.Here is a simple yet interesting example on how to customize your Raspberry Pi to light a led using voice control. In this tutorial we will learn how to install Voice Command, and making the configuration to turn a Led on and off.
How to Connect Raspberry Pi to WiFi- (Part 3/12)
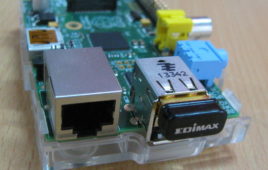
This article is to make the procedure of setting up the WiFi. The Raspberry Pi is connected to Windows PC through Ethernet cable and the GUI is obtained using a VNC server. Although Raspberry Pi Model B comes with 100Mbps wired Ethernet, it is also essential to connect WiFi.The best arrangement is to purchase a cheap USB WiFi connector and utilize one of the USB ports to get to our WiFi home router. Setting up a Raspberry Pi utilizes the Raspbian OS to get to your remote system is simple – This article will guide you through the procedure.
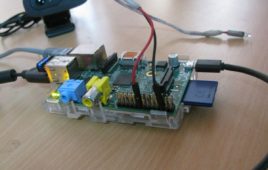
Setup Apache Web Server- (Part 4/12)
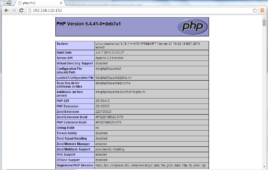
This article is to provide step by step instructions for making Raspberry Pi as a web server where we can publish our web pages over local network. Apache is a prevalent web server application you can introduce on the Raspberry Pi to permit it to serve pages. All alone, Apache can serve HTML documents over HTTP, and with extra modules can serve element website pages utilizing scripting tools, for example, PHP. The fundamental services which are required to turn your Raspberry Pi into a web server are, Apache (the web server itself), PHP (scripting language).
Transferring Files from a Windows PC to Raspberry Pi- (Part 5/12)

This article is to make the process of transferring files from a Windows PC to Raspberry Pi easier. The Raspberry Pi is connected to a Windows PC through Ethernet cable and the GUI is obtained using a VNC server. Sharing files between Raspberry Pi and Windows is often very useful for Raspberry Pi users. Whether we need to transfer media files to the Raspberry Pi or want to share some software packages. This article discusses how to enable file sharing for a folder on the Raspberry Pi running the Raspbian OS.Microsoft developed the protocol called Common Internet File System (CIFS) for transfer of files between windows machines. The most popular implementation of CIFS in LINUX system is known as Samba and it allows Raspberry Pi to act as a CIFS file server, which allows a Windows PC to mount a folder on a Raspberry Pi and then allowing to modify(copy, delete, read and write) the files on it.
GETTING STARTED WITH CAN INTERFACE WITH ARDUINO
This Article is to make readers to explore about how to interface CAN Bus with Arduino which is used in the Communication of Sensors, Actuators and controllers in a car.This project helps in understanding the insights of CAN protocol interfacing with Arduino. Controller Area Network or CAN protocol is a methodology of communication between various electronic devices like engine management systems, gear control, active suspension, ABS, lighting control, air conditioning, airbags, central locking etc. embedded in an automobile. For further learnings refer this article.