A network that implements snmp protocol consist of two broad entities.
- SNMP Agents
- SNMP Managers
An Snmp Agent is a program that is installed on a particular hardware. It gathers the data about hardware(Temperature, Status etc) and keeps the data with him. Snmp Manager is device that gets data from snmp agent. Snmp managers requests the agents to send particular data when ever is needed. Snmp protocol has a defined format for data fetching called MIB(Management Information Base). Manager’s call this mib for fetching data and agents gather data across this mib. Mib is a hierarchical structure of data placement and format etc. This tutorial will not go in deep details of snmp protocol rather it will only focus on implementing snmp on arduino Ethernet shield. If you are a newbie and want to learn more i suggest to google snmp details and structure.
Snmp(Manager) uses pull mechanism to fetch data from remote locations(Agents). Snmp is advantageous only if we do not need our data regularly. Since its a pull method so fetching data regularly will place heavy load on manager. In case we regularly and instantaneously need data we have to implement push protocols such as MQTT etc. In push protocol the agent sends data to manager when any condition is meet or an intrusion is detected.
Demo Snmp over Arduino Project: LM35 Temperature monitoring over network

Snmp Manager Software
Snmp Agent
Project Circuit Diagram
|
Mount Arduino Ethernet shield on Arduino uno. Connect LM35 Vout pin to Analog channel-0 of arduino. Vout is middle pin of lm35. Ground gnd pin of lm35 with arduino ground. Apply vcc +5 volts to another pin of lm35, connect it to +5 volt pin of arduino. Insert on end of network cable in RJ45 port of arduino Ethernet shield and connect other end of network cable to PC or your lap top on whom you installed the snmp manager.
Note: You can use any other arduino board if you want. Code is compatible with all arduino boards mega etc. Make sure to use TTL level boards. Arduino due is a +3.3v board, Ethernet shield will not work with it. If you are new and don’t know about LM35 Pin out, its internal structure and formula derivation for arduino than i have some good tutorial for you. |
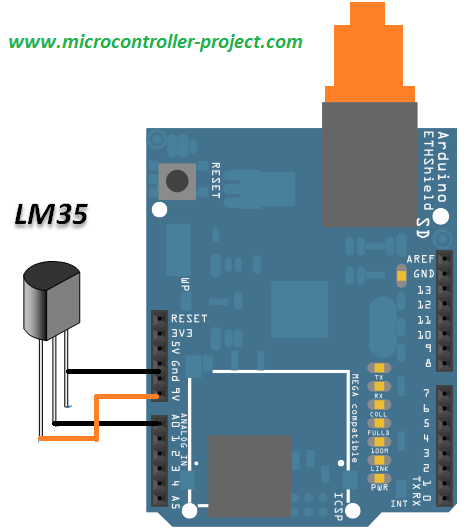
Arduino Ethernet shield with LM35 temperature sensor- SNMP
|
System OID’s
const char sysDescr[] PROGMEM = “1.3.6.1.2.1.1.1.0”; // System Description
const char sysContact[] PROGMEM = “1.3.6.1.2.1.1.4.0”; // System Contact
const char sysName[] PROGMEM = “1.3.6.1.2.1.1.5.0”; // System Name
const char sysLocation[] PROGMEM = “1.3.6.1.2.1.1.6.0”; // System Location
const char sysServices[] PROGMEM = “1.3.6.1.2.1.1.7.0”; // System Services
Custom OID’s
const char temperatureC[] PROGMEM = “1.3.6.1.3.2016.5.1.0”; //Temperature in Celsius
const char temperatureF[] PROGMEM = “1.3.6.1.3.2016.5.1.1”; //Temperature is Fahrenheit
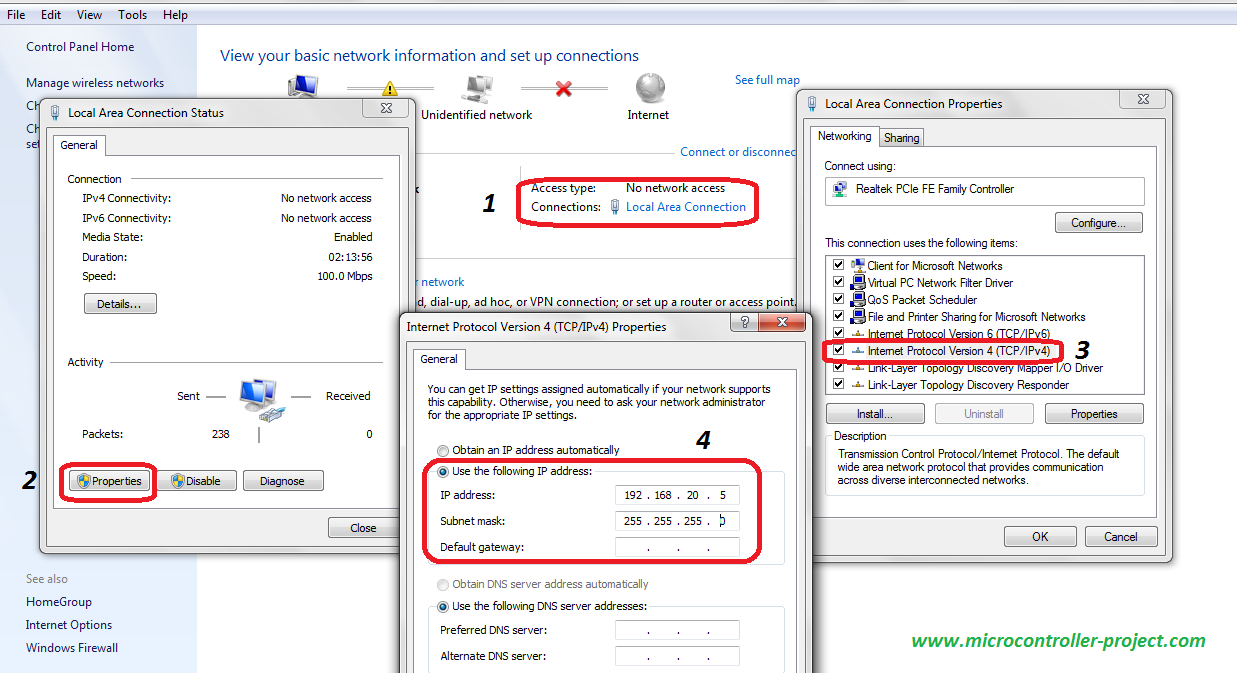
Testing the Snmp Agent and Manager
static byte mac[] = { 0xDE, 0xAD, 0xBE, 0xEF, 0xFE, 0xED }; //Mac Address for Arduino Ethernet Shield
static byte ip[] = { 192, 168, 20, 6 }; //IP Address for Arduino Ethernet Shield

Watch the project video and results here
Filed Under: Arduino, Microcontroller Projects

Questions related to this article?
👉Ask and discuss on EDAboard.com and Electro-Tech-Online.com forums.
Tell Us What You Think!!
You must be logged in to post a comment.