Recently we started a project to interface real time clock(RTC) DS3231 with atmega32 microcontroller. First we wrote program in atmel studio ide, our logic worked and hardware was responding as desired. Then we need some other sensors to be interfaced with the same system. So we decided to move from atmel studio to arduino ide because of the ease that can be found in working with arduino ide. In atmel studio we have to initialize registers and other stuff by our own. In arduino ide their are predefined libraries build we only have to call the functions that are required by the particular application.
Arduino ide does not directly support the atmega32 microcontroller. Some third party drivers are written by geeks that make atmega32 to be programmed by the arduino ide. So to work with atmega32 microcontroller in arduino ide we have to make some changes in files and add some new files in the arduino directory.
Atmega32 Microcontroller Arduino IDE SupportFirst of all we have to make atmega32 visible in arduino ide. For that we have to append our boards.txt file. This file contains the list of arduino boards that are currently installed and supports arduino ide. You can locate this file at C:\Program Files (x86)\Arduino\hardware\arduino\avr\boards.txt. Open the file and at the end place the code that is at the right side.
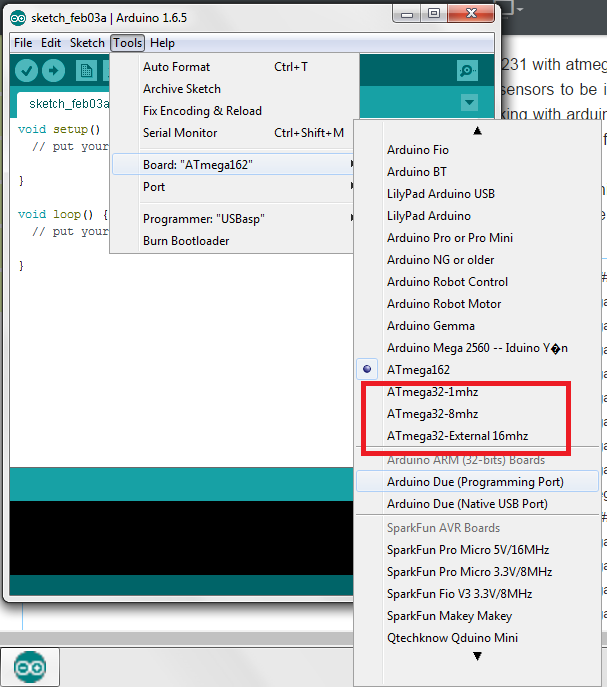
Atmega32 microcontroller support for arduino ide
|
##############################################################
mega32-1.name=ATmega32-1mhz mega32-1.build.mcu=atmega32 mega32-1.build.f_cpu=1000000L mega32-1.build.core=arduino:arduino mega32-1.build.variant=mega32 mega32-1.upload.maximum_size=32000 mega32-1.bootloader.low_fuses=0xE1 mega32-1.bootloader.high_fuses=0xD9 #mega32-1.bootloader.extended_fuses=0xFD ############################################################## mega32-8.name=ATmega32-8mhz mega32-8.build.mcu=atmega32 mega32-8.build.f_cpu=8000000L mega32-8.build.core=arduino:arduino mega32-8.build.variant=mega32 mega32-8.upload.maximum_size=32000 mega32-8.bootloader.low_fuses=0xE4 mega32-8.bootloader.high_fuses=0xD9 #mega32-8.bootloader.extended_fuses=0xFD ############################################################## mega32-16.name=ATmega32-External 16mhz mega32-16.build.mcu=atmega32 mega32-16.build.f_cpu=16000000L mega32-16.build.core=arduino:arduino mega32-16.build.variant=mega32 mega32-16.upload.tool=avrdude mega32-16.upload.maximum_size=32000 mega32-16.bootloader.low_fuses=0xEF mega32-16.bootloader.high_fuses=0x89 #mega32-16.bootloader.extended_fuses=0xFD ############################################################## |
After appending the boards.txt file you can see that the atmega32 is now visible in arduino ide. Atmega32 microcontroller is visible with three frequencies. Two internal and one external. If you want to use internal RC oscillator their are 2 clock speeds supported by arduino ide, 1Mhz and 8Mhz. For external crystal only one frequency is supported 16Mhz. So you have three options to worked with. You can go with any one you want.
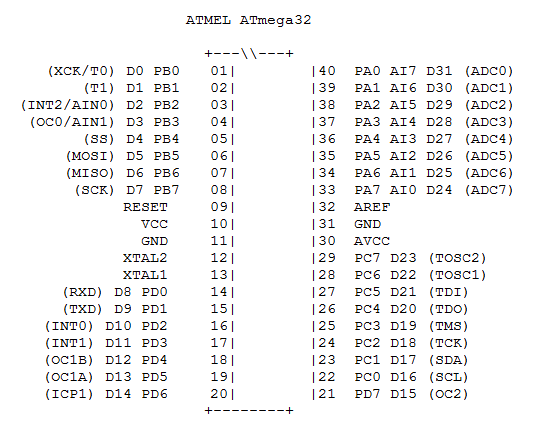
Atmega32 microcontroller pinout for arduino ide.
|
Defining Pins
After the boards appeared in the arduino ide now its time to define the atmega32 pins to which we program using arduino ide. Navigate to C:\Program Files (x86)\Arduino\hardware\arduino\avr\variants and paste the folder atmega32 in their. You can download the folder from below. |
The original pin out of atmega32 is not same as the pin allotted for programming in arduino ide. The original pins are numbered form 1,2,3–40. Where as the pins number’s that are defined to be used for programming in arduino ide are D0,D1,D2—D31. Recall arduino in which for programming the pins are numbered from D0-D13. Same rule applies here. So for programming in arduino ide one should use the number starting with letter ‘D’. Now its all ready full support for atmega32 has been added to arduino ide and now one can program the atmega32 microcontroller with arduino ide.
Note: Their are some limitations you can not program the atmega32 like you program the arduino. Since their is no boot loader written for atmega32. So we need an external programmer to program the atmega32. I am using USBasp for this purpose.
Seven Segment display interfacing with atmega32A and programmed using Arduino IDE
|
Now its time to test the new arduino ide settings. I am going to interface 7- segment display with atmega162 microcontroller. 7-segment display is connected to Port-A of microcontroller. Numbers 0 to 9 are going to be displayed on the 7-segment display. Common Anode 7-segment display is used in the project. So please make sure that common anode seven segment is connected to the Port-A. I am using external 16Mhz crystal for clock input to the microcontroller.
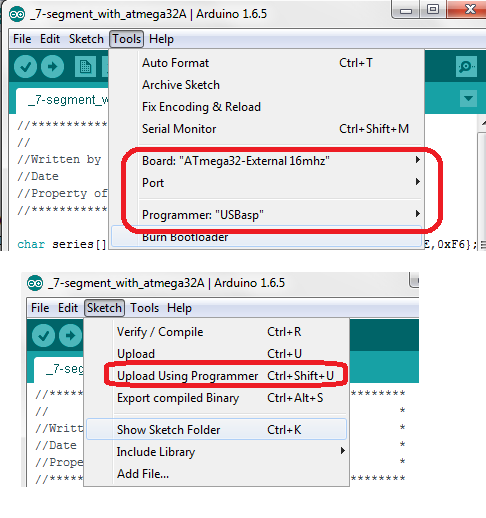
Atmega32 arduino ide USBasp Programmer selection
|
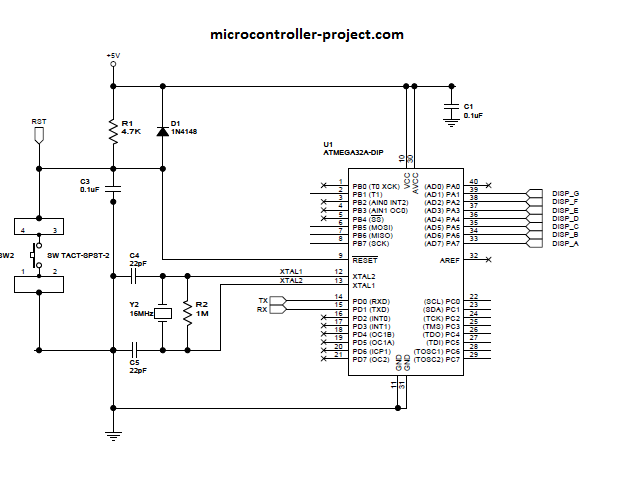
7-segment display interfacing Atmega32A microcontroller
While uploading the code please be sure that you selected the correct clock speed for atmega32 microcontroller. Since i am using external 16Mhz microcontroller so i selected the board as “Atmega32-External16Mhz”. Select the appropriate programmer for uploading the code. I am using USBasp programmer. So i selected it. Numerous other popular programmers are available in market so be sure that you selected the correct programmer before uploading the code. Since we are using an external programmer so we have to upload the code using the “Upload Using Programmer” option. The option can be found under Menu> Sketch. The pic at the left side shows about the board and programmer selection and the upload option.
|
I also tested the atmega32 I2C interface by connecting the DS3231 and programmed using arduino ide and it works fine. But the serial interface does not worked for me. So i decided to initialize the uart registers individually. Uart interface tutorial link is below, visit it to see the uart configuration and working. “Atmega32A Uart Programmed with Arduino IDE”
Download the Project code .ino file and give us your feed back on the post. For more projects related to Atmega32A microcontroller please search the site.
Filed Under: Arduino Projects, Microcontroller Projects
Log in to leave a comment:
Lost your password?
Don't have an account? Register here