The post explains about how to make clock and calendar using internal timers of arduino uno. No external RTC(real time clock) is used on the project. Only Arduino internal tick timer(delay function) is utilized to build clock and calendar system with arduino uno. Clock and calendar with Arduino is a complex project, since the code is too lengthy it will be difficult to understand the code flow. Before beginning i assume that you have basic knowledge of number of days in a week, number of weeks in a month, number of months in a year, number of days in months, number of days in a year and about leap year. The project clock and calendar with arduino is designed keeping in mind all the key features of clock and calendar. If you know about all the key features of clock and calendar than you can easily understand the code below.
Arduino clock and calendar
Arduino clock and calendar – project requirements
- Arduino Uno.
- 16×2 lcd.
- Potentiometer to adjust lcd contrast.
- 4×4 keypad to adjust time and date.
Arduino clock, calendar working principle and schematic
Time and date are displayed on 16×2 character lcd. To set time and date a 4×4 keypad in interfaced with arduino to input the date and time. Character lcd 16×2 is interfaced with Arduino(Microcontroller board) in 4-bit mode. Coulombs of keypad are connected to Pin 0,1,2,3 of arduino and rows are connected to Pins 4,5,6 & 7. Circuit diagram of the project is given below. Lcd data pins are connected to arduino pins#8,9,10,11. Lcd rs(register select) pin is connected to pin#13 of arduino. Lcd E(enable) pin is connected to pin#12 of arduino. Lcd r/w(read/write) pin is grounded directly, to only perform the write operation, no read operation.
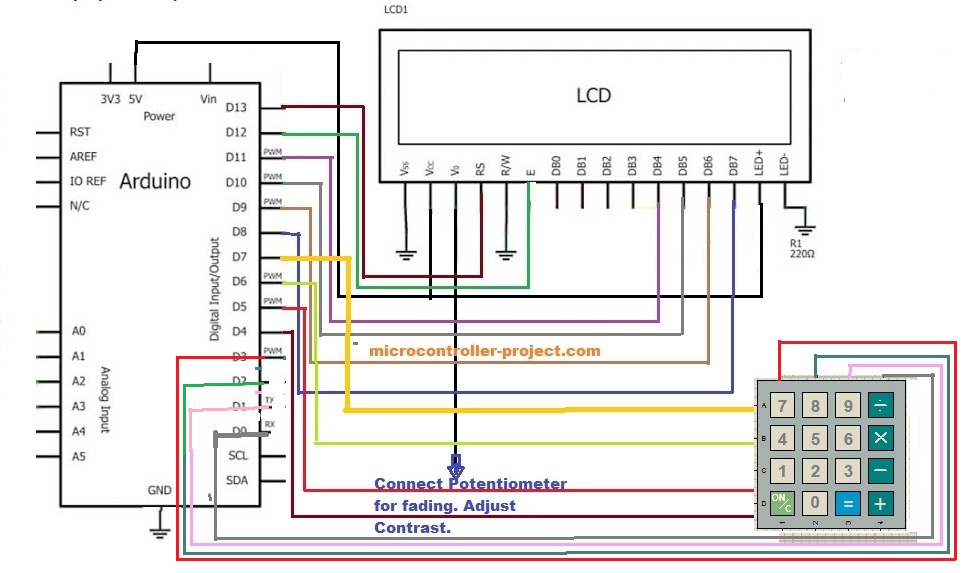
Clock and Calendar with arduino 4×4 keypad and 16×2 lcd- circuit diagram
How arduino clock calendar system works
When you first upload the code/sketch in arduino uno. A message will pop up on 16×2 character lcd asking to input date (year,month,day) and time(hour,minute). You have to enter the current date and time. Once you input the time and date clock will start working automatically.
After the time input seconds will be displayed on lcd and starts to increment one by one. When seconds reach to 60 a minute will be incremented and seconds starts to count again from 0. When hours reaches to 24 date will be incremented. When date reaches the month end month will be incremented and when its end of December year will be incremented. All the months and year days logic are included in the code. Code has the ability to recognize a leap year and increment calendar days like leap year.
After the time input seconds will be displayed on lcd and starts to increment one by one. When seconds reach to 60 a minute will be incremented and seconds starts to count again from 0. When hours reaches to 24 date will be incremented. When date reaches the month end month will be incremented and when its end of December year will be incremented. All the months and year days logic are included in the code. Code has the ability to recognize a leap year and increment calendar days like leap year.
Adjusting arduino clock time and calendar date
If you want to adjust time and date at any time just press 1 on keypad. A message will popup on 16×2 character lcd asking to input time and date. If you input any wrong information like you input seconds=70 or minutes=63 System will take it as an error and inform you at the instance that you inputted the wrong data. All the necessary checks are included in the code.
Its impossible to explain each and every statement of the code. I will recommend you to go through the tutorials below. The Code below is written using the same concepts explained in the tutorials below.
Note: I am using 4×4 keypad in my project. Since their are 16 buttons in 4×4 keypad 4×4=16 and I require only 10 buttons for digits. So i used first ten buttons of keypad. Remaining six are void. Their is nothing on them if you press them nothing will be going to happen.
Arduino clock calendar buttons functions
- BUTTON 1 – Scanning 1 ( first row first coulomb)
- BUTTON 2 – Scanning 2 ( first row second coulomb)
- BUTTON 3 – Scanning 3 ( first row third coulomb)
- BUTTON 4 – Scanning 4 ( first row fourth coulomb)
- BUTTON 5 – Scanning 5 ( second row first coulomb)
- BUTTON 6 – Scanning 6 ( second row second coulomb)
- BUTTON 7 – Scanning 7 ( second row third coulomb)
- BUTTON 8 – Scanning 8 ( second row fourth coulomb)
- BUTTON 9 – Scanning 9 ( third row first coulomb)
- BUTTON 10 – Scanning 0 ( third row second coulomb)
- BUTTON 11 – void-nothing-is empty ( third row third coulomb)
- BUTTON 12 – void-nothing-is empty ( third row fourth coulomb)
- BUTTON 13 – void-nothing-is empty ( fourth row first coulomb)
- BUTTON 14 – void-nothing-is empty ( fourth row second coulomb)
- BUTTON 15 – void-nothing-is empty ( fourth row third coulomb)
- BUTTON 16 – void-nothing-is empty ( fourth row fourth coulomb)
Find more clock and calendar projects. Each project contains free source code and circuit diagram of the project.
Download the project code and arduino sketch .ino file. Please give us your feed back on the project. If you have any queries regarding post please write them below in the comments section.
Filed Under: Arduino, Microcontroller Projects

Questions related to this article?
👉Ask and discuss on EDAboard.com and Electro-Tech-Online.com forums.
Tell Us What You Think!!
You must be logged in to post a comment.