An electrical design engineer by profession, Sandeep Sharma is a part time hobbyist who likes to experiment with electronic projects, especially involving Arduino. With an aim to share his knowledge about arduino and embedded projects, he owns a website as well as a YouTube channel through which he showcases certain interesting projects.
In one of his Arduino based projects, he made a unique use of old DVD drives to build a DIY CNC Plotter at home. This machine is not only inexpensive but also quite easy to construct and operate. Presented here, is one of his exciting DIY projects that illustrates the construction and coding of an arduino based mini CNC plotter.
In order to build the CNC machine, he gathered the hardware in the required amount. All these components are easily available at a low cost including 2 scrap DVD drives, 1 arduino UNO/MEGA, 1 L293D motor shield, a mini servo motor, a pen, 8 bolts measuring 50 mm each with nuts and washer, other tools like glue and some pieces of 5mm tubes. After this, he arranged for the required versions of software i.e. Arduino IDE (Version 1.6.3), Processing IDE (Version 3.0.2), and Inkscape (Version 0.48.5).
The idea behind the project was to build an X and a Y axis with the help of the metal cases and the stepper motor trays of unused DVD drives. Arduino was used as the brain of the project where the CNC code was uploaded. Moreover, it also sent instructions to the motor shield to run the stepper motor.
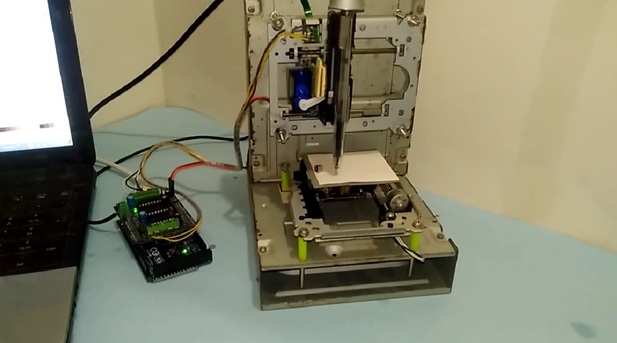
DIY CNC Plotter Using Old DVD Drives (Image Courtesy: mitricks.in)
Moving on, Sandeep used the motor shield to control the two stepper motors on the x and Y axes along with the servo motor. This servo motor drove the pen servo up and down thereby enabling the machine to plot images on a piece of paper, much like a 3D printer.
As far as the software part is concerned, he used the Arduino IDE to upload the code to the arduino, followed by the Processing IDE to stream the G-code to the arduino. Since the system couldn’t understand the usual format of the file used by him, he used Inkscape software to prepare the required G-code file.
In order to prepare the whole setup, he took two scrap DVD drives, unscrewed them, and took out the internal trays. Then he fixed the stepper motor part on each of the metal cases with the help of nuts, bolts, washers, and tubes. This gave him two identical structures which were then affixed in a way so as to build the X and Y axes.
The portion with the stepper motor on the drives on the Y-axis was used to fit a pair of shutter drives which could hold the pen. He also attached a servo motor on the pen holder in such a way that tip of the motor could lift and drop the pen as and when required. This served as the Z-axis of the machine. For the X-axis, he simply used a piece of cardboard to provide the base or platform on which the pen would plot the desired image/text.
After all the axes were in place, he got started with the wiring of the arduino, motor shield, and the servo motor. To start with, he took the motor shield and used its blocks on the edges to connect the wires of the internal drives so as to connect both the X and Y axes to the shield. Now he connected the servo motor to the shield and arranged for the power supply.
Post all the wiring; he mounted the shield on the Arduino UNO, which is the main brain of the project.
Now for the machine to fetch the information about the design, he uploaded the CNC code to the Arduino IDE and prepared the G-Code of the text file. Then he used the Processing IDE to transmit the G-code to the Arduino. Now as he clicked on the play button and chose the text file that he wished to plot, the programming led the Arduino to instruct the machine and move the servo motor.
This movement further enabled the pen to move in a pattern which eventually prepared the desired text on the cardboard sheet. Later he also demonstrated the plotting of an image which is shown in the video. Hence, he was able to plot a text as well as an image on a piece of paper by using old DVD drives, a set of commonly available electronics components, and his knowledge about Arduino.
For complete details of the project, refer to the URL mentioned in the source below.
Filed Under: Arduino, Reviews

Questions related to this article?
👉Ask and discuss on Electro-Tech-Online.com and EDAboard.com forums.
Tell Us What You Think!!
You must be logged in to post a comment.