Engineers Garage

  • Projects and Tutorials
    • Electronic Projects
      • 8051
      • Arduino
      • ARM
      • AVR
      • PIC
      • Raspberry pi
      • STM32
    • Tutorials
    • Circuit Design
    • Project Videos
    • Components
  • Articles
    • Tech Articles
    • Insight
    • Invention Stories
    • How to
    • What Is
  • News
    • Electronic Products News
    • DIY Reviews
    • Guest Post
  • Forums
    • EDABoard.com
    • Electro-Tech-Online
    • EG Forum Archive
  • Digi-Key Store
    • Cables, Wires
    • Connectors, Interconnect
    • Discrete
    • Electromechanical
    • Embedded Computers
    • Enclosures, Hardware, Office
    • Integrated Circuits (ICs)
    • Isolators
    • LED/Optoelectronics
    • Passive
    • Power, Circuit Protection
    • Programmers
    • RF, Wireless
    • Semiconductors
    • Sensors, Transducers
    • Test Products
    • Tools
  • EE Resources
    • DesignFast
    • LEAP Awards
    • Oscilloscope Product Finder
    • White Papers
    • Webinars
  • EE Learning Center
    • Design Guides
      • WiFi & the IOT Design Guide
      • Microcontrollers Design Guide
      • State of the Art Inductors Design Guide
  • Women in Engineering

Fastest Finger First (without microcontroller or IC)

By Gurmeet Singh

REQUIREMNTS:

1. Relays (4 SPDT in 1)- Qty. 4
2. Relay base (refer to pictures below)
3. Power supply (12 V; depends upon the power rating of the relay used)
4. 4 SPST switches

CIRCUIT DIAGRAM:

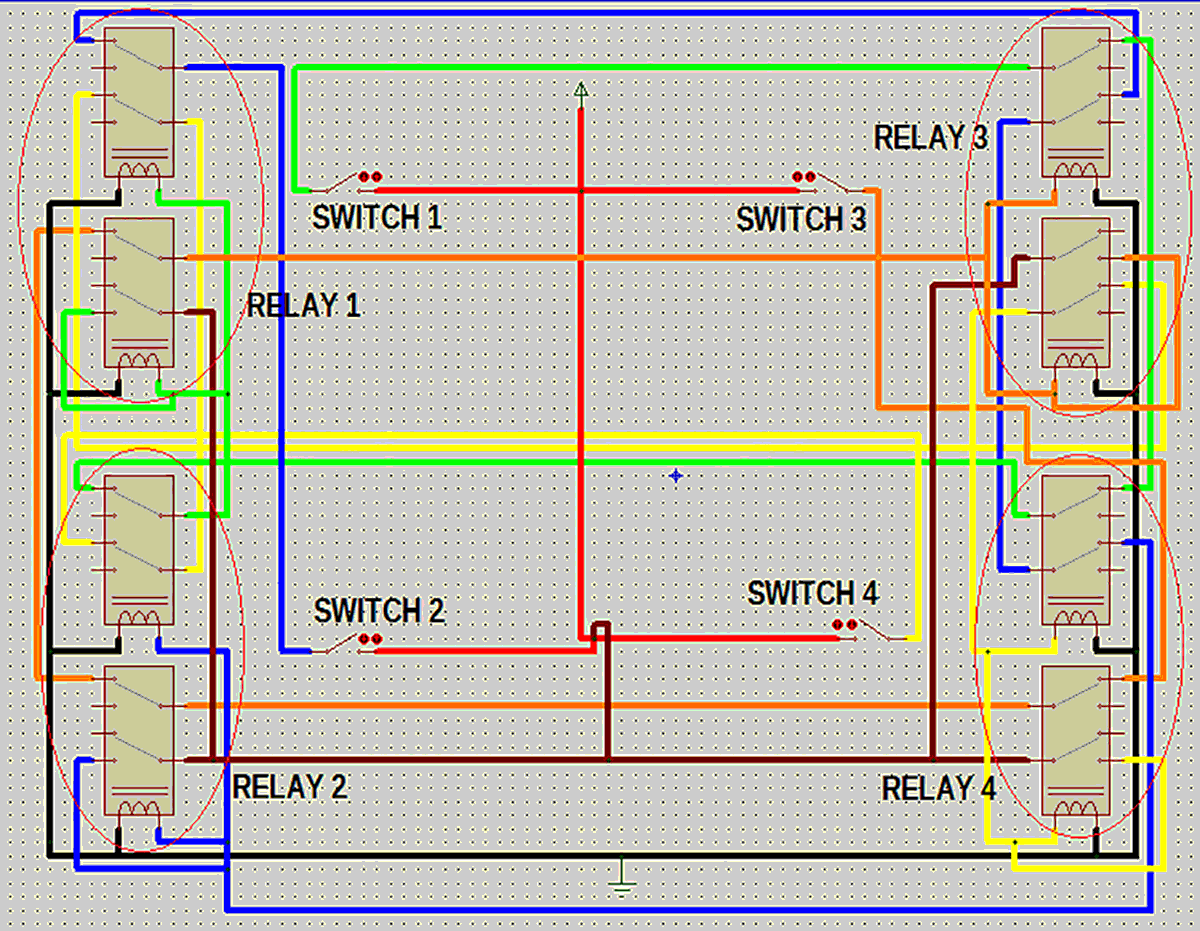
Check the circuit diagram tab for complete circuit for Fastest Finger First (without microcontroller or IC) 

DESCRIPTION:

I heard about this term “Fastest Finger First” in the show “Kaun Banega Carorepati” hosted by  the legendary actor “Mr. Amitabh Bachchan” and I think most of you might be aware of that. But the interesting part of that show for me was when fastest finger first was played amongst the contestants. I always wondered whether I  could build stuff like that. Then in my school days, I was given a job to create a buzzer system which could detect which one of the 4 contestants pressed it first. I implemented it in a quiz at my school and it worked damn awesomely. It took me quite a time to think on how I am going to build  it because at that time I did not have the knowledge of microcontrollers. My dad who’s an electrical engineer helped me with the basic idea of using relays (thank you dad). Then, I started imagining as to what kind of circuit I should make so that it works accordingly. The CIRCUIT DIAGRAM that you can see above is what came out as a result of my hard work. I know it’s a bit complicated but it really makes me feel proud of myself.  Now let’s move on to the description shown in the circuit above. For your ease, I have given a unique colour to every wire associated with individual relay. 

As you can see in the picture below that I have used 4 relays, which implies that this system can be used for a maximum of four contestants.  Here, I have used relays that belong to 14 pins out of which 2 are for GND and VCC  while the remaining 12 are related to NO, NC and Common pin of individual SPDT stuff. This relay comprises of 4 SPDTs.


Image showing Relay with SPDT Switches

Fig. 1: Image showing Relay with SPDT Switches

Image of Relay Base

Fig. 2: Image of Relay Base

Image of 14-Pin Relay having 4 SPDT Switches

Fig. 3: Image of 14-Pin Relay having 4 SPDT Switches

Now for those who don’t know what is NO & NC, don’t worry guys you are going to learn a lot from this project.
 
NO stands for Normally Open
 
NO stands for Normally Closed
 
See this picture:  

Image showing NC and NO pins on Relay

Fig. 4: Image showing NC and NO pins on Relay

The common pin is the one which is right now connected to NC pin. This pin toggles between NO and NC whenever relay is turned onßàoff, just like a SPDT switch.
 
Remember the relay base that I have mentioned above in the requirements section, here is its picture:

Image showing Relay base and MCB Connections

Fig. 5: Image showing Relay base and MCB Connections

What I am doing in this circuit is that I have connected the GND of every relay common to the GND of the battery but I have limited the VCC part (of every individual relay) by passing it through the NC and common pin connection of remaining three relays. Refer to the circuit diagram. Further, I have connected the VCC of the battery and the individual relay via a SPST switch. So as soon as the first switch is pressed VCC goes via three relays (via their NC and common connections) to the VCC pin of the fourth one. This turns ON that relay,  and switches its common pin (4 common pins) to NO part which breaks out the VCC connection for the remaining three relays. In this manner we can determine which one pressed the buzzer first. One more addition that I have done in this circuit is that even after releasing the buzzer the relay remains ON. If you are  interested in knowing how I did this; then check out for the ‘maroon’ coloured lines in the Circuit Diagram.  This also led me to include a refresh button (I have not mentioned it in the circuit diagram) for starting it all over again after the  results are known. It’s just like removing the contacts from the battery terminal. So, I placed a SPST switch in between the VCC wire connection as the refreshing button.   

Prototype of Relay based Fastest Finger First Circuit

Fig. 6: Prototype of Relay based Fastest Finger First Circuit

Circuit Diagrams

Circuit-Diagram-Relay-Based-Fastest-Finger-First-Prototype

Project Video


Filed Under: Electronic Projects


Questions related to this article?
👉Ask and discuss on Electro-Tech-Online.com and EDAboard.com forums.


Tell Us What You Think!! Cancel reply

You must be logged in to post a comment.

HAVE A QUESTION?

Have a technical question about an article or other engineering questions? Check out our engineering forums EDABoard.com and Electro-Tech-Online.com where you can get those questions asked and answered by your peers!


Featured Tutorials

  • Introduction to Brain Waves & its Types (Part 1/13)
  • Understanding NeuroSky EEG Chip in Detail (Part 2/13)
  • Performing Experiments with Brainwaves (Part 3/13)
  • Amplification of EEG Signal and Interfacing with Arduino (Part 4/13)
  • Controlling Led brightness using Meditation and attention level (Part 5/13)
  • Control Motor’s Speed using Meditation and Attention Level of Brain (Part 6/13)

Stay Up To Date

Newsletter Signup

Sign up and receive our weekly newsletter for latest Tech articles, Electronics Projects, Tutorial series and other insightful tech content.

EE Training Center Classrooms

EE Classrooms

Recent Articles

  • What are the battery-selection criteria for low-power design?
  • Key factors to optimize power consumption in an embedded device
  • EdgeLock A5000 Secure Authenticator
  • How to interface a DS18B20 temperature sensor with MicroPython’s Onewire driver
  • Introduction to Brain Waves & its Types (Part 1/13)

Most Popular

5G 555 timer circuit 8051 ai Arduino atmega16 automotive avr bluetooth dc motor display Electronic Part Electronic Parts Fujitsu ic infineontechnologies integratedcircuit Intel IoT ir lcd led maximintegratedproducts microchip microchiptechnology Microchip Technology microcontroller microcontrollers mosfet motor powermanagement Raspberry Pi remote renesaselectronics renesaselectronicscorporation Research samsung semiconductor sensor software STMicroelectronics switch Technology vishayintertechnology wireless

RSS EDABOARD.com Discussions

  • Advice for my disabled son please
  • Very low voltage/power Schmitt trigger?
  • 3D IC Design: Is it possible to stack CPU and FPGA?
  • dc to dc converter sparks when inserting fuse
  • 7 segment display connections

RSS Electro-Tech-Online.com Discussions

  • Pet Microchip scan
  • Disabled son needs advice please
  • Modify a digital clamp ammeter ?
  • Confirming whether this circuit will work
  • How does a blinky/flashing ball work?
Engineers Garage
  • Analog IC TIps
  • Connector Tips
  • DesignFast
  • EDABoard Forums
  • EE World Online
  • Electro-Tech-Online Forums
  • Microcontroller Tips
  • Power Electronic Tips
  • Sensor Tips
  • Test and Measurement Tips
  • 5G Technology World
  • About Us
  • Contact Us
  • Advertise

Copyright © 2022 WTWH Media LLC. All Rights Reserved. The material on this site may not be reproduced, distributed, transmitted, cached or otherwise used, except with the prior written permission of WTWH Media
Privacy Policy | Advertising | About Us

Search Engineers Garage

  • Projects and Tutorials
    • Electronic Projects
      • 8051
      • Arduino
      • ARM
      • AVR
      • PIC
      • Raspberry pi
      • STM32
    • Tutorials
    • Circuit Design
    • Project Videos
    • Components
  • Articles
    • Tech Articles
    • Insight
    • Invention Stories
    • How to
    • What Is
  • News
    • Electronic Products News
    • DIY Reviews
    • Guest Post
  • Forums
    • EDABoard.com
    • Electro-Tech-Online
    • EG Forum Archive
  • Digi-Key Store
    • Cables, Wires
    • Connectors, Interconnect
    • Discrete
    • Electromechanical
    • Embedded Computers
    • Enclosures, Hardware, Office
    • Integrated Circuits (ICs)
    • Isolators
    • LED/Optoelectronics
    • Passive
    • Power, Circuit Protection
    • Programmers
    • RF, Wireless
    • Semiconductors
    • Sensors, Transducers
    • Test Products
    • Tools
  • EE Resources
    • DesignFast
    • LEAP Awards
    • Oscilloscope Product Finder
    • White Papers
    • Webinars
  • EE Learning Center
    • Design Guides
      • WiFi & the IOT Design Guide
      • Microcontrollers Design Guide
      • State of the Art Inductors Design Guide
  • Women in Engineering