Toys have come a long way from basic dolls and wooden blocks. In today’s tech-savvy world, electronic toys have become integral to childhood play. This includes interactive tablets, electronic games, and robotic devices. Several toys incorporate sophisticated technologies to engage, educate, and entertain kids.
One of the features of many modern toys is audio. From cheerful melodies for infants to interactive conversations in educational gadgets, audio can offer an enhanced playtime experience and profoundly impact a child’s development in terms of vocabulary, pronunciation, and conversational patterns.
Some modern toys also stimulate cognitive development by introducing rhythm, patterns, and cause-and-effect relationships, encouraging problem-solving and critical thinking. Toys with laughter or soothing lullabies can help children express and understand their emotions, which is often comforting for infants and toddlers. Audio elements in toys can spark creativity and imaginative play. Kids often incorporate sound effects and voices into their storytelling and pretend play, enhancing their narratives and role-playing experiences.
Typical audio features include musical toys, sound effects, educational audio, interactive dialogues, and storytelling. To incorporate audio in a toy’s design, an MP3 player or decoder is required. MP3 decoders can add sound effects, songs, dialogues, stories, or audiobooks to toys. One of the cheapest MP3 decoders used for this purpose is GPD2856. In this project, we’ll play various audio files using a GPD2856 MP3 decoder. The decoder IC can play MP3 audio files from a Micro SD card or pen drive.
Components required
1. GPD2856 MP3 decoder board
2. Speakers
3. MicroSD card or USB flash drive
4. Connecting wires
GPD2856 IC
The GPD2856 is an MP3 decoder chip developed by Generalplus Technology. It’s a low-cost, low-power chip that can create MP3 players, car stereos, and other audio devices. It supports many MP3 encoding formats, including MP3, WMA, WAV, AAC, and various playback modes, including sequential playback, random playback, and repeat playback.
The chip can drive a pair of speakers directly with a built-in amplifier. It also has a headphone jack to connect headphones or an external amplifier. Several sources, including a lithium battery, a USB port, or a car adapter can power the GPD2856. It’s also compatible with various storage devices, including TF cards and USB flash drives.
The GPD2856 is popular for hobbyists and makers who want to build an MP3 player or another audio device. It’s also used in many commercial products, including car stereos and portable speakers.

The pin diagram of the GPD2856A IC.
The GDP2856A is a single-chip MP3 player solution. It’s used in MP3 player applications with FM radio and operates with RDA5807, BK1080, and RTC6207E single-chip FM radio solution ICs. The chip also has an audio equalizer function that can cycle through normal, classic, bass, live, rock, and pop. However, this mod requires additional resistors and a switch.

The keyboard decoding for the chip.
The GDP2856A is a single-chip MP3 player solution. It’s used in MP3 player applications with FM radio and operates with RDA5807, BK1080, and RTC6207E single-chip FM radio solution ICs. The chip also has an audio equalizer function that can cycle through normal, classic, bass, live, rock, and pop. However, this mod requires additional resistors and a switch. The keyboard decoding for the chip is shown in the below image.

The complete circuit diagram for building an MP3 decoder using GPD2856.
In GPD2856, pin 8 (AD-key) decodes the switch input. Each switch has a resistor associated with it, and they all form one-half of a voltage divider network with resistor R17. Usually, an analogue-to-digital converter (ADC) is used for this type of input.
GPD2856C MP3 decoder board
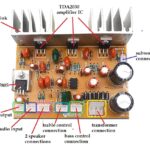
Fortunately, not all these circuit connections need to be made. An MP3 decoder board based on the GPD2856 is commonly available. One such decoder board is shown in the image below.

The GPD2856C MP3 decoder board.
This MP3 decoder board can play MP3 files from a USB flash drive or a MicroSD flash memory card. The player has an onboard 2W mono amplifier, which produces a decent sound quality even if speakers are directly connected to the speaker terminals. It features a 3.5mm gold-plated headphone jack that can connect headphones or an external audio amplifier.
The board has a MicroUSB port, so a regular MicroUSB (mobile phone) cable can power the board. There are also solder terminals for connecting a 3.7V lithium battery pack. The connectors on the battery can withstand up to 5.5V DC. The 3.7V lithium battery attached to the device can be charged by applying power to the MicroUSB connector.
Note: some USB sticks demand a minimum voltage of 5V and will not function with a 3.7V power supply.
The player supports files stored on a USB flash drive (up to 32GB) and a MicroSD flash card (up to 16GB). The SD card will play first if both are attached, but the “mode” button can override this.
Audio will automatically play when powered on. The chip searches through the directories of the root to find the MP3 files.

The pin diagram for the decoder board.
Circuit connections
The GPD2856 MP3 decoder board is readily available on the market. Once you’re set with the board, connect speakers directly to the board’s speaker terminals. Download some MP3 files in a MicroSD card or USB flash drive. Connect a memory card to the TF card slot and/or USB flash drive to the USB port. Power the board using either a 3.7V lithium battery or a mobile charger.
How it works
The MP3 decoder board will play audio files loaded in the TF card whenever powered on. If the TF card is inserted after the board is turned on, the audio files will play as soon as the card is inserted. If a MicroSD card and USB flash drive are inserted, the decoder board plays music from the SD card by default.
The USB and MicroSD can be toggled by briefly pressing the P/P mode button. When an MP3 is playing, the red LED flashes.
- The next track can be selected by quickly pressing the Next/V++ button
- To increase the volume, hold the Next/V++ button down for a bit longer
- To navigate to the previous track, briefly press the Prev/V– button
- To increase the volume, hold the Next/V++ button down for a bit
- To repeat a single track, press the “Repeat” button.
Results
Check out video here.
You may also like:


Filed Under: Audio, Electronic Projects

Questions related to this article?
👉Ask and discuss on EDAboard.com and Electro-Tech-Online.com forums.
Tell Us What You Think!!
You must be logged in to post a comment.