In this article, we will be making an IoT-based pre-paid electricity system and learn exactly how that works.
We will create a meter that will monitor the electricity usage and report to a monitoring server (which we will also create) for bills. In an ordinary electricity system, bills come after the usage, and then we pay the bill. But, in this system, you have to first pay for the electricity by recharge. When your electricity usage crosses the limit of your recharge, you will get warnings. If the bill is still unpaid, the power will go down automatically.
Components required
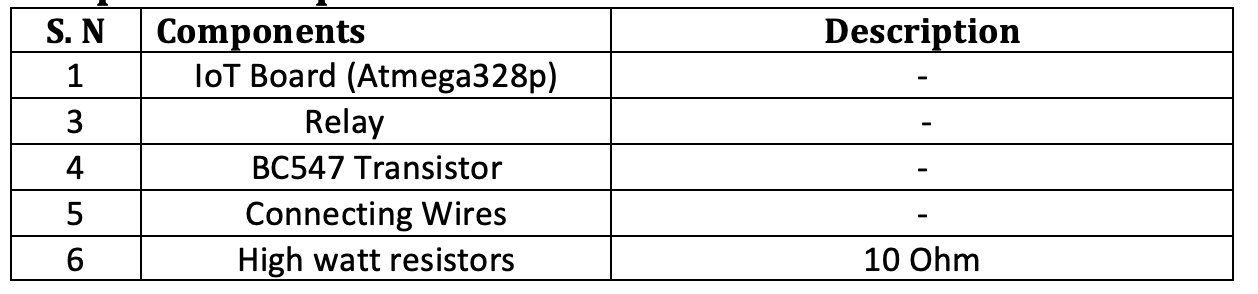
Dependencies
Operating System – Windows / Linux / MacOSx
Programming languages used – Python 2.7
Communication medium – GPRS
Technology Used
- MQTT Protocol (Message Queue Telemetry Transportation) – MQTT is a lightweight protocol for message transmission over the Internet. It works as a client-server architecture. The server is called a broker.
- GPRS – (General Packet Radio Service) service, which works on packet radio service and provides internet connectivity to cellular devices.
Technical insights
We will calculate the power usage using some sensors or circuits. Then we will map power usages in terms of money – i.e., 500 W in 50 bucks. The smart meter will have a switch to turn the electricity OFF / ON and will be controlled by the monitoring server. When a user recharges, the power goes UP, and the server will send an ON command to the meter. It will then switch the power on, and when the recharge is over, the command will be turn off the meter to OFF.
Making a system like this will have some challenges such as:
How will the meter calculate the power?
We will use a power calculator sensor to get the power data, and then the data will be sent to the main controller of the smart meter.
How will the main supply station (monitoring station) communicate with the meter?
For communication, we will use a GSM module and GPRS technology for internet connectivity. For signaling, we will use the MQTT protocol.
How will the bill and recharges be done?
We will build a Python script at the server side that will handle all operations, such as calculating the real-time power and comparing it with the user’s purchased power plan and sending an ON or OFF signal to the meter.
Switching the power OFF and ON for particular events.
The meter will have a microcontroller unit for switching the main supply ON or OFF and handling all the controlling parts.
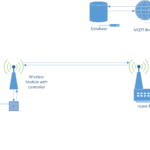
Block Diagram
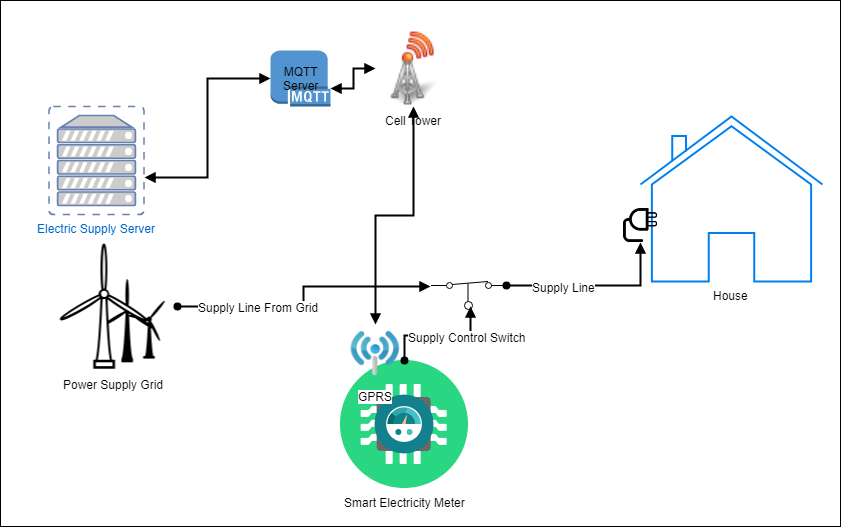
Figure 1 GPRS based pre-paid electricity system
- The meter unit contains a microcontroller and GSM module for processing and communication. The meter has a relay that controls the house’s electricity. There is also a sensor which calculates the power.
- The electricity supply server is a Python script that keeps the records for power supply usage and receives that data from the meter over MQTT.
- The electricity supply server can send ON and OFF commands to the meter over MQTT.
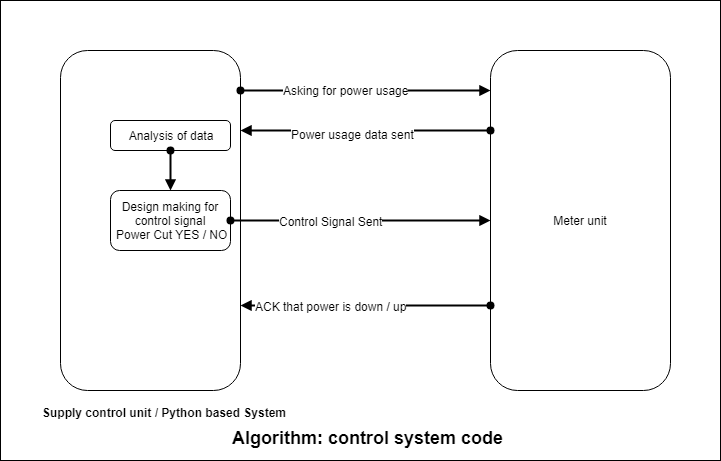
How does the system work?
When users recharge for a particular power plan, the meter starts to read power usage using a power sensor. In this case, we calculate the voltage difference across a resistance, so thus we get the power used by all the appliances attached to the meter. The power usage is sent to the supply system (server/Python script) using the MQTT protocol, and the bill and power calculations are done on the server. After all the calculations are done, we can determine the following signals that we need to send to the meter and the user:
Warning signals: When the recharge of the meter is about to finish.
Meter ON / OFF: Turning OFF / ON the power connection
Total power usage: When the user requests power usage, the data is sent with a usage summary.
To further recharge the connection, the user can contact the supply station, changing a few variables.
Understanding the source code
Setting up GSM modem and MQTT connection variables
First of all, we set our meter for communication by including the TinyGSM library:
#include <TinyGsmClient.h>
We define our modem on the top of the code, which we are using for GPRS purposes.
#define TINY_GSM_MODEM_SIM800
Then we define our connection of modem with our microcontroller with the software serial pins.
SoftwareSerial SerialAT(5, 6); // RX, TX
Now we tell our GSM modem library to which serial pins we are going to connect.
TinyGsm modem(SerialAT);
Then we change our APN (Access point name) to our SIM card APN.
const char apn[] = “bsnllive”;
At this point, our GSM modem is almost set up. The rest can be self-understood from the code comments.
Now we set our communication protocol “MQTT”, but first, let’s import the pub-sub-client library necessary for MQTT.
#include <PubSubClient.h>
Then we define our broker address and the topics on which we will be subscribing, that can be anything according to meter names.
const char* broker = “broker.hivemq.com”;
const char* topicSub = “GsmClientTest/led”;
const char* topicInit = “GsmClientTest/init”;
const char* topicPub = “GsmClientTest/ledStatus”;
Now it’s time for setting both modem and MQTT clients in our code.
TinyGsmClient client(modem);
PubSubClient mqtt(client);
Setup function to start everything in order
First, we start our serial connections and set the digital pins OUTPUT and our relay pin (main supply switch) OUPUT.
pinMode(Relay_PIN, OUTPUT);
Now we restart our modem to check if there is anything previously going on with it.
modem.restart();
We then take the modem info and print on a serial terminal.
String modemInfo = modem.getModemInfo();
SerialMon.print(“Modem: “);
SerialMon.println(modemInfo);
Now, as we are going to send data on the network, we should not proceed until our modem is connected to the cellular network, so we add a blocking condition.
if (!modem.waitForNetwork()) {
SerialMon.println(” fail”);
while (true);
}
SerialMon.println(” OK”);
After we are connected to the network we now proceed for connecting to the GPRS service, this is also done in a blocking connection.
if (!modem.gprsConnect(apn, user, pass)) {
SerialMon.println(” fail”);
while (true);
}
Our system is connected to the internet, we are assigned IPs, and the TCP connection is UP. Now we connect to our MQTT server.
mqtt.setServer(broker, 1883);
As we are using MQTT, the library sends ping signals every time to the broker. We do not want to disturb anything in the library or our main connection. So for receiving the messages from the broker, we add a callback method.
mqtt.setCallback(mqttCallback);
We are now connected to the MQTT broker and need to set a condition that dictates if we ever get disconnected from the server, we will automatically reconnect. Or if we are connected, then we send our client to the loop.
if (mqtt.connected()) {
mqt.loop();
}
Or else we just reconnect as outlined below.
else {
// Reconnect every 10 seconds
unsigned long t = millis();
if (t – lastReconnectAttempt > 10000L) {
lastReconnectAttempt = t;
if (mqttConnect()) {
lastReconnectAttempt = 0;
}
}
There are a few points about the MQTT connection function regarding receiving callbacks.
mqttConnect() : function explanation
We connect to the broker, providing our client name as a unique name.
mqtt.connect(“electricitymeterGSM”)
Then we send a confirmation signal to any client on a topic connected to the broker.
mqtt.publish(topicInit, “Meter Started”);
Afterward, we subscribe our client with a topic.
mqtt.subscribe(topicSub);
Finally, we return that if our client is connected or not.
return mqtt.connected();
mqttCallback(char* topic, byte* payload, unsigned int len): function explanation
This function receives messages coming from the broker in some variables
Topic: This is the topic on which the message is coming; it is required when we are subscribed to multiple topics and determine which message is coming.
Payload: This is the real message that we are receiving from the broker in bytes
Len: This gives us the total length of the incoming message
Now, by using these variables, we determine what the server is trying to say to the meter.
if(data_r_in_string == “data”){
Now, if we receive a command from the server saying “data” we start to take readings from the sensor or analog pin and send them to the server:
float v1 = analogRead(A0);
float v2 = analogRead(A1);
Also when we get messages like turning the meter / main supply ON or OFF we switch the relay too
if( data_r_in_string == “ON”){
digitalWrite(Relay_PIN,HIGH);
mqtt.publish(topicPub, “meter is on”);
}
This is how our meter unit works. For information about the server unit, please read below.
Server script
The server script is totally based on Python, so we first start with the communication protocol MQTT. So, setting up the communication is given below.
Then we import libraries that are required for communication with the MQTT broker.
Import paho.mqtt.client as mqtt
import paho.mqtt.publish as publish
Then we assign two variables with topics of MQTT, one on which we will send messages, and another is on which we will receive messages.
subscription_topic = “ts/coffee/report”
publish_topic = “ts/coffee/machine”
Now we will declare a variable named client with mqtt client.
client = mqtt.Client()
Now we will make two function callbacks 1. For receiving messages 2. Doing something on connection successful.
client.on_connect = on_connect
client.on_message = on_message
Finally, we will connect to MQTT broker on a port, and start the client inside a nonblocking loop.
client.connect(“broker.hivemq.com”, 1883, 60)
client.loop_start()
After the connection is successful, we can send messages using the following:
publish.single(topic, message_data, hostname=”broker.hivemq.com”)
Now we go into our call back function for analyzing the received messages.
We have two functions for receiving data. One is for the initial status of the meter to check if it has started or not; the second is for receiving the data from the meter.
On_message(): Receives the data from meter like readings and state
Init(): Gets the initial status of meter if it is started
Now we display all the data received from meter in a line as a screen as we did in one of our IoT project “IoT dashboard”
if(connected == True):
print ‘\r’ + “Meter Status:”,status, ‘\t’, “Meter Data:”,
data, ‘\t’, “Meter State:”, state,
After we start receiving the data, we can design how we will respond to the meter.
Here, we are just receiving two voltages, and if the condition of V1 is less than V2, then the meter will shut off. Otherwise, it will turn on when both voltages are the same.
if(“:” in message):
data = message
v1,v2= message.split(“:”)
#any condition for switching the power on /off
if(int(v1) < int(v2)):
send_signals(“ON”)
if(int(v1) == int(v2)):
send_signals(“OFF”)
Meter Code
You may also like:

Filed Under: IoT tutorials, Tutorials
