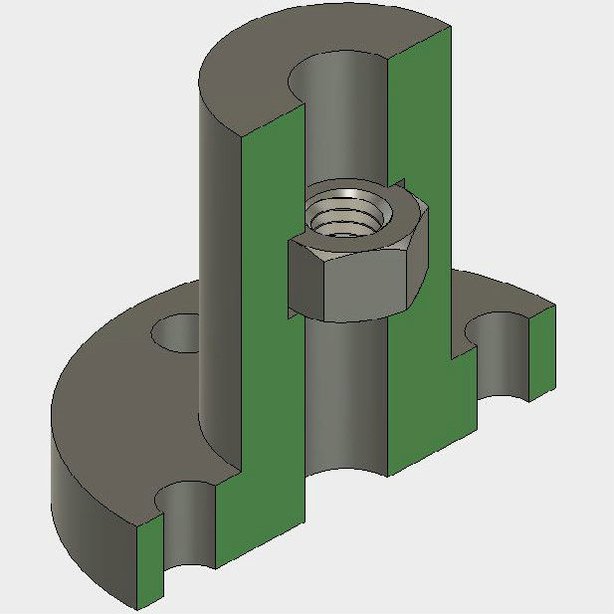
Make a Seamless Captive Nut in a 3D Printed Part
Whenever, the term “captive” is heard in a device development, it is referred to a section of hardware that is rooted or attached to another. This concept is mainlyadvantageous in applications requiring a tensioning nut or a lead screw nut for linear motion. Further, it can be used to assimilate other mechanisms, such as electronics or magnets.
In this project of Instructables, a basic design will be pondered that includes a captive part and also a tutorial for explaining the making of a basic flange part with a captive nut embedded. The Software used for this project are Fusion 360 (CAD Modeling) and Repetier (3D Printer Controller). While hardware used are 3/8″ Nut, 3/8″ x 6″ Bolt and Prusa is 3D Printer.
For the creation of captive part, a pocket in the middle of the larger part is shaped for the smaller part to embed in. To accomplish this, the print is paused in the midway and the part that requires embedment is inserted. Later the printer is allowed to continue printing on top of it. Flat objects are easiest to be embedded.

The base part is modelled to add the captive nut by using 3D modeling skills. And this is followed by creation of your work planeinside the body of the flange to insert the pocket for the captive part.
Now the 2D Sketch of the Nut is created online to make an extruded cut and hencegenerating a properly shaped pocket for the nut to sit in. After the sketch is drawn, the pocket is created in the form of extruded cut. With this, the model is complete and ready for printing.
A critical stage in building a captive component, when 3D Printing is safeguarding the printer will pause at the correct layer to insert the component on time. Here, Repetieris used as the printer controller, as it makes it easy to pause at a specific layer. As the printer is paused, lift the head up and jog it to the side while using the Repetier.

Now, the nut is placed into the pocket. The nut must be laid completely flat to avoid collision. Now, restart the print and the printer will seal the nut inside the part. The software used here is either free or open source and parts files for the flange, the flange with cavity, and the finished STL file for the flange with cavity are downloadable from the following site.
http://www.instructables.com/id/Make-a-Seamless-Captive-Nut-in-a-3D-Printed-Part/?ALLSTEPS
Filed Under: Reviews


Questions related to this article?
👉Ask and discuss on EDAboard.com and Electro-Tech-Online.com forums.
Tell Us What You Think!!
You must be logged in to post a comment.